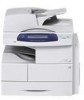
Quick Use Guide
Page 15
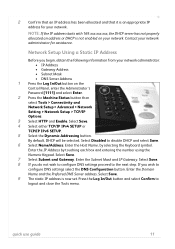
...; IP Address • Gateway Address • Subnet Mask • DNS Server Address 1 Press the Log In/Out button on the Control Panel, enter the Administrator's Password [1111] and select Enter. 2 Press the Machine Status button then select Tools > Connectivity and Network Setup > Advanced > Network Setting > Network Setup > TCP/IP Options. 3 Select...
...; IP Address • Gateway Address • Subnet Mask • DNS Server Address 1 Press the Log In/Out button on the Control Panel, enter the Administrator's Password [1111] and select Enter. 2 Press the Machine Status button then select Tools > Connectivity and Network Setup > Advanced > Network Setting > Network Setup > TCP/IP Options. 3 Select...
Quick Use Guide
Page 17
... fully functional. If you do not see the E-mail button on the Services Home screen, enable E-mail in the Tools Pathway. (Press Log In/Out > Password [1111] > Enter > Machine Status > Tools > User Interface > Service Enablements > E-mail > Enable). The default is [admin] which the machine will not be ... This task should be accessible. quick use as the default From address. • Test the E-mail account by sending an E-mail to the Xerox machine account. NOTE: If you wish to setup the E-mail service follow this procedure. Refer to Network Setup Using a Static IP Address on ...
... fully functional. If you do not see the E-mail button on the Services Home screen, enable E-mail in the Tools Pathway. (Press Log In/Out > Password [1111] > Enter > Machine Status > Tools > User Interface > Service Enablements > E-mail > Enable). The default is [admin] which the machine will not be ... This task should be accessible. quick use as the default From address. • Test the E-mail account by sending an E-mail to the Xerox machine account. NOTE: If you wish to setup the E-mail service follow this procedure. Refer to Network Setup Using a Static IP Address on ...
Quick Use Guide
Page 18
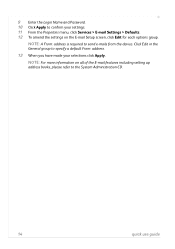
9 Enter the Login Name and Password. 10 Click Apply to send e-mails from the device. NOTE: A From: address is required to confirm your selections click Apply. NOTE: For more information on all of the E-mail features including setting up address books, please refer to specify a default From: address. 13 When you have made your settings. 11 From the Properties menu, click Services > E-mail Settings > Defaults. 12 To amend the settings on the E-mail Setup screen, click Edit for each options group. Click Edit in the General group to the System Administration CD. 14 quick use guide
9 Enter the Login Name and Password. 10 Click Apply to send e-mails from the device. NOTE: A From: address is required to confirm your selections click Apply. NOTE: For more information on all of the E-mail features including setting up address books, please refer to specify a default From: address. 13 When you have made your settings. 11 From the Properties menu, click Services > E-mail Settings > Defaults. 12 To amend the settings on the E-mail Setup screen, click Edit for each options group. Click Edit in the General group to the System Administration CD. 14 quick use guide
Quick Use Guide
Page 19
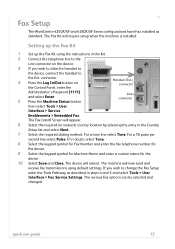
...to attach a handset to the device, connect the handset to the Line connector on the Control Panel, enter the Handset (Ext.) connector Administrator's Password [1111] and select Enter. 5 Press the Machine Status button Line connector then select Tools > User Interface > Service Enablements > Embedded Fax. ... The various Fax options can be selected and changed. The device will require setup when the machine is installed. Fax Setup The WorkCentre 4250X/XF and 4260X/XF Series configurations have Fax installed as described in doubt, select Tone. 8 Select the keypad symbol for ...
...to attach a handset to the device, connect the handset to the Line connector on the Control Panel, enter the Handset (Ext.) connector Administrator's Password [1111] and select Enter. 5 Press the Machine Status button Line connector then select Tools > User Interface > Service Enablements > Embedded Fax. ... The various Fax options can be selected and changed. The device will require setup when the machine is installed. Fax Setup The WorkCentre 4250X/XF and 4260X/XF Series configurations have Fax installed as described in doubt, select Tone. 8 Select the keypad symbol for ...
Quick Use Guide
Page 20
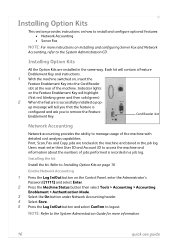
... 16. Card Reader slot Network Accounting Network accounting provides the ability to logout. Refer to Installing Option Kits on the Control Panel, enter the Administrator's Password [1111] and select Enter. 2 Press the Machine Status button then select Tools > Accounting > Accounting Enablement > Authentication Mode. 3 Select the On button under Network Accounting header...
... 16. Card Reader slot Network Accounting Network accounting provides the ability to logout. Refer to Installing Option Kits on the Control Panel, enter the Administrator's Password [1111] and select Enter. 2 Press the Machine Status button then select Tools > Accounting > Accounting Enablement > Authentication Mode. 3 Select the On button under Network Accounting header...
Quick Use Guide
Page 21
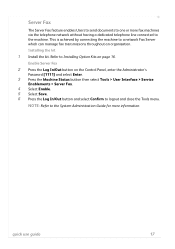
... the telephone network without having a dedicated telephone line connected to the machine. NOTE: Refer to Installing Option Kits on the Control Panel, enter the Administrator's Password [1111] and select Enter. 3 Press the Machine Status button then select Tools > User Interface > Service Enablements > Server Fax. 4 Select Enable. 5 Select Save. 6 Press the Log...
... the telephone network without having a dedicated telephone line connected to the machine. NOTE: Refer to Installing Option Kits on the Control Panel, enter the Administrator's Password [1111] and select Enter. 3 Press the Machine Status button then select Tools > User Interface > Service Enablements > Server Fax. 4 Select Enable. 5 Select Save. 6 Press the Log...
System Administration Guide
Page 3
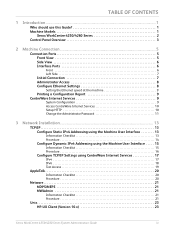
TABLE OF CONTENTS 1 Introduction ...1 Who should use this Guide 1 Machine Models 1 Xerox WorkCentre 4250/4260 Series 2 Control Panel Overview 3 2 Machine Connection ...5 Connection Ports 5 Front View 5 Side View 6 Interface Ports 6 Front 6 Left Side 7 ... Printing a Configuration Report 9 CentreWare Internet Services 9 System Configuration 9 Access CentreWare Internet Services 10 Setup HTTP 10 Change the Administrator Password 11 3 Network Installation ...13 TCP/IP 13 Configure Static IPv4 Addressing using the Machine User Interface 13 Information Checklist 13 Procedure 14...
TABLE OF CONTENTS 1 Introduction ...1 Who should use this Guide 1 Machine Models 1 Xerox WorkCentre 4250/4260 Series 2 Control Panel Overview 3 2 Machine Connection ...5 Connection Ports 5 Front View 5 Side View 6 Interface Ports 6 Front 6 Left Side 7 ... Printing a Configuration Report 9 CentreWare Internet Services 9 System Configuration 9 Access CentreWare Internet Services 10 Setup HTTP 10 Change the Administrator Password 11 3 Network Installation ...13 TCP/IP 13 Configure Static IPv4 Addressing using the Machine User Interface 13 Information Checklist 13 Procedure 14...
System Administration Guide
Page 20
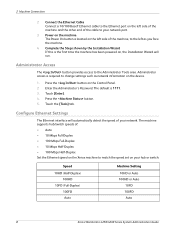
... located on the left side of the machine and the other end of your network port. 3. Press the button. 5. Enter the Administrator's Password. Touch [Enter]. 4. The machine supports hub/switch speeds of the machine, to change settings such as you face the machine. 4. Complete ...Speed 10HD (Half-Duplex) 100HD 10FD (Full-Duplex) 100FD Auto Machine Setting 10HD or Auto 100HD or Auto 10FD 100FD Auto 8 Xerox WorkCentre 4250/4260 Series System Administration Guide Administrator Access The button provides access to the Administrator Tools area. Press the button on , the Installation...
... located on the left side of the machine and the other end of your network port. 3. Press the button. 5. Enter the Administrator's Password. Touch [Enter]. 4. The machine supports hub/switch speeds of the machine, to change settings such as you face the machine. 4. Complete ...Speed 10HD (Half-Duplex) 100HD 10FD (Full-Duplex) 100FD Auto Machine Setting 10HD or Auto 100HD or Auto 10FD 100FD Auto 8 Xerox WorkCentre 4250/4260 Series System Administration Guide Administrator Access The button provides access to the Administrator Tools area. Press the button on , the Installation...

System Administration Guide
Page 21
Touch [Enter]. 4. Touch [Connectivity and Network Setup]. 7. Touch [Advanced]. 8. Press the button on Xerox WorkCentre 4250/4260 Series System Administration Guide 9 Internet Services allows Administrators to enter the Tools Pathway. 2. Press the button on the ...to match the speed set via the machine and the CentreWare Internet Service. Many features available on your machine will require an Administrator Username and Password. Touch [System Configuration]. 4. The default is the embedded HTTP server application that resides in the device. Touch [Save]. 12. Press ...
Touch [Enter]. 4. Touch [Connectivity and Network Setup]. 7. Touch [Advanced]. 8. Press the button on Xerox WorkCentre 4250/4260 Series System Administration Guide 9 Internet Services allows Administrators to enter the Tools Pathway. 2. Press the button on the ...to match the speed set via the machine and the CentreWare Internet Service. Many features available on your machine will require an Administrator Username and Password. Touch [System Configuration]. 4. The default is the embedded HTTP server application that resides in the device. Touch [Save]. 12. Press ...
System Administration Guide
Page 23
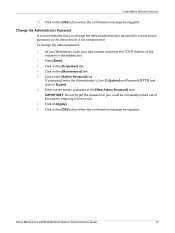
...] and click on the [Properties] tab. 4. Press [Enter]. 3. Click on the [Maintenance] link. 5. IMPORTANT: Do not forget the password or you change the admin password: 1. Xerox WorkCentre 4250/4260 Series System Administration Guide 11 Enter a new numeric password in the Address bar. 2. At your Workstation, open your web browser and enter the TCP/IP Address of...
...] and click on the [Properties] tab. 4. Press [Enter]. 3. Click on the [Maintenance] link. 5. IMPORTANT: Do not forget the password or you change the admin password: 1. Xerox WorkCentre 4250/4260 Series System Administration Guide 11 Enter a new numeric password in the Address bar. 2. At your Workstation, open your web browser and enter the TCP/IP Address of...
System Administration Guide
Page 26
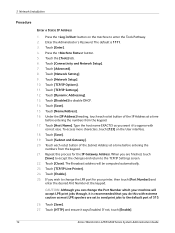
... LPR print jobs through, it says Enabled. CAUTION: Although you are set to send print jobs to disable DHCP. 14. If not, touch [Enable]. 14 Xerox WorkCentre 4250/4260 Series System Administration Guide Touch the [Tools] tab. 6. Touch [Enable]. 25. Touch [Save]. 15. Press the button on the User interface. 18.... Press the button. 5. Touch [Name/Address]. 16. 3 Network Installation Procedure Enter a Static IP Address 1. Enter the Administrator's Password. Touch [Host Name]. Touch each octet button of 515. 26. Touch [Close].
... LPR print jobs through, it says Enabled. CAUTION: Although you are set to send print jobs to disable DHCP. 14. If not, touch [Enable]. 14 Xerox WorkCentre 4250/4260 Series System Administration Guide Touch the [Tools] tab. 6. Touch [Enable]. 25. Touch [Save]. 15. Press the button on the User interface. 18.... Press the button. 5. Touch [Name/Address]. 16. 3 Network Installation Procedure Enter a Static IP Address 1. Enter the Administrator's Password. Touch [Host Name]. Touch each octet button of 515. 26. Touch [Close].
System Administration Guide
Page 28
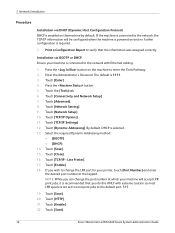
... [TCP/IP Options]. 11. If you do this ONLY with Ethernet cabling. 1. Touch [Save]. 20. Touch [Enable]. 18. Touch [Network Setup]. 10. Touch [Save]. 16 Xerox WorkCentre 4250/4260 Series System Administration Guide 3 Network Installation Procedure Installation via BOOTP or DHCP Ensure your machine will be configured when the machine is powered on...
... [TCP/IP Options]. 11. If you do this ONLY with Ethernet cabling. 1. Touch [Save]. 20. Touch [Enable]. 18. Touch [Network Setup]. 10. Touch [Save]. 16 Xerox WorkCentre 4250/4260 Series System Administration Guide 3 Network Installation Procedure Installation via BOOTP or DHCP Ensure your machine will be configured when the machine is powered on...
System Administration Guide
Page 32
... keyboard. Touch [Connectivity and Network Setup]. 7. Enter the Administrator's Password. Press the button. 5. Touch [Enable]. 13. This check box is selected when [IP Address Resolution] is a display-only item. Enter the name using a DHCP server. Touch [Protocol]. 12. Touch [Area Name]. 20 Xerox WorkCentre 4250/4260 Series System Administration Guide 3 Network Installation Zero-Configuration...
... keyboard. Touch [Connectivity and Network Setup]. 7. Enter the Administrator's Password. Press the button. 5. Touch [Enable]. 13. This check box is selected when [IP Address Resolution] is a display-only item. Enter the name using a DHCP server. Touch [Protocol]. 12. Touch [Area Name]. 20 Xerox WorkCentre 4250/4260 Series System Administration Guide 3 Network Installation Zero-Configuration...
System Administration Guide
Page 33
... the Tools Pathway. 2. Enter the Administrator's Password. The default is * which means the printer will appear in ALL zones). Xerox WorkCentre 4250/4260 Series System Administration Guide 21 Touch [Save]. 20. Refer to www.xerox.com for installation procedures and to remove the default... the NDS Tree, NDS Context Name, frame type, Print Server Name and the Print Server password assigned. Touch [Enter]. 4. Touch the [Clear Text] button to download the Xerox NDPS Solution. Touch [Close] three times. Existing operational NetWare network. 2. Enter the desired area...
... the Tools Pathway. 2. Enter the Administrator's Password. The default is * which means the printer will appear in ALL zones). Xerox WorkCentre 4250/4260 Series System Administration Guide 21 Touch [Save]. 20. Refer to www.xerox.com for installation procedures and to remove the default... the NDS Tree, NDS Context Name, frame type, Print Server Name and the Print Server password assigned. Touch [Enter]. 4. Touch the [Clear Text] button to download the Xerox NDPS Solution. Touch [Close] three times. Existing operational NetWare network. 2. Enter the desired area...
System Administration Guide
Page 34
... File Server, touch [Rates]. • Select the box under [Poll Interval] and enter the desired number from the keypad. Touch [Print Server Password]. Touch [Network Setting]. 9. Touch [Network Setup]. 10. Touch [Save]. 14. Novell suggests using typeful names when entering Name Context and Directory ... case you recorded when you have finished, touch [Save] twice to enter the print server password, in the NDS Tree Name and NDS Context. Touch [Close] three times. 22 Xerox WorkCentre 4250/4260 Series System Administration Guide Enter a directory tree and context for the [SAP Rate] by...
... File Server, touch [Rates]. • Select the box under [Poll Interval] and enter the desired number from the keypad. Touch [Print Server Password]. Touch [Network Setting]. 9. Touch [Network Setup]. 10. Touch [Save]. 14. Novell suggests using typeful names when entering Name Context and Directory ... case you recorded when you have finished, touch [Save] twice to enter the print server password, in the NDS Tree Name and NDS Context. Touch [Close] three times. 22 Xerox WorkCentre 4250/4260 Series System Administration Guide Enter a directory tree and context for the [SAP Rate] by...
System Administration Guide
Page 40
...steps in the [Make] menu. 16. Open the web browser from your client. Click on [Continue]. 15. Enter the root and the root password. 8. Click on [Add Printer]. 6. Press [Enter]. 5. The Authorization dialog box will appear. 7. Enter ipp://hostname/ipp/printername. Procedure 1. NOTE...available at cups.org. 2. Enter http://127.0.0.1:631/printers in the [Driver] menu. 28 Xerox WorkCentre 4250/4260 Series System Administration Guide Where hostname is the hostname of the Xerox machine and printername is the printer name of Linux support printtool. Select the correct driver in...
...steps in the [Make] menu. 16. Open the web browser from your client. Click on [Continue]. 15. Enter the root and the root password. 8. Click on [Add Printer]. 6. Press [Enter]. 5. The Authorization dialog box will appear. 7. Enter ipp://hostname/ipp/printername. Procedure 1. NOTE...available at cups.org. 2. Enter http://127.0.0.1:631/printers in the [Driver] menu. 28 Xerox WorkCentre 4250/4260 Series System Administration Guide Where hostname is the hostname of the Xerox machine and printername is the printer name of Linux support printtool. Select the correct driver in...

System Administration Guide
Page 45
..., open the web browser, enter the TCP/IP Address of the machine in the Address bar. 2. Click on the [Browse] button. Xerox WorkCentre 4250/4260 Series System Administration Guide 33 Install Clone File to another Device NOTE: This procedure will be used to specify the name and location for.... In the [Install Clone File] area, click on [Open]. 9. The machine will appear. If prompted, enter the Administrator's User ID [admin] and Password [1111] and click on the laptop or PC. 8. NOTE: You can now be unavailable over the network for several minutes. 1. Press [Enter]. 3....
..., open the web browser, enter the TCP/IP Address of the machine in the Address bar. 2. Click on the [Browse] button. Xerox WorkCentre 4250/4260 Series System Administration Guide 33 Install Clone File to another Device NOTE: This procedure will be used to specify the name and location for.... In the [Install Clone File] area, click on [Open]. 9. The machine will appear. If prompted, enter the Administrator's User ID [admin] and Password [1111] and click on the laptop or PC. 8. NOTE: You can now be unavailable over the network for several minutes. 1. Press [Enter]. 3....
System Administration Guide
Page 55
...Connection Properties] dialog box opens. 4. Click on the [Protocols] link. 6. Windows 2000/2003 From the Desktop: a) Right-click on [Network Connections] Xerox WorkCentre 4250/4260 Series System Administration Guide 43 b) Click on the [My Network Places] icon. Press [Enter]. 3. If prompted, enter the Administrator's User ID [...admin] and Password [1111], and click on [Network Connections]. At your workstation, open the Web browser and enter the TCP/IP address of the ...
...Connection Properties] dialog box opens. 4. Click on the [Protocols] link. 6. Windows 2000/2003 From the Desktop: a) Right-click on [Network Connections] Xerox WorkCentre 4250/4260 Series System Administration Guide 43 b) Click on the [My Network Places] icon. Press [Enter]. 3. If prompted, enter the Administrator's User ID [...admin] and Password [1111], and click on [Network Connections]. At your workstation, open the Web browser and enter the TCP/IP address of the ...
System Administration Guide
Page 66
... Administrator's Password. Touch [Save]. 11. Click on [Control Panel] then [Printers]. 2. Touch [Tools]. 6. click on [+] symbol next to the [Paper/Output] category to enter the Tools Pathway. 2. Click on [Printers and Faxes]. Next to the Banner Sheet option, use the drop-down arrow to exit the Tools Pathway. 54 Xerox WorkCentre 4250/4260 Series...
... Administrator's Password. Touch [Save]. 11. Click on [Control Panel] then [Printers]. 2. Touch [Tools]. 6. click on [+] symbol next to the [Paper/Output] category to enter the Tools Pathway. 2. Click on [Printers and Faxes]. Next to the Banner Sheet option, use the drop-down arrow to exit the Tools Pathway. 54 Xerox WorkCentre 4250/4260 Series...
System Administration Guide
Page 68
... [Enter]. 4. see Server Message Block (SMB) on the Server or Workstation where images scanned by the machine will be stored. 56 Xerox WorkCentre 4250/4260 Series System Administration Guide Enter the Administrator's Password. Touch [Confirm] to a computer that File Transfer Protocol (FTP) services are running on page 58. 5 Network Scanning Enable the Feature from...
... [Enter]. 4. see Server Message Block (SMB) on the Server or Workstation where images scanned by the machine will be stored. 56 Xerox WorkCentre 4250/4260 Series System Administration Guide Enter the Administrator's Password. Touch [Confirm] to a computer that File Transfer Protocol (FTP) services are running on page 58. 5 Network Scanning Enable the Feature from...


