
Quick Use Guide
Page 15
... Windows XP or Windows 2000 using the USB port ) All applications should be closed on your computer is not connected to the WorkCentre 4118 at this point. 1 ¾ Insert the Xerox Drivers CD into the CD-ROM drive. 13 with Network Kit option. quick_use.book Page 13 Thursday, March 2, 2006 9:38 AM System Requirements...
... Windows XP or Windows 2000 using the USB port ) All applications should be closed on your computer is not connected to the WorkCentre 4118 at this point. 1 ¾ Insert the Xerox Drivers CD into the CD-ROM drive. 13 with Network Kit option. quick_use.book Page 13 Thursday, March 2, 2006 9:38 AM System Requirements...

Quick Use Guide
Page 17
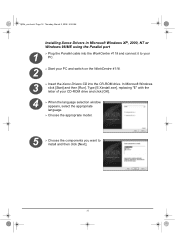
... on changing USB modes can be found in the default 'Fast' mode, if this document. 15 The Hardware Wizard will search for and find the drivers. ¾ If the Hardware Wizard prompts you, follow the instructions provided. ) Two modes of this occurs select the Slow mode. quick_use.book Page 15 Thursday..., March 2, 2006 9:38 AM 6 ¾ When the setup has completed click [Finish]. 7 ¾ Plug the USB cable into the WorkCentre 4118 and connect it to your Personal Workstation (PC).
... on changing USB modes can be found in the default 'Fast' mode, if this document. 15 The Hardware Wizard will search for and find the drivers. ¾ If the Hardware Wizard prompts you, follow the instructions provided. ) Two modes of this occurs select the Slow mode. quick_use.book Page 15 Thursday..., March 2, 2006 9:38 AM 6 ¾ When the setup has completed click [Finish]. 7 ¾ Plug the USB cable into the WorkCentre 4118 and connect it to your Personal Workstation (PC).
Quick Use Guide
Page 18
Type [E:Xinstall.exe], replacing "E" with the letter of your PC and switch on the WorkCentre 4118. 3 ¾ Insert the Xerox Drivers CD into the WorkCentre 4118 and connect it to your PC. 2 ¾ Start your CD-ROM drive and click [OK]. 4 ¾ When the language selection window appears, ...5 ¾ Choose the components you want to install and then click [Next]. 16 quick_use.book Page 16 Thursday, March 2, 2006 9:38 AM Installing Xerox Drivers in Microsoft Windows XP, 2000, NT or Windows 98/ME using the Parallel port 1 ¾ Plug the Parallel cable into the CR-ROM drive. In...
Type [E:Xinstall.exe], replacing "E" with the letter of your PC and switch on the WorkCentre 4118. 3 ¾ Insert the Xerox Drivers CD into the WorkCentre 4118 and connect it to your PC. 2 ¾ Start your CD-ROM drive and click [OK]. 4 ¾ When the language selection window appears, ...5 ¾ Choose the components you want to install and then click [Next]. 16 quick_use.book Page 16 Thursday, March 2, 2006 9:38 AM Installing Xerox Drivers in Microsoft Windows XP, 2000, NT or Windows 98/ME using the Parallel port 1 ¾ Plug the Parallel cable into the CR-ROM drive. In...

Quick Use Guide
Page 19
.... 1 ¾ Open a document on the device and verify that it prints correctly. The installation process is now complete. ) Instructions for installing a USB driver in the Xerox WorkCentre 4118 User Guide, or at www.xerox.com. quick_use.book Page 17 Thursday, March 2, 2006 9:38 AM 6 ¾ The confirmation screen summarizes your selections. 7 ¾ Click [Finish]. The...
.... 1 ¾ Open a document on the device and verify that it prints correctly. The installation process is now complete. ) Instructions for installing a USB driver in the Xerox WorkCentre 4118 User Guide, or at www.xerox.com. quick_use.book Page 17 Thursday, March 2, 2006 9:38 AM 6 ¾ The confirmation screen summarizes your selections. 7 ¾ Click [Finish]. The...

Quick Use Guide
Page 29
... and select Programs, then Nuance OmniPage SE. ¾ Select Scanner Wizard. ¾ Click on the other drivers button and select the TWAIN option, then click OK. Select the Xerox WorkCentre printer and click Next. Click Finish and perform another Test Scan. ¾ Follow the prompts to test the...Source, then click Next and then select Xerox WorkCentre 4118. quick_use.book Page 27 Thursday, March 2, 2006 9:38 AM Scanning (4 in 1 only) 1 Scan Setup ¾ If you have not already installed the PC Scan Drivers from the Print Drivers CD, insert the Print Drivers CD into the CD-ROM and follow...
... and select Programs, then Nuance OmniPage SE. ¾ Select Scanner Wizard. ¾ Click on the other drivers button and select the TWAIN option, then click OK. Select the Xerox WorkCentre printer and click Next. Click Finish and perform another Test Scan. ¾ Follow the prompts to test the...Source, then click Next and then select Xerox WorkCentre 4118. quick_use.book Page 27 Thursday, March 2, 2006 9:38 AM Scanning (4 in 1 only) 1 Scan Setup ¾ If you have not already installed the PC Scan Drivers from the Print Drivers CD, insert the Print Drivers CD into the CD-ROM and follow...
Quick Use Guide
Page 30
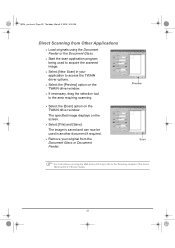
... the scan application program being used in your original from Other Applications ¾ Load originals using the WIA driver (XP only) refer to the Scanning chapter of the Xerox WorkCentre 4118 User Guide. 28 quick_use.book Page 28 Thursday, March 2, 2006 9:38 AM Direct Scanning from the Document... ¾ Select [New Scan] in another document if required. ¾ Remove your application to access the TWAIN driver options. ¾ Select the [Preview] option on the TWAIN driver window. ¾ If necessary, drag the selection tool to the area requiring scanning. ¾ Select the [Scan]...
... the scan application program being used in your original from Other Applications ¾ Load originals using the WIA driver (XP only) refer to the Scanning chapter of the Xerox WorkCentre 4118 User Guide. 28 quick_use.book Page 28 Thursday, March 2, 2006 9:38 AM Direct Scanning from the Document... ¾ Select [New Scan] in another document if required. ¾ Remove your application to access the TWAIN driver options. ¾ Select the [Preview] option on the TWAIN driver window. ¾ If necessary, drag the selection tool to the area requiring scanning. ¾ Select the [Scan]...
Quick Use Guide
Page 31
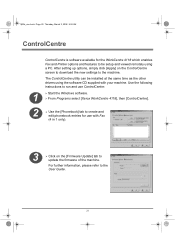
... ControlCentre ControlCentre is software available for use ControlCentre: 1 ¾ Start the Windows software. ¾ From Programs select [Xerox WorkCentre 4118], then [ControlCentre]. 2 ¾ Use the [Phonebook] tab to create and edit phonebook entries for the WorkCentre 4118 which enables Fax and Printer options and features to be installed at the same time as the other...
... ControlCentre ControlCentre is software available for use ControlCentre: 1 ¾ Start the Windows software. ¾ From Programs select [Xerox WorkCentre 4118], then [ControlCentre]. 2 ¾ Use the [Phonebook] tab to create and edit phonebook entries for the WorkCentre 4118 which enables Fax and Printer options and features to be installed at the same time as the other...
System Administration Guide
Page 3
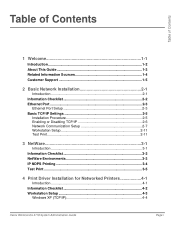
... or Disabling TCP/IP 2-6 Network Communication Setup 2-7 Workstation Setup 2-11 Test Print 2-11 3 NetWare 3-1 Introduction 3-1 Information Checklist 3-2 NetWare Environments 3-3 IP NDPS Printing 3-4 Test Print ...3-5 4 Print Driver Installation for Networked Printers 4-1 Introduction 4-1 Information Checklist 4-2 Workstation Setup 4-3 Windows XP (TCP/IP 4-4 Xerox WorkCentre 4118 System Administration Guide Page i
... or Disabling TCP/IP 2-6 Network Communication Setup 2-7 Workstation Setup 2-11 Test Print 2-11 3 NetWare 3-1 Introduction 3-1 Information Checklist 3-2 NetWare Environments 3-3 IP NDPS Printing 3-4 Test Print ...3-5 4 Print Driver Installation for Networked Printers 4-1 Introduction 4-1 Information Checklist 4-2 Workstation Setup 4-3 Windows XP (TCP/IP 4-4 Xerox WorkCentre 4118 System Administration Guide Page i
System Administration Guide
Page 4
...4-13 Test Print 4-14 5 AppleTalk 5-1 Introduction 5-1 Information Checklist 5-2 AppleTalk Installation 5-3 Installation Procedure 5-3 Network Communication Setup 5-3 Printer Driver Installation 5-5 Installation Procedure 5-5 Setting the Printer Driver 5-5 Test Print ...5-7 6 Advanced TCP/IP Setup 6-1 Introduction 6-1 Information Checklist 6-2 Enabling/Disabling LPR/LPD 6-3 Enabling/Disabling Raw Printing...7-4 Enabling Internet Services 7-5 Configuring the Network 7-6 Ethernet 7-7 AppleTalk 7-8 TCP/IP 7-10 SNMP...7-13 Page ii Xerox WorkCentre 4118 System Administration Guide
...4-13 Test Print 4-14 5 AppleTalk 5-1 Introduction 5-1 Information Checklist 5-2 AppleTalk Installation 5-3 Installation Procedure 5-3 Network Communication Setup 5-3 Printer Driver Installation 5-5 Installation Procedure 5-5 Setting the Printer Driver 5-5 Test Print ...5-7 6 Advanced TCP/IP Setup 6-1 Introduction 6-1 Information Checklist 6-2 Enabling/Disabling LPR/LPD 6-3 Enabling/Disabling Raw Printing...7-4 Enabling Internet Services 7-5 Configuring the Network 7-6 Ethernet 7-7 AppleTalk 7-8 TCP/IP 7-10 SNMP...7-13 Page ii Xerox WorkCentre 4118 System Administration Guide

System Administration Guide
Page 35
...port you are creating or use the default name created). The driver is installed on the CD in the [Name or address of a test page. For PostScript, you wish to choose the required language. Xerox WorkCentre 4118 System Administration Guide Page 4-5 Enter the Printer Name and select ...[Next]. 5 ¾ If you will be found in the Drivers>Print folder on a Windows 2000 Workstation. Use the Add Printer Wizard ...
...port you are creating or use the default name created). The driver is installed on the CD in the [Name or address of a test page. For PostScript, you wish to choose the required language. Xerox WorkCentre 4118 System Administration Guide Page 4-5 Enter the Printer Name and select ...[Next]. 5 ¾ If you will be found in the Drivers>Print folder on a Windows 2000 Workstation. Use the Add Printer Wizard ...
System Administration Guide
Page 36
... the box labelled [SNMP Status Enabled]. The [Community Name] should be loaded onto the workstation. Page 4-6 Xerox WorkCentre 4118 System Administration Guide For PostScript, you wish to 1. It is identified by the file extension .inf. The driver is recommended that you have configured the device to have a custom SNMP community name) and the [SNMP...
... the box labelled [SNMP Status Enabled]. The [Community Name] should be loaded onto the workstation. Page 4-6 Xerox WorkCentre 4118 System Administration Guide For PostScript, you wish to 1. It is identified by the file extension .inf. The driver is recommended that you have configured the device to have a custom SNMP community name) and the [SNMP...
System Administration Guide
Page 37
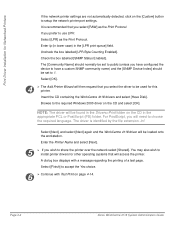
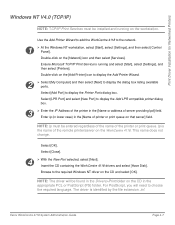
...printer or print queue on the CD and select [OK]. Browse to display the dialog box listing available ports. Xerox WorkCentre 4118 System Administration Guide Page 4-7 Print Driver Installation for Networked Printers Windows NT V4.0 (TCP/IP) NOTE: TCP/IP Print Services must be found in the...PCL or PostScript (PS) folder. Select [Close]. 4 ¾ With the New Port selected, select [Next]. Insert the CD containing the WorkCentre 4118 drivers and select [Have Disk]. Ensure Microsoft TCP/IP Print Service is identified by the file extension .inf. Select [LPR Port] and select ...
...printer or print queue on the CD and select [OK]. Browse to display the dialog box listing available ports. Xerox WorkCentre 4118 System Administration Guide Page 4-7 Print Driver Installation for Networked Printers Windows NT V4.0 (TCP/IP) NOTE: TCP/IP Print Services must be found in the...PCL or PostScript (PS) folder. Select [Close]. 4 ¾ With the New Port selected, select [Next]. Insert the CD containing the WorkCentre 4118 drivers and select [Have Disk]. Ensure Microsoft TCP/IP Print Service is identified by the file extension .inf. Select [LPR Port] and select ...

System Administration Guide
Page 38
Select [Shared], select all the Windows NT V4.0 choices for Networked Printers Select [Next], and select [Next] again and the WorkCentre 4118 driver will be loaded onto the workstation. 5 ¾ Enter the Printer Name and select [Next]. Select [Finish] to accept the Yes ... 98/Me NOTE: Prior to starting the setup procedure, download and install Xerox TCP/IP port monitor driver from www.xerox.com. 1 ¾ Access the Xerox website (www.xerox.com) and type WorkCentre 4118 into the search box. Print Driver Installation for the operating systems that require access to the printer, and then...
Select [Shared], select all the Windows NT V4.0 choices for Networked Printers Select [Next], and select [Next] again and the WorkCentre 4118 driver will be loaded onto the workstation. 5 ¾ Enter the Printer Name and select [Next]. Select [Finish] to accept the Yes ... 98/Me NOTE: Prior to starting the setup procedure, download and install Xerox TCP/IP port monitor driver from www.xerox.com. 1 ¾ Access the Xerox website (www.xerox.com) and type WorkCentre 4118 into the search box. Print Driver Installation for the operating systems that require access to the printer, and then...

System Administration Guide
Page 39
... is identified by the file extension .inf. Xerox WorkCentre 4118 System Administration Guide Page 4-9 You should click [OK] to display the Add Printer Wizard. 2 ¾ Verify that the [Network Printer] is installed on the [Add Printer] icon to install the driver. 4 ¾ Insert the CD containing the WorkCentre 4118 drivers and select [Have Disk]. The [Specify a Printer...
... is identified by the file extension .inf. Xerox WorkCentre 4118 System Administration Guide Page 4-9 You should click [OK] to display the Add Printer Wizard. 2 ¾ Verify that the [Network Printer] is installed on the [Add Printer] icon to install the driver. 4 ¾ Insert the CD containing the WorkCentre 4118 drivers and select [Have Disk]. The [Specify a Printer...

System Administration Guide
Page 40
...-name is installed on the CD and select [OK]. The [Locate Your Printer] screen displays. 3 ¾ Select [Connect to install the driver. 4 ¾ Insert the CD containing the WorkCentre 4118 drivers and select [Have Disk]. Page 4-10 Xerox WorkCentre 4118 System Administration Guide Browse to the network. 1 ¾ Select [Start], select [Settings], and then select [Printers]. Print...
...-name is installed on the CD and select [OK]. The [Locate Your Printer] screen displays. 3 ¾ Select [Connect to install the driver. 4 ¾ Insert the CD containing the WorkCentre 4118 drivers and select [Have Disk]. Page 4-10 Xerox WorkCentre 4118 System Administration Guide Browse to the network. 1 ¾ Select [Start], select [Settings], and then select [Printers]. Print...

System Administration Guide
Page 50
This automatically searches for the printer. 3 ¾ Select [Appletalk]. 4 ¾ Choose the WorkCentre 4118 driver. 5 ¾ Close the Mac Print Utility. AppleTalk 1 ¾ Ensure the printer is on and that AppleTalk has been enabled (see "Network Communication Setup" on page 5-3). 2 ¾ On the Apple menu select [Mac Print Utility]. Page 5-6 Xerox WorkCentre 4118 System Administration Guide
This automatically searches for the printer. 3 ¾ Select [Appletalk]. 4 ¾ Choose the WorkCentre 4118 driver. 5 ¾ Close the Mac Print Utility. AppleTalk 1 ¾ Ensure the printer is on and that AppleTalk has been enabled (see "Network Communication Setup" on page 5-3). 2 ¾ On the Apple menu select [Mac Print Utility]. Page 5-6 Xerox WorkCentre 4118 System Administration Guide
System Administration Guide
Page 88
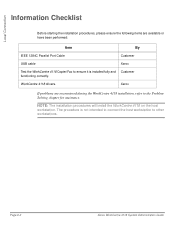
WorkCentre 4118 drivers. Xerox If problems are available or have been performed: Item By IEEE 1284C Parallel Port Cable Customer USB cable Xerox Test the WorkCentre 4118 Copier/Fax to the Problem Solving chapter for assistance. NOTE: The installation procedures will install the WorkCentre 4118 on the host workstation. Page 8-2 Xerox WorkCentre 4118 System Administration Guide Local Connection Information Checklist Before starting the...
WorkCentre 4118 drivers. Xerox If problems are available or have been performed: Item By IEEE 1284C Parallel Port Cable Customer USB cable Xerox Test the WorkCentre 4118 Copier/Fax to the Problem Solving chapter for assistance. NOTE: The installation procedures will install the WorkCentre 4118 on the host workstation. Page 8-2 Xerox WorkCentre 4118 System Administration Guide Local Connection Information Checklist Before starting the...
System Administration Guide
Page 117
... scheme that is typically created by a Third Party Email application, for networking. An acronym for Dynamic Host Configuration Protocol. Xerox WorkCentre 4118 System Administration Guide Page 12-1 An acronym for Comma Separated Value. The WorkCentre 4118 drivers are designed specifically for Information Interchange. The Ethernet Address is also called "twisted-pair" because it is expressed as...
... scheme that is typically created by a Third Party Email application, for networking. An acronym for Dynamic Host Configuration Protocol. Xerox WorkCentre 4118 System Administration Guide Page 12-1 An acronym for Comma Separated Value. The WorkCentre 4118 drivers are designed specifically for Information Interchange. The Ethernet Address is also called "twisted-pair" because it is expressed as...
User Guide
Page 60
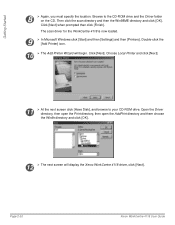
Then click the scan directory and then the Win98ME directory and click [OK]. Open the Driver directory, then open the Print directory, then open the AddPrint directory and them choose the Win9x directory and click [OK]. 12 ¾ ... CD. Page 2-30 Xerox WorkCentre 4118 User Guide The scan driver for the WorkCentre 4118 is now loaded. 9 ¾ In Microsoft Windows click [Start] and then [Settings] and then [Printers]. Browse to your CD-ROM drive. Double-click the [Add Printer] icon. 10 ¾ The Add Printer Wizard will display the Xerox WorkCentre 4118 driver, click [Next]. Click...
Then click the scan directory and then the Win98ME directory and click [OK]. Open the Driver directory, then open the Print directory, then open the AddPrint directory and them choose the Win9x directory and click [OK]. 12 ¾ ... CD. Page 2-30 Xerox WorkCentre 4118 User Guide The scan driver for the WorkCentre 4118 is now loaded. 9 ¾ In Microsoft Windows click [Start] and then [Settings] and then [Printers]. Browse to your CD-ROM drive. Double-click the [Add Printer] icon. 10 ¾ The Add Printer Wizard will display the Xerox WorkCentre 4118 driver, click [Next]. Click...

User Guide
Page 61
The WorkCentre 4118 driver will now be installed and a test page should print. Getting Started 13 ¾ Click the port that the printer cable is attached to, in this case USB and click [Next]. 14 ¾ You can type in a name for your new printer or accept the default then click [Next]. 15 ¾ Choose [Yes] to print a test page and click [Finish]. Xerox WorkCentre 4118 User Guide Page 2-31
The WorkCentre 4118 driver will now be installed and a test page should print. Getting Started 13 ¾ Click the port that the printer cable is attached to, in this case USB and click [Next]. 14 ¾ You can type in a name for your new printer or accept the default then click [Next]. 15 ¾ Choose [Yes] to print a test page and click [Finish]. Xerox WorkCentre 4118 User Guide Page 2-31


