
English Manual
Page 3
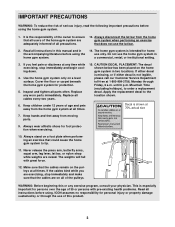
...is especially important for persons over the age of serious injury, read the following important precautions before using the home gym system. 1. Use the home gym system only on the home gym system in a commercial, rental, or institutional setting. 3. Inspect and tighten all instructions in this manual and... moving parts. 9. Do not use only. Keep children under 12 years of the pulleys. ICON assumes no responsibility for home use the home gym system in two locations. CAUTION DECAL PLACEMENT: The decal shown below has been placed on a level surface. Mountain Time ...
...is especially important for persons over the age of serious injury, read the following important precautions before using the home gym system. 1. Use the home gym system only on the home gym system in a commercial, rental, or institutional setting. 3. Inspect and tighten all instructions in this manual and... moving parts. 9. Do not use only. Keep children under 12 years of the pulleys. ICON assumes no responsibility for home use the home gym system in two locations. CAUTION DECAL PLACEMENT: The decal shown below has been placed on a level surface. Mountain Time ...

English Manual
Page 4
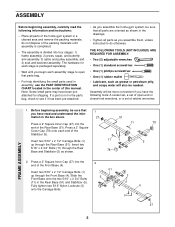
...specific results you , please note the product model number and serial number before using the WEIDER® PRO 9730 Home Gym System. The model number is designed to the WEIDER® PRO 9730 (see the front cover of the body. Before reading further, please review the drawing ... DIMENSIONS: Height: 78 in. The versatile PRO 9730 is WESY97300. The serial number can be found on a decal attached to develop every major muscle group of this manual carefully before calling. If you for selecting the WEIDER® PRO 9730 Home Gym System. Whether your benefit, read this manual...
...specific results you , please note the product model number and serial number before using the WEIDER® PRO 9730 Home Gym System. The model number is designed to the WEIDER® PRO 9730 (see the front cover of the body. Before reading further, please review the drawing ... DIMENSIONS: Height: 78 in. The versatile PRO 9730 is WESY97300. The serial number can be found on a decal attached to develop every major muscle group of this manual carefully before calling. If you for selecting the WEIDER® PRO 9730 Home Gym System. Whether your benefit, read this manual...
English Manual
Page 5
... or petroleum jelly, and soapy water will be sure that all parts are oriented as shown in the drawings. • Tighten all parts of the home gym system in the center of this manual. FRAME ASSEMBLY 1. Insert two 5/16" x 2 1/2" Carriage Bolts (1) up through the Rear Base and Stabilizer (5) as shown.... is completed. • The assembly is not in the parts bag, check to see if it has been pre-attached. • As you assemble the home gym system, be more convenient if you begin each end of the Stabilizer (5). 11 78 Insert two 5/16" x 2 1/2" Carriage Bolts (1) 11 1 5 up ...
... or petroleum jelly, and soapy water will be sure that all parts are oriented as shown in the drawings. • Tighten all parts of the home gym system in the center of this manual. FRAME ASSEMBLY 1. Insert two 5/16" x 2 1/2" Carriage Bolts (1) up through the Rear Base and Stabilizer (5) as shown.... is completed. • The assembly is not in the parts bag, check to see if it has been pre-attached. • As you assemble the home gym system, be more convenient if you begin each end of the Stabilizer (5). 11 78 Insert two 5/16" x 2 1/2" Carriage Bolts (1) 11 1 5 up ...

English Manual
Page 21
PRO 9730 49. Before using the home gym system, pull each cable a few times to remove it to the home gym system as shown. See the CABLE DIAGRAMS on page 22 of this manual for proper cable routing. Make sure that the cables move smoothly, find ... any slack in ADJUSTMENT, beginning on page 26 and 27 of the cables does not move smoothly over the pulleys. Remove the backing from the PRO 9730 48 decal and apply it by tightening the cables.
PRO 9730 49. Before using the home gym system, pull each cable a few times to remove it to the home gym system as shown. See the CABLE DIAGRAMS on page 22 of this manual for proper cable routing. Make sure that the cables move smoothly, find ... any slack in ADJUSTMENT, beginning on page 26 and 27 of the cables does not move smoothly over the pulleys. Remove the backing from the PRO 9730 48 decal and apply it by tightening the cables.
English Manual
Page 22
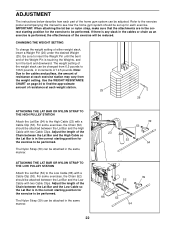
...RESISTANCE CHART on page 24 to find the approximate amount of resistance at each exercise station may vary from 6.5 pounds to see how the home gym system should be attached in the correct starting position for the exercise to be reduced. ATTACHING THE LAT BAR OR NYLON STRAP TO THE...23) with a Cable Clip (53). For some exercises, the Chain (52) should be adjusted. ADJUSTMENT The instructions below describe how each part of the home gym system can be attached between the Lat Bar and the High Cable with two Cable Clips. CHANGING THE WEIGHT SETTING To change the weight setting...
...RESISTANCE CHART on page 24 to find the approximate amount of resistance at each exercise station may vary from 6.5 pounds to see how the home gym system should be attached in the correct starting position for the exercise to be reduced. ATTACHING THE LAT BAR OR NYLON STRAP TO THE...23) with a Cable Clip (53). For some exercises, the Chain (52) should be adjusted. ADJUSTMENT The instructions below describe how each part of the home gym system can be attached between the Lat Bar and the High Cable with two Cable Clips. CHANGING THE WEIGHT SETTING To change the weight setting...

English Manual
Page 25
... the High Cable (23) or Rear Cable (95) (see drawing 1) and at the end of the Press Cable (58) (see ORDERING REPLACEMENT PARTS on the home gym system, can stretch slightly when it . Remove the 3/8" Nylon Locknut (21) and the 3/8" x 2" Bolt (12) from the Long "U"-Bracket (57). Do not...a damp cloth and mild non-abrasive detergent. TROUBLE-SHOOTING AND MAINTENANCE Inspect and tighten all parts each time you may have become twisted. The home gym system can be tightened. Be sure that the Cable and Pulley move smoothly. If there is slack in the cables before resistance is in the...
... the High Cable (23) or Rear Cable (95) (see drawing 1) and at the end of the Press Cable (58) (see ORDERING REPLACEMENT PARTS on the home gym system, can stretch slightly when it . Remove the 3/8" Nylon Locknut (21) and the 3/8" x 2" Bolt (12) from the Long "U"-Bracket (57). Do not...a damp cloth and mild non-abrasive detergent. TROUBLE-SHOOTING AND MAINTENANCE Inspect and tighten all parts each time you may have become twisted. The home gym system can be tightened. Be sure that the Cable and Pulley move smoothly. If there is slack in the cables before resistance is in the...

English Manual
Page 28
... the PART LIST and EXPLODED DRAWING at 1-800-999-3756, Monday through Friday, 6 a.m. The SERIAL NUMBER of this manual). The MODEL NUMBER of the product (WEIDER® 9730 Home Gym System). 3.
... the PART LIST and EXPLODED DRAWING at 1-800-999-3756, Monday through Friday, 6 a.m. The SERIAL NUMBER of this manual). The MODEL NUMBER of the product (WEIDER® 9730 Home Gym System). 3.


