

English Manual
Page 2
... whatsoever nature. This warranty gives you . TABLE OF CONTENTS LIMITED WARRANTY IMPORTANT PRECAUTIONS BEFORE YOU BEGIN ASSEMBLY HOW TO USE THE HOME GYM SYSTEM WEIGHT RESISTANCE CHART TROUBLE-SHOOTING AND MAINTENANCE CABLE DIAGRAMS ORDERING REPLACEMENT PARTS 2 3 4 5 24 26 27 29 Back Cover Note...ICON Health & Fitness, Inc. (ICON), warrants this warranty is not responsible or liable for which vary from the date of purchase. WEIDER is limited in lieu of any implied warranties of merchantability or fitness for commercial or rental purposes, or products used for a particular ...
... whatsoever nature. This warranty gives you . TABLE OF CONTENTS LIMITED WARRANTY IMPORTANT PRECAUTIONS BEFORE YOU BEGIN ASSEMBLY HOW TO USE THE HOME GYM SYSTEM WEIGHT RESISTANCE CHART TROUBLE-SHOOTING AND MAINTENANCE CABLE DIAGRAMS ORDERING REPLACEMENT PARTS 2 3 4 5 24 26 27 29 Back Cover Note...ICON Health & Fitness, Inc. (ICON), warrants this warranty is not responsible or liable for which vary from the date of purchase. WEIDER is limited in lieu of any implied warranties of merchantability or fitness for commercial or rental purposes, or products used for a particular ...
English Manual
Page 3
...Read all precautions. 2. Always stand on the assist arm:. Do not use only. Cover tt* floor beneath he home gym sytenifor protection. 5 Inspect and tighten`all users of the home gym system are on it. 6 Keep small children and pets away from the leg press upright when the military press arm... the cables are adequately informed of the owner to tip. 8. It is being used . Always be sure that your hands away from the ome gym system at any worn parts,immediately. 11. ICON assumes no responsibility for persons over the age of the pulleys. 14. If you are raised....
...Read all precautions. 2. Always stand on the assist arm:. Do not use only. Cover tt* floor beneath he home gym sytenifor protection. 5 Inspect and tighten`all users of the home gym system are on it. 6 Keep small children and pets away from the leg press upright when the military press arm... the cables are adequately informed of the owner to tip. 8. It is being used . Always be sure that your hands away from the ome gym system at any worn parts,immediately. 11. ICON assumes no responsibility for persons over the age of the pulleys. 14. If you are raised....
English Manual
Page 4
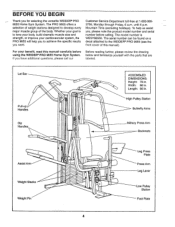
...Arm Backrests Assist Arm Weight Stacks -ir.AA - The PRO 9655 offers a selection of weight stations designed to the WEIDER® PRO 9655 (see the front cover of the body. If you for selecting the versatile WEIDER® PRO 9655 Home Gym System. Lat Bar Pull-up Handles Dip Handles Aveiro,.... model number is to achieve the specific results you , please note the product model number and serial number before using the WEIDER® PRO 9655 Home Gym System. The serial number can be found on a decal attached to develop every major muscle group of this manual carefully before...
...Arm Backrests Assist Arm Weight Stacks -ir.AA - The PRO 9655 offers a selection of weight stations designed to the WEIDER® PRO 9655 (see the front cover of the body. If you for selecting the versatile WEIDER® PRO 9655 Home Gym System. Lat Bar Pull-up Handles Dip Handles Aveiro,.... model number is to achieve the specific results you , please note the product model number and serial number before using the WEIDER® PRO 9655 Home Gym System. The serial number can be found on a decal attached to develop every major muscle group of this manual carefully before...
English Manual
Page 23
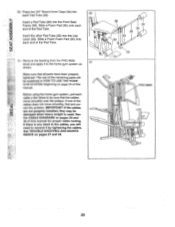
..., find and cor- Ca rect the problem. If there is used. ASSEMBLY 50. Before using the home gym system, pull each end of the Pad Tube. IMPORTANT: If the cables are not properly installed, they may...of the remaining parts will be damaged when heavy weight is any slack in HOW TO USE THE HOME GYM SYSTEM, beginning on page 24 of the Pad Tube. 51. Press two 3/4" Round Inner Caps (34)... DIAGRAMS on pages 27 and 28. 36 30 34 28 34 30 0 29 0 PRO 9655 0 0 23 Remove the backing from the PRO 9655 decal and apply it by tightening the cables. Insert a Pad Tube (28) into the Leg...
..., find and cor- Ca rect the problem. If there is used. ASSEMBLY 50. Before using the home gym system, pull each end of the Pad Tube. IMPORTANT: If the cables are not properly installed, they may...of the remaining parts will be damaged when heavy weight is any slack in HOW TO USE THE HOME GYM SYSTEM, beginning on page 24 of the Pad Tube. 51. Press two 3/4" Round Inner Caps (34)... DIAGRAMS on pages 27 and 28. 36 30 34 28 34 30 0 29 0 PRO 9655 0 0 23 Remove the backing from the PRO 9655 decal and apply it by tightening the cables. Insert a Pad Tube (28) into the Leg...
English Manual
Page 24
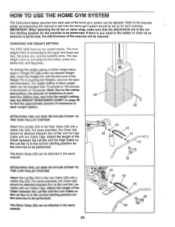
...the press arm, and the butterfly arms. The rear weight stack is in the correct starting position for the exercise to see how the home gym system should be attached in increments of 10 pounds. Note: Due to the cables and pulleys, the amount of resistance at each exercise station may... TO THE LOW PULLEY STATION Attach the Lat Bar (54) to find the approximate amount of resistance at each exercise. CHANGING THE WEIGHT SETTING The PRO 9655 features two weight stacks. The weight setting of either weight stack, insert a Weight Pin (26) under the desired Weight (25). The Nylon Strap (39) ...
...the press arm, and the butterfly arms. The rear weight stack is in the correct starting position for the exercise to see how the home gym system should be attached in increments of 10 pounds. Note: Due to the cables and pulleys, the amount of resistance at each exercise station may... TO THE LOW PULLEY STATION Attach the Lat Bar (54) to find the approximate amount of resistance at each exercise. CHANGING THE WEIGHT SETTING The PRO 9655 features two weight stacks. The weight setting of either weight stack, insert a Weight Pin (26) under the desired Weight (25). The Nylon Strap (39) ...

English Manual
Page 27
...to be tightened in the same manner. 2 23 or 99 • See drawing 2. Repeat until the 3/8" Nut touches the Weight Cover. The home gym system can stretch slightly when it is felt, the cables should be adjusted in the same manner. • See drawing 1. If any slack is ...proper position and that the Cable Trap is felt when using a damp cloth and mild non-abrasive detergent. Loosen the 3/8" 2 Nut (113) on the home gym system, can be tightened. Hand-tighten the 3/8" Nut against the Weight Cover. Slack can be tightened. Remove the 3/8" Nylon Locknut (21) and the 3/8" ...
...to be tightened in the same manner. 2 23 or 99 • See drawing 2. Repeat until the 3/8" Nut touches the Weight Cover. The home gym system can stretch slightly when it is felt, the cables should be adjusted in the same manner. • See drawing 1. If any slack is ...proper position and that the Cable Trap is felt when using a damp cloth and mild non-abrasive detergent. Loosen the 3/8" 2 Nut (113) on the home gym system, can be tightened. Hand-tighten the 3/8" Nut against the Weight Cover. Slack can be tightened. Remove the 3/8" Nylon Locknut (21) and the 3/8" ...
English Manual
Page 29
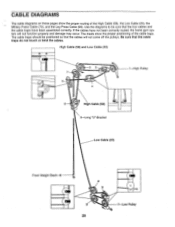
... traps do not touch or bind the cables. Be sure that the four cables and the cable traps have not been correctly routed, the home gym system will not come off the pulleys.
... traps do not touch or bind the cables. Be sure that the four cables and the cable traps have not been correctly routed, the home gym system will not come off the pulleys.

English Manual
Page 32
... the front cover of this manual). 4. To help us assist you, please be prepared to give the following information: 1. The MODEL NUMBER of the product (WEIDER' PRO 9655 Home Gym System). 3. The NAME of the product (WESY96550). 2. The SERIAL NUMBER of the product (see the PART LIST and EXPLODED DRAWING attached at 1-800-999...
... the front cover of this manual). 4. To help us assist you, please be prepared to give the following information: 1. The MODEL NUMBER of the product (WEIDER' PRO 9655 Home Gym System). 3. The NAME of the product (WESY96550). 2. The SERIAL NUMBER of the product (see the PART LIST and EXPLODED DRAWING attached at 1-800-999...


