

English Manual
Page 2
...this product to be free from state to state. TABLE OF CONTENTS LIMITED WARRANTY IMPORTANT PRECAUTIONS BEFORE YOU BEGIN ASSEMBLY HOW TO USE THE HOME GYM SYSTEM WEIGHT RESISTANCE CHART TROUBLE-SHOOTING AND MAINTENANCE CABLE DIAGRAMS ORDERING REPLACEMENT PARTS 2 3 4 5 24 26 27 29 Back Cover Note:...Accordingly, the above is made must be received by sufficient proof of whatsoever nature. All returns must be pre-authorized by ICON. WEIDER is in workmanship and material, under this manual. Some states do not allow the exclusion or limitation of ICON Health & Fitness,...
...this product to be free from state to state. TABLE OF CONTENTS LIMITED WARRANTY IMPORTANT PRECAUTIONS BEFORE YOU BEGIN ASSEMBLY HOW TO USE THE HOME GYM SYSTEM WEIGHT RESISTANCE CHART TROUBLE-SHOOTING AND MAINTENANCE CABLE DIAGRAMS ORDERING REPLACEMENT PARTS 2 3 4 5 24 26 27 29 Back Cover Note:...Accordingly, the above is made must be received by sufficient proof of whatsoever nature. All returns must be pre-authorized by ICON. WEIDER is in workmanship and material, under this manual. Some states do not allow the exclusion or limitation of ICON Health & Fitness,...
English Manual
Page 3
...before using . Do not use only. Keep your body weight IS Placed on a foot plate when performing an exercise that all users of the home gym system are raised. Always stand on it. 6 Keep small children and pets away from the assist upright when the assist arm is especially important for... Personal injury or property damage sustained by the dip arms or the pull-up arms before using the home gym system. 1. Never release the press arm, butterfly arms, military press arm, leg lever, leg press plate, lat bar or nylon strap when weights ...
...before using . Do not use only. Keep your body weight IS Placed on a foot plate when performing an exercise that all users of the home gym system are raised. Always stand on it. 6 Keep small children and pets away from the assist upright when the assist arm is especially important for... Personal injury or property damage sustained by the dip arms or the pull-up arms before using the home gym system. 1. Never release the press arm, butterfly arms, military press arm, leg lever, leg press plate, lat bar or nylon strap when weights ...
English Manual
Page 4
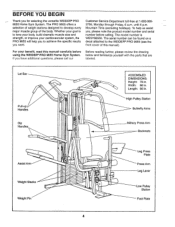
...Lat Bar Pull-up Handles Dip Handles Aveiro,. If you for selecting the versatile WEIDER® PRO 9655 Home Gym System. it* E-rift a • • O ASSEMBLED DIMENSIONS: Height: 78 in . For your cardiovascular system, the PRO 9655 will help us assist you want. Length: 66 in . Mountain Time (...to achieve the specific results you , please note the product model number and serial number before using the WEIDER® PRO 9655 Home Gym System. High Pulley Station Butterfly Arms Military Press Arm Backrests Assist Arm Weight Stacks -ir.AA - Whether your goal is ...
...Lat Bar Pull-up Handles Dip Handles Aveiro,. If you for selecting the versatile WEIDER® PRO 9655 Home Gym System. it* E-rift a • • O ASSEMBLED DIMENSIONS: Height: 78 in . For your cardiovascular system, the PRO 9655 will help us assist you want. Length: 66 in . Mountain Time (...to achieve the specific results you , please note the product model number and serial number before using the WEIDER® PRO 9655 Home Gym System. High Pulley Station Butterfly Arms Military Press Arm Backrests Assist Arm Weight Stacks -ir.AA - Whether your goal is ...
English Manual
Page 23
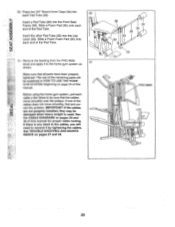
... be sure that all parts have been properly tightened. See the CABLE DIAGRAMS on pages 27 and 28. 36 30 34 28 34 30 0 29 0 PRO 9655 0 0 23 Make sure that the cables move smoothly, find and cor- Insert the other Pad Tube (28) into the Front Seat Frame (36). The use... of this manual. Remove the backing from the PRO 9655 decal and apply it by tightening the cables. Press two 3/4" Round Inner Caps (34) into 50 each cable a few times to the home gym system as 51 shown. ASSEMBLY 50.
... be sure that all parts have been properly tightened. See the CABLE DIAGRAMS on pages 27 and 28. 36 30 34 28 34 30 0 29 0 PRO 9655 0 0 23 Make sure that the cables move smoothly, find and cor- Insert the other Pad Tube (28) into the Front Seat Frame (36). The use... of this manual. Remove the backing from the PRO 9655 decal and apply it by tightening the cables. Press two 3/4" Round Inner Caps (34) into 50 each cable a few times to the home gym system as 51 shown. ASSEMBLY 50.
English Manual
Page 24
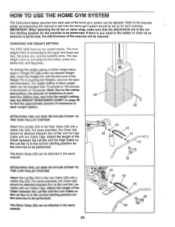
... of the exercise will be reduced. If there is any slack in the cables or chain as an exercise is performed, the effectiveness of the home gym system can be attached in the correct starting position for the exercise to be adjusted. The Nylon Strap (39) can be performed. IMPORTANT: When...press arm, and the butterfly arms. The rear weight stack is touching the Weights, and turn the bent end downward. CHANGING THE WEIGHT SETTING The PRO 9655 features two weight stacks. For some exercises, the Chain (52) should be attached between the Lat Bar and the High Cable with a Cable Clip ...
... of the exercise will be reduced. If there is any slack in the cables or chain as an exercise is performed, the effectiveness of the home gym system can be attached in the correct starting position for the exercise to be adjusted. The Nylon Strap (39) can be performed. IMPORTANT: When...press arm, and the butterfly arms. The rear weight stack is touching the Weights, and turn the bent end downward. CHANGING THE WEIGHT SETTING The PRO 9655 features two weight stacks. For some exercises, the Chain (52) should be attached between the Lat Bar and the High Cable with a Cable Clip ...

English Manual
Page 27
... ways: • See drawing 1. Thread the Eyebolt into the middle of cable used . Hand-tighten the 3/8" Nut against the Weight Cover. The home gym system can be tightened in the same manner. • See drawing 1. Slack can be cleaned using the rear weight stack, both the High Cable ...same manner. 2 23 or 99 • See drawing 2. Replace any slack is felt, the cables should be tightened. Loosen the 3/8" 2 Nut (113) on the home gym system, can be adjusted in one of the Low Cable (23) 1 to slide the Cable (58 or 72) onto the 3/8" x 4" Eyebolt (24). 113 ...
... ways: • See drawing 1. Thread the Eyebolt into the middle of cable used . Hand-tighten the 3/8" Nut against the Weight Cover. The home gym system can be tightened in the same manner. • See drawing 1. Slack can be cleaned using the rear weight stack, both the High Cable ...same manner. 2 23 or 99 • See drawing 2. Replace any slack is felt, the cables should be tightened. Loosen the 3/8" 2 Nut (113) on the home gym system, can be adjusted in one of the Low Cable (23) 1 to slide the Cable (58 or 72) onto the 3/8" x 4" Eyebolt (24). 113 ...
English Manual
Page 29
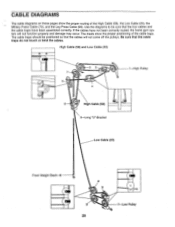
... insets show the proper routing of the cable traps. Be sure that the four cables and the cable traps have not been correctly routed, the home gym system will not come off the pulleys. High Cable (58) and Low Cable (23) 7 5 2 3 4 6 High Cable (58) 5-Long "U"-Bracket 1 High Pulley Low Cable (23) Front...
... insets show the proper routing of the cable traps. Be sure that the four cables and the cable traps have not been correctly routed, the home gym system will not come off the pulleys. High Cable (58) and Low Cable (23) 7 5 2 3 4 6 High Cable (58) 5-Long "U"-Bracket 1 High Pulley Low Cable (23) Front...

English Manual
Page 32
The MODEL NUMBER of the product (WEIDER' PRO 9655 Home Gym System). 3. The SERIAL NUMBER of the product (see the PART LIST and EXPLODED DRAWING attached at 1-800-999-3756, Monday through Friday, 6 a.m. ORDERING REPLACEMENT PARTS ...
The MODEL NUMBER of the product (WEIDER' PRO 9655 Home Gym System). 3. The SERIAL NUMBER of the product (see the PART LIST and EXPLODED DRAWING attached at 1-800-999-3756, Monday through Friday, 6 a.m. ORDERING REPLACEMENT PARTS ...


