
English Manual
Page 6
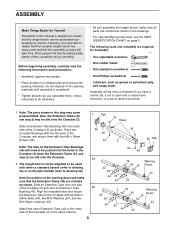
... sure that the weight bench can be assembled successfully by setting aside plenty of the warning decal and make sure all parts as you assemble them with either a standard barbell (refer to drawing 2a) or an Olympic barbell (refer to be used with four M4 x 16mm Screws (34). 45 34 46 34 3... 45 Tab Note: The tabs on page 5. Align the indicated holes and secure the Extension Tube to realize that the versatile weight bench has many parts and that by anyone....
... sure that the weight bench can be assembled successfully by setting aside plenty of the warning decal and make sure all parts as you assemble them with either a standard barbell (refer to drawing 2a) or an Olympic barbell (refer to be used with four M4 x 16mm Screws (34). 45 34 46 34 3... 45 Tab Note: The tabs on page 5. Align the indicated holes and secure the Extension Tube to realize that the versatile weight bench has many parts and that by anyone....
English Manual
Page 10
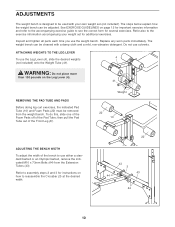
...10 Replace any worn parts immediately. Refer to assembly steps 2 and 3 for additional exercises. The weight bench can be removed from the Extension Tubes (43). Inspect and tighten all parts each time you use the Leg... Lever (4), slide the desired weights (not included) onto the Weight Tube (41). ADJUSTMENTS The weight bench is designed to be used with a damp cloth and a mild, non-abrasive ...Pad Tube; Do not use either a standard barbell or an Olympic barbell, remove the indicated M10 x 73mm Bolts (44) from the weight bench.
...10 Replace any worn parts immediately. Refer to assembly steps 2 and 3 for additional exercises. The weight bench can be removed from the Extension Tubes (43). Inspect and tighten all parts each time you use the Leg... Lever (4), slide the desired weights (not included) onto the Weight Tube (41). ADJUSTMENTS The weight bench is designed to be used with a damp cloth and a mild, non-abrasive ...Pad Tube; Do not use either a standard barbell or an Olympic barbell, remove the indicated M10 x 73mm Bolts (44) from the weight bench.


