

English Manual
Page 2
Note: The decal(s) may not be shown at actual size. 2 TABLE OF CONTENTS WARNING DECAL PLACEMENT 2 IMPORTANT PRECAUTIONS 3 BEFORE YOU BEGIN 4 PART IDENTIFICATION CHART 5 ASSEMBLY 6 ADJUSTMENT 21 WEIGHT RESISTANCE CHART 23 CABLE DIAGRAM 24 MAINTENANCE 25 EXERCISE GUIDELINES 26 PART LIST 29 EXPLODED DRAWING 30 ORDERING REPLACEMENT PARTS Back Cover 90 DAY FULL WARRANTY...
Note: The decal(s) may not be shown at actual size. 2 TABLE OF CONTENTS WARNING DECAL PLACEMENT 2 IMPORTANT PRECAUTIONS 3 BEFORE YOU BEGIN 4 PART IDENTIFICATION CHART 5 ASSEMBLY 6 ADJUSTMENT 21 WEIGHT RESISTANCE CHART 23 CABLE DIAGRAM 24 MAINTENANCE 25 EXERCISE GUIDELINES 26 PART LIST 29 EXPLODED DRAWING 30 ORDERING REPLACEMENT PARTS Back Cover 90 DAY FULL WARRANTY...
English Manual
Page 6
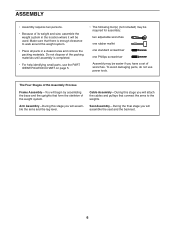
... Assembly Process Frame Assembly—-You will assemble the arms and the leg lever. To avoid damaging parts, do not use the PART IDENTIFICATION CHART on page 5. •• The following tool(s) (not included) may be required for assembly: two adjustable wrenches one rubber mallet one ...the skeleton of wrenches. Seat Assembly—-During the final stage you have a set of the weight system. Do not dispose of the packing materials until assembly is enough clearance to the weights. Cable Assembly—-During this stage you will assemble the seat and the backrest. 6 ASSEMBLY ...
... Assembly Process Frame Assembly—-You will assemble the arms and the leg lever. To avoid damaging parts, do not use the PART IDENTIFICATION CHART on page 5. •• The following tool(s) (not included) may be required for assembly: two adjustable wrenches one rubber mallet one ...the skeleton of wrenches. Seat Assembly—-During the final stage you have a set of the weight system. Do not dispose of the packing materials until assembly is enough clearance to the weights. Cable Assembly—-During this stage you will assemble the seat and the backrest. 6 ASSEMBLY ...

English Manual
Page 21
Use the WEIGHT RESISTANCE CHART on page 26 for several exercises. See the EXERCISE GUIDELINES on page 23 to find the approximate amount of the Chain between the Lat Bar (35) and the High Cable (55) with a Cable Clip (37). Replace any worn parts immediately. CHANGING THE WEIGHT SETTING To ...exercise guide to see the correct form for important information about how to the cables and pulleys, the amount of the weight stack, insert a Weight Pin (26) under the desired Weight (22). Turn the bent end downward. For some exercises, attach the Chain (83) between the Lat Bar and ...
Use the WEIGHT RESISTANCE CHART on page 26 for several exercises. See the EXERCISE GUIDELINES on page 23 to find the approximate amount of the Chain between the Lat Bar (35) and the High Cable (55) with a Cable Clip (37). Replace any worn parts immediately. CHANGING THE WEIGHT SETTING To ...exercise guide to see the correct form for important information about how to the cables and pulleys, the amount of the weight stack, insert a Weight Pin (26) under the desired Weight (22). Turn the bent end downward. For some exercises, attach the Chain (83) between the Lat Bar and ...
English Manual
Page 23
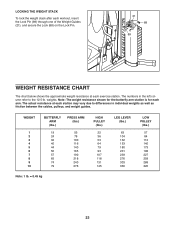
... friction between the cables, pulleys, and weight guides. LOCKING THE WEIGHT STACK To lock the weight stack after each workout, insert the Lock Pin (89) through one of the Weight Guides (21), and secure the Lock (88) on the Lock Pin. 21 88 89 WEIGHT RESISTANCE CHART The chart below shows the approximate weight resistance at each arm.
... friction between the cables, pulleys, and weight guides. LOCKING THE WEIGHT STACK To lock the weight stack after each workout, insert the Lock Pin (89) through one of the Weight Guides (21), and secure the Lock (88) on the Lock Pin. 21 88 89 WEIGHT RESISTANCE CHART The chart below shows the approximate weight resistance at each arm.


