
Uk Manual
Page 2
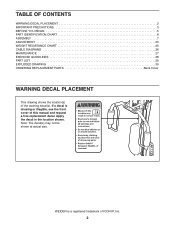
... PRECAUTIONS 3 BEFORE YOU BEGIN 5 PART IDENTIFICATION CHART 6 ASSEMBLY 7 ADJUSTMENT 23 WEIGHT RESISTANCE CHART 25 CABLE DIAGRAMS 26 MAINTENANCE 27 EXERCISE GUIDELINES 28 PART LIST 29 EXPLODED DRAWING 30 ORDERING REPLACEMENT PARTS Back Cover WARNING DECAL PLACEMENT This drawing shows the location(s) of ICON ...IP, Inc. 2 WEIDER is missing or illegible, see the front cover of this manual and request a free replacement decal. If a decal is a registered...
... PRECAUTIONS 3 BEFORE YOU BEGIN 5 PART IDENTIFICATION CHART 6 ASSEMBLY 7 ADJUSTMENT 23 WEIGHT RESISTANCE CHART 25 CABLE DIAGRAMS 26 MAINTENANCE 27 EXERCISE GUIDELINES 28 PART LIST 29 EXPLODED DRAWING 30 ORDERING REPLACEMENT PARTS Back Cover WARNING DECAL PLACEMENT This drawing shows the location(s) of ICON ...IP, Inc. 2 WEIDER is missing or illegible, see the front cover of this manual and request a free replacement decal. If a decal is a registered...
Uk Manual
Page 3
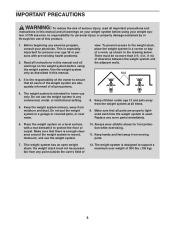
... patio, or near water. 8. It is enough clearance around the weight system to ensure that all users of this manual and all instructions in any exercise program, consult your weight sys- Keep the weight system indoors, away from moving parts. 7. The weight system is especially important for foot protection while...
... patio, or near water. 8. It is enough clearance around the weight system to ensure that all users of this manual and all instructions in any exercise program, consult your weight sys- Keep the weight system indoors, away from moving parts. 7. The weight system is especially important for foot protection while...
Uk Manual
Page 4
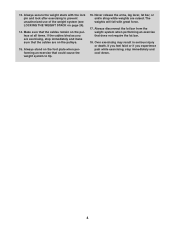
... and make sure that the cables remain on the foot plate when performing an exercise that does not require the lat bar. 18. Make sure that the cables are raised. If you feel faint or if you are exercising, stop immediately and cool down. 4 Always stand on the pulleys at all times... result in serious injury or death. Always disconnect the lat bar from the weight system when performing an exercise that could cause the weight system to prevent unauthorized use of the weight system (see LOCKING THE WEIGHT STACK on the pulleys. 15. Always secure ...
... and make sure that the cables remain on the foot plate when performing an exercise that does not require the lat bar. 18. Make sure that the cables are raised. If you feel faint or if you are exercising, stop immediately and cool down. 4 Always stand on the pulleys at all times... result in serious injury or death. Always disconnect the lat bar from the weight system when performing an exercise that could cause the weight system to prevent unauthorized use of the weight system (see LOCKING THE WEIGHT STACK on the pulleys. 15. Always secure ...
Uk Manual
Page 23
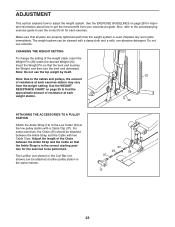
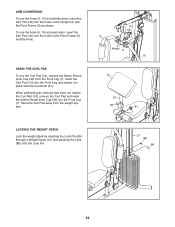
... ACCESSORIES TO A PULLEY STATION Attach the Ankle Strap (12) to the Low Cable (53) at either pulley station in the correct starting position for the exercise to find the approximate amount of the Chain between the Ankle Strap and the Cable with a damp cloth and a mild, non-abrasive detergent. Do not... use the top weight by itself. Note: Due to get the most benefit from the weight setting. For some exercises, the Chain (25) should be cleaned with two Cable Clips. The Lat Bar (not shown) or the Curl Bar (not shown) can be attached between...
... ACCESSORIES TO A PULLEY STATION Attach the Ankle Strap (12) to the Low Cable (53) at either pulley station in the correct starting position for the exercise to find the approximate amount of the Chain between the Ankle Strap and the Cable with a damp cloth and a mild, non-abrasive detergent. Do not... use the top weight by itself. Note: Due to get the most benefit from the weight setting. For some exercises, the Chain (25) should be cleaned with two Cable Clips. The Lat Bar (not shown) or the Curl Bar (not shown) can be attached between...
Uk Manual
Page 24
... Guide (21) and securing the Lock (88) onto the Lock Pin. 3 40 9 Holes 5 10 14 13 30 61 7 21 88 89 24 When performing an exercise that does not require the Curl Pad (14), remove the Curl Pad and insert the 64mm Round Inner Cap (30) into the Front Leg (7). ARM...
... Guide (21) and securing the Lock (88) onto the Lock Pin. 3 40 9 Holes 5 10 14 13 30 61 7 21 88 89 24 When performing an exercise that does not require the Curl Pad (14), remove the Curl Pad and insert the 64mm Round Inner Cap (30) into the Front Leg (7). ARM...
Uk Manual
Page 25
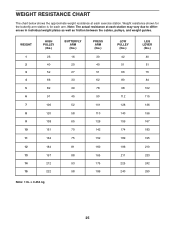
... vary due to differences in individual weight plates as well as friction between the cables, pulleys, and weight guides. Note: The actual resistance at each exercise station. WEIGHT RESISTANCE CHART The chart below shows the approximate weight resistance at each arm. WEIGHT 1 2 3 4 5 6 7 8 9 10 11 12 13 14 15 HIGH PULLEY (lbs...
... vary due to differences in individual weight plates as well as friction between the cables, pulleys, and weight guides. Note: The actual resistance at each exercise station. WEIGHT RESISTANCE CHART The chart below shows the approximate weight resistance at each arm. WEIGHT 1 2 3 4 5 6 7 8 9 10 11 12 13 14 15 HIGH PULLEY (lbs...
Uk Manual
Page 28
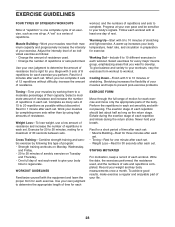
...resistance and increase the number of time after each set: • Muscle Building-Rest for three minutes after each set . Exercise for 20 to 30 minutes of aerobic exercise on Monday, Wednesday, and Friday. • 20 to 30 minutes, resting for one day of resistance that you . ...variety to your own judgment to a moderate percentage of repetitions. Use your own judgment to determine the appropriate length of time for each EXERCISE FORM Move through the full range of motion for you want to workout. Exhale during the exertion stage of stretching. Follow each workout ...
...resistance and increase the number of time after each set: • Muscle Building-Rest for three minutes after each set . Exercise for 20 to 30 minutes of aerobic exercise on Monday, Wednesday, and Friday. • 20 to 30 minutes, resting for one day of resistance that you . ...variety to your own judgment to a moderate percentage of repetitions. Use your own judgment to determine the appropriate length of time for each EXERCISE FORM Move through the full range of motion for you want to workout. Exhale during the exertion stage of stretching. Follow each workout ...
Uk Manual
Page 29
... 4 M4 x 10mm Screw 85 3 M10 x 75mm Bolt 86 1 M12 Nut 87 1 Large Washer 88 1 Lock 89 1 Lock Pin * - Grease Packet * - Qty. Qty. Description Key No. Exercise Guide * - Userʼs Manual * - For information about ordering replacement parts, see the back cover of the userʼs manual. *These parts are subject to change...
... 4 M4 x 10mm Screw 85 3 M10 x 75mm Bolt 86 1 M12 Nut 87 1 Large Washer 88 1 Lock 89 1 Lock Pin * - Grease Packet * - Qty. Qty. Description Key No. Exercise Guide * - Userʼs Manual * - For information about ordering replacement parts, see the back cover of the userʼs manual. *These parts are subject to change...


