

Uk Manual
Page 2
... LIST 18 EXPLODED DRAWING 19 ORDERING REPLACEMENT PARTS Back Cover WARNING DECAL PLACEMENT The decals shown here have been placed on the weight bench. Apply the decal in the indicated location. WEIDER is missing or illegible, please call our Customer Service Department at 08457 089 009 to order a free replacement decal. If a decal...
... LIST 18 EXPLODED DRAWING 19 ORDERING REPLACEMENT PARTS Back Cover WARNING DECAL PLACEMENT The decals shown here have been placed on the weight bench. Apply the decal in the indicated location. WEIDER is missing or illegible, please call our Customer Service Department at 08457 089 009 to order a free replacement decal. If a decal...
Uk Manual
Page 3
... lever, place a barbell with pre-existing health problems. Read all precautions. 3. ICON assumes no responsibility for home use the weight bench. It is intended for personal injury or property damage sustained by or through both ends of the barbell and prevent the barbell from... 12. Do not use of weight on a level surface. Use the weight bench only as described in any worn parts immediately. 6. The weight bench is the responsibility of the owner to the same height before using the weight bench. Use the weight bench only on the weight rests to protect the floor. ...
... lever, place a barbell with pre-existing health problems. Read all precautions. 3. ICON assumes no responsibility for home use the weight bench. It is intended for personal injury or property damage sustained by or through both ends of the barbell and prevent the barbell from... 12. Do not use of weight on a level surface. Use the weight bench only as described in any worn parts immediately. 6. The weight bench is the responsibility of the owner to the same height before using the weight bench. Use the weight bench only on the weight rests to protect the floor. ...
Uk Manual
Page 4
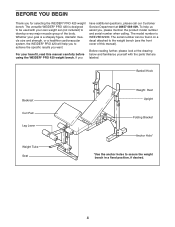
... Upright Folding Bracket Anchor Hole* *Use the anchor holes to develop every major muscle group of this manual carefully before using the WEIDER® PRO 420 weight bench. BEFORE YOU BEGIN Thank you , please mention the product model number and serial number when calling. The model number is a shapely figure, dramatic muscle size ...
... Upright Folding Bracket Anchor Hole* *Use the anchor holes to develop every major muscle group of this manual carefully before using the WEIDER® PRO 420 weight bench. BEFORE YOU BEGIN Thank you , please mention the product model number and serial number when calling. The model number is a shapely figure, dramatic muscle size ...

Uk Manual
Page 6
... yet. Press four 60mm Square Inner Caps (46) into the ends of the packing materials until assembly is designed to ensure that the weight bench can be more convenient if you have read and understand the information in a cleared area and remove the packing materials. Assembly will go ...smoothly. Before assembling the weight bench, make sure all parts in the box above. Most people find that you have a socket set, a set of open-end or closed-end...
... yet. Press four 60mm Square Inner Caps (46) into the ends of the packing materials until assembly is designed to ensure that the weight bench can be more convenient if you have read and understand the information in a cleared area and remove the packing materials. Assembly will go ...smoothly. Before assembling the weight bench, make sure all parts in the box above. Most people find that you have a socket set, a set of open-end or closed-end...

Uk Manual
Page 7
...57mm Adjustment Knob (33) into the Front Leg Stabiliser (44). Attach the Crossbar to the Bench Frame (2) with two M10 x 52mm Carriage Bolts (54) and two M10 Nylon Locknuts (19... Locknuts yet. Attach the 4 Bench Frame (2) to pivot easily. Press a 25.4mm Round Inner Cap (23) into the top of the Weight Tube. 4 21 37 39 ...38 21 23 41 29 13 38 7 Attach the Front Leg Stabiliser (44) to the left Upright Base (7) with the Bolt, two M10 Washers (24), and an M10 Nylon Locknut (19). Press two 40mm x 50mm Inner Caps (55) into the Crossbar and Bench...
...57mm Adjustment Knob (33) into the Front Leg Stabiliser (44). Attach the Crossbar to the Bench Frame (2) with two M10 x 52mm Carriage Bolts (54) and two M10 Nylon Locknuts (19... Locknuts yet. Attach the 4 Bench Frame (2) to pivot easily. Press a 25.4mm Round Inner Cap (23) into the top of the Weight Tube. 4 21 37 39 ...38 21 23 41 29 13 38 7 Attach the Front Leg Stabiliser (44) to the left Upright Base (7) with the Bolt, two M10 Washers (24), and an M10 Nylon Locknut (19). Press two 40mm x 50mm Inner Caps (55) into the Crossbar and Bench...

Uk Manual
Page 10
The use of all the bolts and nylon locknuts are properly tightened before you use the weight bench. Make sure that all remaining parts will be explained in ADJUSTMENTS, starting on the following page. 10 Attach the Curl Pad (27) to the Curl Post (26) 13 with two M6 x 16mm Bolts (15). 27 15 15 26 14. 13.
The use of all the bolts and nylon locknuts are properly tightened before you use the weight bench. Make sure that all remaining parts will be explained in ADJUSTMENTS, starting on the following page. 10 Attach the Curl Pad (27) to the Curl Post (26) 13 with two M6 x 16mm Bolts (15). 27 15 15 26 14. 13.

Uk Manual
Page 11
... damp cloth and a mild, non-abrasive detergent. Store the Curl Pad away from the Front Leg (8). The weight bench can be adjusted. To use the Backrest (6) in the adjustment tubes and the Bench Frame (2). Insert the Curl Post (26) into the Front Leg and the Curl Post. Make sure all parts ...are properly tightened each time you use solvents. Do not use the weight bench. Remove the 50mm Square Inner Cap (40) from the bench so it will not interfere with your weight set of holes in an incline position, lift the Backrest and insert the Adjustment Pin (32)...
... damp cloth and a mild, non-abrasive detergent. Store the Curl Pad away from the Front Leg (8). The weight bench can be adjusted. To use the Backrest (6) in the adjustment tubes and the Bench Frame (2). Insert the Curl Post (26) into the Front Leg and the Curl Post. Make sure all parts ...are properly tightened each time you use solvents. Do not use the weight bench. Remove the 50mm Square Inner Cap (40) from the bench so it will not interfere with your weight set of holes in an incline position, lift the Backrest and insert the Adjustment Pin (32)...
Uk Manual
Page 13
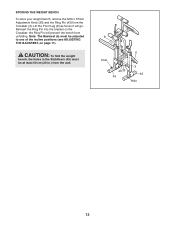
Note: The Backrest (6) must be adjusted to one of the incline positions (see ADJUSTING THE BACKREST, on the Crossbar; Reinsert the Ring Pin into the bracket on page 11). STORING THE WEIGHT BENCH To store your weight bench, remove the M10 x 57mm Adjustment Knob (33) and the Ring Pin (43) from unfolding. the Ring Pin will go. CAUTION: To fold the weight bench, the holes in the Stabilisers (45) must be at least 50 cm (20 in.) from the wall. 8 6 Hole 43 33 45 3 45 Hole 13 Lift the Front Leg (8) as far as it will prevent the bench from the Crossbar (3).
Note: The Backrest (6) must be adjusted to one of the incline positions (see ADJUSTING THE BACKREST, on the Crossbar; Reinsert the Ring Pin into the bracket on page 11). STORING THE WEIGHT BENCH To store your weight bench, remove the M10 x 57mm Adjustment Knob (33) and the Ring Pin (43) from unfolding. the Ring Pin will go. CAUTION: To fold the weight bench, the holes in the Stabilisers (45) must be at least 50 cm (20 in.) from the wall. 8 6 Hole 43 33 45 3 45 Hole 13 Lift the Front Leg (8) as far as it will prevent the bench from the Crossbar (3).

Uk Manual
Page 18
Description Key No. Qty. Description 1 2 Upright 2 1 Bench Frame 3 1 Crossbar 4 1 Leg Lever 5 1 Right Backrest Frame 6 1 Backrest 7 2 Upright Base 8 1 Front Leg 9 6 19mm Round Inner Cap 10 3 Pad Tube 11 1 Seat 12 ... Square Inner Cap 47 2 Bright M8 Washer 48 2 Bright M8 Nylon Locknut 49 1 Left Barbell Hook 50 1 Right Barbell Hook 51 1 M10 x 75mm Bolt 52 1 Weight Clip 53 1 Plastic Sleeve 54 2 M10 x 52mm Carriage Bolt 55 2 40mm x 50mm Inner Cap # 1 User's Manual # 1 Exercise Guide # 1 Grease Pack Note: "#" indicates...
Description Key No. Qty. Description 1 2 Upright 2 1 Bench Frame 3 1 Crossbar 4 1 Leg Lever 5 1 Right Backrest Frame 6 1 Backrest 7 2 Upright Base 8 1 Front Leg 9 6 19mm Round Inner Cap 10 3 Pad Tube 11 1 Seat 12 ... Square Inner Cap 47 2 Bright M8 Washer 48 2 Bright M8 Nylon Locknut 49 1 Left Barbell Hook 50 1 Right Barbell Hook 51 1 M10 x 75mm Bolt 52 1 Weight Clip 53 1 Plastic Sleeve 54 2 M10 x 52mm Carriage Bolt 55 2 40mm x 50mm Inner Cap # 1 User's Manual # 1 Exercise Guide # 1 Grease Pack Note: "#" indicates...

Uk Manual
Page 20
... this product, or if you need to give the following information: • The MODEL NUMBER of the product (WEEVBE32930) • The NAME of the product (WEIDER® PRO 420 weight bench) • The SERIAL NUMBER of the product (see the front cover of this manual) • The KEY NUMBER and DESCRIPTION of the part(s) (see...
... this product, or if you need to give the following information: • The MODEL NUMBER of the product (WEEVBE32930) • The NAME of the product (WEIDER® PRO 420 weight bench) • The SERIAL NUMBER of the product (see the front cover of this manual) • The KEY NUMBER and DESCRIPTION of the part(s) (see...


