
English Manual
Page 3
... pre-existing health problems. Read all times. 6. ICON assumes no responsibility for home use of this manual before using the weight bench. The weight bench is the responsibility of the owner to catch the barbell if you feel pain or dizziness at all instructions before beginning any exercise ... adequately informed of your barbell when you are properly tightened each time you to ensure that the adjustment knobs are performing bench press exercises, your physician. When adding or removing weights, always keep an equal amount of weight on both ends of all instructions in...
... pre-existing health problems. Read all times. 6. ICON assumes no responsibility for home use of this manual before using the weight bench. The weight bench is the responsibility of the owner to catch the barbell if you feel pain or dizziness at all instructions before beginning any exercise ... adequately informed of your barbell when you are properly tightened each time you to ensure that the adjustment knobs are performing bench press exercises, your physician. When adding or removing weights, always keep an equal amount of weight on both ends of all instructions in...
English Manual
Page 5
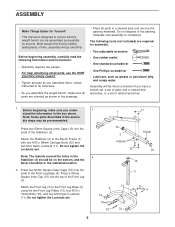
... four M10 x 72mm Bolts (70), and four M10 Nylon Locknuts (11). Attach the Front Leg (3) to the Bench Frame (1) with two M10 x 58mm Carriage Bolts (32) and two M10 Nylon Locknuts (11). Press two 50mm Square Inner Caps (10) into the top of time, assembly will be more convenient if you... socket set, a set of open-end or closed-end wrenches, or a set of the Stabilizer (2). Press a 50mm Square Inner Cap (10) into the ends of ratchet wrenches. 1. Most people find that the weight bench can be pre-assembled. Before beginning, make sure all parts are required for Yourself This manual is...
... four M10 x 72mm Bolts (70), and four M10 Nylon Locknuts (11). Attach the Front Leg (3) to the Bench Frame (1) with two M10 x 58mm Carriage Bolts (32) and two M10 Nylon Locknuts (11). Press two 50mm Square Inner Caps (10) into the top of time, assembly will be more convenient if you... socket set, a set of open-end or closed-end wrenches, or a set of the Stabilizer (2). Press a 50mm Square Inner Cap (10) into the ends of ratchet wrenches. 1. Most people find that the weight bench can be pre-assembled. Before beginning, make sure all parts are required for Yourself This manual is...
English Manual
Page 6
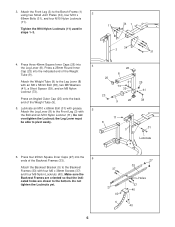
Attach the Front Leg (3) to pivot easily. 8 31 3 Lubricate 6. Press an Angled Outer Cap (25) onto the back end of the Backrest Frames (33). the Leg Lever must 11 be able to the Bench Frame (1) using two Small Joint Plates (34), four M10 x 3 68mm Bolts (31), and four M10 Nylon Locknuts (11... to the Backrest Frames (33) with an M8 x 58mm Bolt (38), two M8 Washers (41), a Short Spacer (39), and an M8 Nylon Locknut (73). Press three 45mm Square Inner Caps (26) into the Leg Lever (8). Lubricate an M10 x 68mm Bolt (31) with grease. 5 Attach the Leg Lever (8) to the bottom...
Attach the Front Leg (3) to pivot easily. 8 31 3 Lubricate 6. Press an Angled Outer Cap (25) onto the back end of the Backrest Frames (33). the Leg Lever must 11 be able to the Bench Frame (1) using two Small Joint Plates (34), four M10 x 3 68mm Bolts (31), and four M10 Nylon Locknuts (11... to the Backrest Frames (33) with an M8 x 58mm Bolt (38), two M8 Washers (41), a Short Spacer (39), and an M8 Nylon Locknut (73). Press three 45mm Square Inner Caps (26) into the Leg Lever (8). Lubricate an M10 x 68mm Bolt (31) with grease. 5 Attach the Leg Lever (8) to the bottom...

English Manual
Page 7
...). Slide the Backrest Bracket (5) into the indicated slot on the Pin to the bottom of the three Pad Tubes (17). Engage the Bench Pin (21) into the ends of the Bench Frame with the M4 x 16mm Screw (71). Tighten the M6 Nylon Locknuts (40) and the M6 x 36mm Screws (37) used in... oriented as shown. Slide two Foam Pads (19) onto each Pad Tube (17). 10 19 8 30 3 19 18 17 18 19 18 17 18 19 7 Press two 19mm Round Inner Caps (18) into an adjustment hole in the Backrest Bracket. Wide End 36 37 36 37 36 37 8 Lubricate 33 6 35...
...). Slide the Backrest Bracket (5) into the indicated slot on the Pin to the bottom of the three Pad Tubes (17). Engage the Bench Pin (21) into the ends of the Bench Frame with the M4 x 16mm Screw (71). Tighten the M6 Nylon Locknuts (40) and the M6 x 36mm Screws (37) used in... oriented as shown. Slide two Foam Pads (19) onto each Pad Tube (17). 10 19 8 30 3 19 18 17 18 19 18 17 18 19 7 Press two 19mm Round Inner Caps (18) into an adjustment hole in the Backrest Bracket. Wide End 36 37 36 37 36 37 8 Lubricate 33 6 35...

English Manual
Page 8
...(16) into top of the Left Weight Rest (47). Make sure the tabs are in the indicated locations. Press a Foot (51) onto the bottom of the Left Weight Rest with two M4 x 16mm Screws (71). ... Rest (48). 16 12 48 16 30 47 55 45 Hole 71 71 45 46 Tab 54 51 13. Press the Upright Bushing into 29 the Weight Adapter (15). 28 15 12. Repeat this step with 11 two M6 ...x 16mm Screws (30). Slide an Upright Bushing (46) onto the bottom of the Upright. Press the tab on the side shown. Attach the Frame (43) to the Curl Post (28) with the other Upright (...
...(16) into top of the Left Weight Rest (47). Make sure the tabs are in the indicated locations. Press a Foot (51) onto the bottom of the Left Weight Rest with two M4 x 16mm Screws (71). ... Rest (48). 16 12 48 16 30 47 55 45 Hole 71 71 45 46 Tab 54 51 13. Press the Upright Bushing into 29 the Weight Adapter (15). 28 15 12. Repeat this step with 11 two M6 ...x 16mm Screws (30). Slide an Upright Bushing (46) onto the bottom of the Upright. Press the tab on the side shown. Attach the Frame (43) to the Curl Post (28) with the other Upright (...

English Manual
Page 9
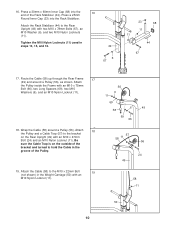
... and bottom of the weight tube on the Carriage from the side shown. Press two Carriage 14 Bushings (52) into the bracket on the Carriage. Slide the Weight Carriage (50) onto the Rear Upright (49), as shown. 14. Press two 25mm Round Inner Caps (23) into the ends of the Rear Upright... (49). Press the Carriage Stop Bushing (72) into the Weight Stop (53). 22 49 Press two 60mm Square Inner Caps (22) into the ends of the Weight...
... and bottom of the weight tube on the Carriage from the side shown. Press two Carriage 14 Bushings (52) into the bracket on the Carriage. Slide the Weight Carriage (50) onto the Rear Upright (49), as shown. 14. Press two 25mm Round Inner Caps (23) into the ends of the Rear Upright... (49). Press the Carriage Stop Bushing (72) into the Weight Stop (53). 22 49 Press two 60mm Square Inner Caps (22) into the ends of the Weight...
English Manual
Page 10
... Inner Cap (68) into the Rack Stabilizer. Press a 25mm Round Inner Cap (23) into the 16 end of the Pulley. 19. Tighten the M10 Nylon Locknuts (11) used in the Weight Carriage (50) ...
... Inner Cap (68) into the Rack Stabilizer. Press a 25mm Round Inner Cap (23) into the 16 end of the Pulley. 19. Tighten the M10 Nylon Locknuts (11) used in the Weight Carriage (50) ...


