
English Manual
Page 1
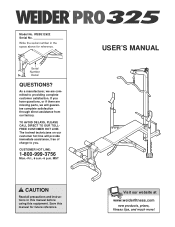
... through direct assistance from our factory. Write the serial number in this manual before using this manual for reference. As a manufacturer, we are committed to you have questions, or if there are missing parts, we will provide immediate assistance, free of charge to providing complete customer satisfaction. USER'S MANUAL Visit our website at www.weiderfitness.com new products, prizes, fitness tips...
... through direct assistance from our factory. Write the serial number in this manual before using this manual for reference. As a manufacturer, we are committed to you have questions, or if there are missing parts, we will provide immediate assistance, free of charge to providing complete customer satisfaction. USER'S MANUAL Visit our website at www.weiderfitness.com new products, prizes, fitness tips...
English Manual
Page 2
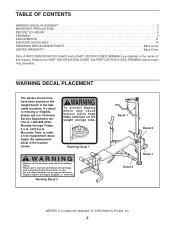
... 1 Decal 2 WEIDER is missing or illegible, please call our Customer Service Department tollfree at 1-800-999-3756, Monday through Friday, 6 a.m. TABLE OF CONTENTS WARNING DECAL PLACEMENT 2 IMPORTANT PRECAUTIONS 3 BEFORE YOU BEGIN 4 ASSEMBLY 5 ADJUSTMENTS 11 EXERCISE GUIDELINES 14 ORDERING REPLACEMENT PARTS Back Cover LIMITED WARRANTY Back Cover Note: A PART IDENTIFICATION CHART and a PART LIST/EXPLODED DRAWING are attached in the center of ICON Health & Fitness, Inc. 2 Remove the PART IDENTIFICATION CHART and PART LIST/EXPLODED...
... 1 Decal 2 WEIDER is missing or illegible, please call our Customer Service Department tollfree at 1-800-999-3756, Monday through Friday, 6 a.m. TABLE OF CONTENTS WARNING DECAL PLACEMENT 2 IMPORTANT PRECAUTIONS 3 BEFORE YOU BEGIN 4 ASSEMBLY 5 ADJUSTMENTS 11 EXERCISE GUIDELINES 14 ORDERING REPLACEMENT PARTS Back Cover LIMITED WARRANTY Back Cover Note: A PART IDENTIFICATION CHART and a PART LIST/EXPLODED DRAWING are attached in the center of ICON Health & Fitness, Inc. 2 Remove the PART IDENTIFICATION CHART and PART LIST/EXPLODED...
English Manual
Page 3
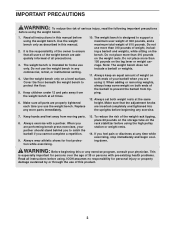
... weight rests at any exercise program, consult your partner should stand behind you to ensure that the adjustment knobs are inserted completely and tightened into the uprights before using it. Keep hands and feet away from the weight bench at all precautions. 3. When you are properly tightened each time you are adequately informed of this manual before beginning any worn parts immediately. 10. The weight bench...
... weight rests at any exercise program, consult your partner should stand behind you to ensure that the adjustment knobs are inserted completely and tightened into the uprights before using it. Keep hands and feet away from the weight bench at all precautions. 3. When you are properly tightened each time you are adequately informed of this manual before beginning any worn parts immediately. 10. The weight bench...
English Manual
Page 4
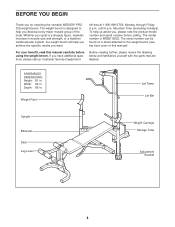
.... The serial number can be found on a decal attached to help you achieve the specific results you develop every major muscle group of this manual carefully before calling. Weight Rest Lat Tower Lat Bar Upright Backrest Seat Leg Lever Weight Carriage Storage Tube Adjustment Bracket 4 For your goal is WEBE12622. The model number is a shapely figure, dramatic increase in . If you for selecting the versatile WEIDER® PRO 325 weight bench. BEFORE...
.... The serial number can be found on a decal attached to help you achieve the specific results you develop every major muscle group of this manual carefully before calling. Weight Rest Lat Tower Lat Bar Upright Backrest Seat Leg Lever Weight Carriage Storage Tube Adjustment Bracket 4 For your goal is WEBE12622. The model number is a shapely figure, dramatic increase in . If you for selecting the versatile WEIDER® PRO 325 weight bench. BEFORE...
English Manual
Page 5
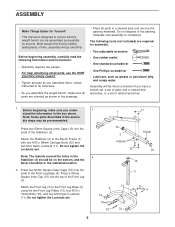
... people find that the weight bench can be more convenient if you assemble them, unless instructed to the Front Leg Base (4) using the two Front Leg Plates (13), four M10 x 72mm Bolts (70), and four M10 Nylon Locknuts (11). Do not dispose of the Front Leg Base (4). Attach the Stabilizer (2) to ensure that by anyone. Press two 50mm Square Outer Caps...
... people find that the weight bench can be more convenient if you assemble them, unless instructed to the Front Leg Base (4) using the two Front Leg Plates (13), four M10 x 72mm Bolts (70), and four M10 Nylon Locknuts (11). Do not dispose of the Front Leg Base (4). Attach the Stabilizer (2) to ensure that by anyone. Press two 50mm Square Outer Caps...
English Manual
Page 6
Attach the Front Leg (3) to pivot easily. 8 31 3 Lubricate 6. Lubricate an M10 x 68mm Bolt (31) with grease. 5 Attach the Leg Lever (8) to the Backrest Frames (33) with the Bolt and an M10 Nylon Locknut (11). the Leg Lever must 11 be able to the Bench Frame (1) using two Small Joint Plates (34), four M10 x 3 68mm Bolts (31), and four M10 Nylon Locknuts (11). Attach the...
Attach the Front Leg (3) to pivot easily. 8 31 3 Lubricate 6. Lubricate an M10 x 68mm Bolt (31) with grease. 5 Attach the Leg Lever (8) to the Backrest Frames (33) with the Bolt and an M10 Nylon Locknut (11). the Leg Lever must 11 be able to the Bench Frame (1) using two Small Joint Plates (34), four M10 x 3 68mm Bolts (31), and four M10 Nylon Locknuts (11). Attach the...

English Manual
Page 7
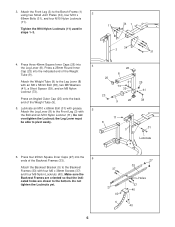
...in steps 6 and 7. 9. the Backrest must be able to the Backrest Frames 7 (33) with the M4 x 16mm Screw (71). Slide the Backrest Bracket (5) into an adjustment hole in the Backrest Bracket. Attach the Backrest (7) to pivot freely. Do not tighten the Screws yet....Tighten the M6 Nylon Locknuts (40) and the M6 x 36mm Screws (37) used in the Front Leg (3) and the Leg Lever (8). Wide End 36 37 36 37 36 37 8 Lubricate 33 6 35 1 5 71 9 Wide End 20 6 21 11 1 10. Engage the Bench Pin (21) into the indicated slot on the Pin to the Bench Frame (1) with four M6 x 16mm Screws (30). Press...
...in steps 6 and 7. 9. the Backrest must be able to the Backrest Frames 7 (33) with the M4 x 16mm Screw (71). Slide the Backrest Bracket (5) into an adjustment hole in the Backrest Bracket. Attach the Backrest (7) to pivot freely. Do not tighten the Screws yet....Tighten the M6 Nylon Locknuts (40) and the M6 x 36mm Screws (37) used in the Front Leg (3) and the Leg Lever (8). Wide End 36 37 36 37 36 37 8 Lubricate 33 6 35 1 5 71 9 Wide End 20 6 21 11 1 10. Engage the Bench Pin (21) into the indicated slot on the Pin to the Bench Frame (1) with four M6 x 16mm Screws (30). Press...

English Manual
Page 8
... Weight Rest (47) Slide the Weight Rest and Upright Bushing into top of an Upright (45). Repeat this step with an Adjustment Knob (55). Do not tighten the Locknuts yet. Press the two Weight Adapter Bushings (16) into the indicated holes in the same manner. Slide an Upright Bushing (46) onto the bottom of the Left Weight Rest with two M4 x 16mm Screws (71). Attach a Weight...
... Weight Rest (47) Slide the Weight Rest and Upright Bushing into top of an Upright (45). Repeat this step with an Adjustment Knob (55). Do not tighten the Locknuts yet. Press the two Weight Adapter Bushings (16) into the indicated holes in the same manner. Slide an Upright Bushing (46) onto the bottom of the Left Weight Rest with two M4 x 16mm Screws (71). Attach a Weight...

English Manual
Page 9
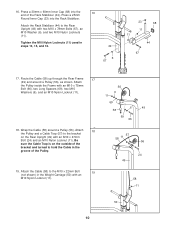
... Insert the M10 x 22mm Bolt (60) into the ends of the weight tube on the Carriage from the side shown. Press two Carriage 14 Bushings (52) into the ends of the Weight Carriage (50). See the inset drawing. Attach the Rear Upright (49) to the Frame ...tighten the Locknuts yet. 49 43 67 9 11 61 See the inset drawing. Press the Carriage Stop Bushing (72) into the Weight Stop (53). 22 49 Press two 60mm Square Inner Caps (22) into the top and bottom of the Rear Upright (49). Slide the Weight Stop (53) onto the Rear Upright and secure it with four M10 x 78mm Bolts (67), a Support...
... Insert the M10 x 22mm Bolt (60) into the ends of the weight tube on the Carriage from the side shown. Press two Carriage 14 Bushings (52) into the ends of the Weight Carriage (50). See the inset drawing. Attach the Rear Upright (49) to the Frame ...tighten the Locknuts yet. 49 43 67 9 11 61 See the inset drawing. Press the Carriage Stop Bushing (72) into the Weight Stop (53). 22 49 Press two 60mm Square Inner Caps (22) into the top and bottom of the Rear Upright (49). Slide the Weight Stop (53) onto the Rear Upright and secure it with four M10 x 78mm Bolts (67), a Support...
English Manual
Page 10
... Route the Cable (58) up through the Rear Frame 17 (49) and around a Pulley (56). Tighten the M10 Nylon Locknuts (11) used in the groove of the bracket and turned to the M10 x 22mm Bolt 19 (not shown) in the Weight Carriage (50) with two M10 x 78mm Bolts (67), an M10 Washer (6), and two M10 Nylon Locknuts (11). Attach 18 the Pulley...
... Route the Cable (58) up through the Rear Frame 17 (49) and around a Pulley (56). Tighten the M10 Nylon Locknuts (11) used in the groove of the bracket and turned to the M10 x 22mm Bolt 19 (not shown) in the Weight Carriage (50) with two M10 x 78mm Bolts (67), an M10 Washer (6), and two M10 Nylon Locknuts (11). Attach 18 the Pulley...

English Manual
Page 11
... tightened each exercise. Replace any worn parts immediately. To do this, slide one of all parts are properly tightened before you use the Leg Lever (8), slide the desired amount of weight onto the Weight Tube (9). See the EXERCISE GUIDELINES on the Weight Tube (9). 8 15 62 9 Weight 11 Also, refer to the accompanying exercise guide to see the correct form for important information about how to adjust the weight bench. The weight bench...
... tightened each exercise. Replace any worn parts immediately. To do this, slide one of all parts are properly tightened before you use the Leg Lever (8), slide the desired amount of weight onto the Weight Tube (9). See the EXERCISE GUIDELINES on the Weight Tube (9). 8 15 62 9 Weight 11 Also, refer to the accompanying exercise guide to see the correct form for important information about how to adjust the weight bench. The weight bench...
English Manual
Page 12
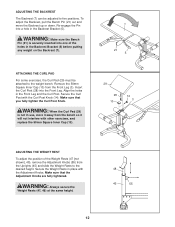
... Backrest, pull the Bench Pin (21) out and move the Backrest up or down. ATTACHING THE CURL PAD For some exercises, the Curl Pad (29) must be adjusted to five positions. Secure the Curl Post with the Adjustment Knobs. Make sure that the Adjustment Knobs are fully tightened. Secure the Weight Rests in use, store it away from the bench so it will not...
... Backrest, pull the Bench Pin (21) out and move the Backrest up or down. ATTACHING THE CURL PAD For some exercises, the Curl Pad (29) must be adjusted to five positions. Secure the Curl Post with the Adjustment Knobs. Make sure that the Adjustment Knobs are fully tightened. Secure the Weight Rests in use, store it away from the bench so it will not...

English Manual
Page 13
... (44). Secure the Adapters with the Weight Clips (62) WARNING: Before using the Lat Bar (42), place 60 pounds of weight on the weight tube on both sides of the barbell. 47 Weight Tube 44 USING THE LAT BAR To use the Lat Bar (42), attach it to the Cable (58) with the Weight Carriage (50), slide the Weight Adapters (15) onto the Weight Carriage before adding weight. Then, slide the...
... (44). Secure the Adapters with the Weight Clips (62) WARNING: Before using the Lat Bar (42), place 60 pounds of weight on the weight tube on both sides of the barbell. 47 Weight Tube 44 USING THE LAT BAR To use the Lat Bar (42), attach it to the Cable (58) with the Weight Carriage (50), slide the Weight Adapters (15) onto the Weight Carriage before adding weight. Then, slide the...

English Manual
Page 14
... 10 different exercises. Cross Training Cross training is a series of repetitions.) The proper amount of weight for each set. Find out what is an essential part of an effective exercise program. Schedule your workouts for you will continually adapt and grow as one sit-up . On the exercise guide accompanying this manual you , stick with 5 to 10 minutes of stretching and light exercise to their capacity. Your muscles...
... 10 different exercises. Cross Training Cross training is a series of repetitions.) The proper amount of weight for each set. Find out what is an essential part of an effective exercise program. Schedule your workouts for you will continually adapt and grow as one sit-up . On the exercise guide accompanying this manual you , stick with 5 to 10 minutes of stretching and light exercise to their capacity. Your muscles...
English Manual
Page 15
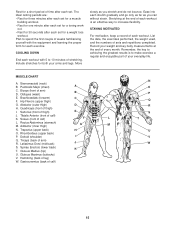
... equipment and learning the proper form for a weight loss workout. Rhomboideus (upper back) P. Spinae Erectors (lower back) K T. Gastrocnemius (back of sets and repetitions completed. List the date, the exercises performed, the weight used, and the numbers of calf) N O P Q R S T U V W 15 Deltoid (shoulder) I . Gluteus Maximus (buttocks) V. Plan to increase flexibility. Stretching at the end of thigh) I Q. Remember, the key to achieving the greatest...
... equipment and learning the proper form for a weight loss workout. Rhomboideus (upper back) P. Spinae Erectors (lower back) K T. Gastrocnemius (back of sets and repetitions completed. List the date, the exercises performed, the weight used, and the numbers of calf) N O P Q R S T U V W 15 Deltoid (shoulder) I . Gluteus Maximus (buttocks) V. Plan to increase flexibility. Stretching at the end of thigh) I Q. Remember, the key to achieving the greatest...

English Manual
Page 16
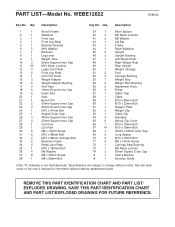
... Carriage Bolt (32) The number in parentheses below to see if it has been preattached. If a part is the key number of this manual. Note: Some small parts may have been pre-attached. PART IDENTIFICATION CHART Refer to the drawings below each drawing is not in the parts bag, check to identify small parts used in the center of the part, from the PART LIST in assembly.
... Carriage Bolt (32) The number in parentheses below to see if it has been preattached. If a part is the key number of this manual. Note: Some small parts may have been pre-attached. PART IDENTIFICATION CHART Refer to the drawings below each drawing is not in the parts bag, check to identify small parts used in the center of the part, from the PART LIST in assembly.
English Manual
Page 17
... Inner Cap 69 2 Long Spacer 70 4 M10 x 72mm Bolt 71 5 M4 x 16mm Screw 72 1 Carriage Stop Bushing 73 1 M8 Nylon Locknut 74 2 50mm Square Outer Cap # 1 User's Manual # 1 Exercise Guide Note: "#" indicates a non-illustrated part. WEBE12622 R0803A Key No. Specifications are subject to change without notice. REMOVE THIS PART IDENTIFICATION CHART AND PART LIST/ EXPLODED DRAWING. See the back cover of the user's manual for information about ordering replacement parts. Qty. PART LIST-Model No.
... Inner Cap 69 2 Long Spacer 70 4 M10 x 72mm Bolt 71 5 M4 x 16mm Screw 72 1 Carriage Stop Bushing 73 1 M8 Nylon Locknut 74 2 50mm Square Outer Cap # 1 User's Manual # 1 Exercise Guide Note: "#" indicates a non-illustrated part. WEBE12622 R0803A Key No. Specifications are subject to change without notice. REMOVE THIS PART IDENTIFICATION CHART AND PART LIST/ EXPLODED DRAWING. See the back cover of the user's manual for information about ordering replacement parts. Qty. PART LIST-Model No.

English Manual
Page 18
... 50 23 16 55 46 52 72 11 53 15 16 45 59 12 67 12 43 12 67 11 51 67 R0803A EXPLODED DRAWING-Model No.
... 50 23 16 55 46 52 72 11 53 15 16 45 59 12 67 12 43 12 67 11 51 67 R0803A EXPLODED DRAWING-Model No.
English Manual
Page 19
... (WEIDER® PRO 325 weight bench) • The SERIAL NUMBER of the product (see the front cover of this manual) • The KEY NUMBER and DESCRIPTION of the desired part(s) (see the PART LIST and the EXPLODED DRAWING in the center of this manual) LIMITED WARRANTY ICON Health & Fitness, Inc. (ICON), warrants this warranty is authorized by an ICON authorized service center; You may also have other warranty beyond that specifically set forth herein. ORDERING REPLACEMENT PARTS To order replacement parts...
... (WEIDER® PRO 325 weight bench) • The SERIAL NUMBER of the product (see the front cover of this manual) • The KEY NUMBER and DESCRIPTION of the desired part(s) (see the PART LIST and the EXPLODED DRAWING in the center of this manual) LIMITED WARRANTY ICON Health & Fitness, Inc. (ICON), warrants this warranty is authorized by an ICON authorized service center; You may also have other warranty beyond that specifically set forth herein. ORDERING REPLACEMENT PARTS To order replacement parts...


