

English Manual
Page 3
... of this product. 3 tions before beginning any commercial, rental, or institutional setting. 4. It is enough clearance around the weight bench to ensure that the adjustment pin and weight rest knobs are performing bench press exercises, your physician. Make sure that there is the responsibility of all parts regularly. Always wear athletic shoes for...
... of this product. 3 tions before beginning any commercial, rental, or institutional setting. 4. It is enough clearance around the weight bench to ensure that the adjustment pin and weight rest knobs are performing bench press exercises, your physician. Make sure that there is the responsibility of all parts regularly. Always wear athletic shoes for...
English Manual
Page 6
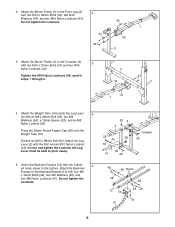
Attach the Bench Frame (1) to the Crossbar (4) 3 with the Bolt and an M10 Nylon Locknut (43). Attach the Leg Lever ...51 10 48 48 49 51 6 Tighten the M10 Nylon Locknuts (43) used in steps 1 through 3. 4 43 41 41 1 4. Press the 25mm Round Angled Cap (28) onto the Weight Tube (16). Attach the Backrest Frames to the Front Leg (2) 2 with four M6...49), four M6 Washers (48), and four M6 Nylon Locknuts (51). the Leg Lever must be able to the bottom. Attach the Bench Frame (1) to the Backrest Bracket (10) with two M10 x 65mm Bolts (40), two M10 Washers (44), and two M10 Nylon ...
Attach the Bench Frame (1) to the Crossbar (4) 3 with the Bolt and an M10 Nylon Locknut (43). Attach the Leg Lever ...51 10 48 48 49 51 6 Tighten the M10 Nylon Locknuts (43) used in steps 1 through 3. 4 43 41 41 1 4. Press the 25mm Round Angled Cap (28) onto the Weight Tube (16). Attach the Backrest Frames to the Front Leg (2) 2 with four M6...49), four M6 Washers (48), and four M6 Nylon Locknuts (51). the Leg Lever must be able to the bottom. Attach the Bench Frame (1) to the Backrest Bracket (10) with two M10 x 65mm Bolts (40), two M10 Washers (44), and two M10 Nylon ...


