Weider Gym 4000 Support and Manuals
Get Help and Manuals for this Weider item

View All Support Options Below
Free Weider Gym 4000 manuals!
Problems with Weider Gym 4000?
Ask a Question
Free Weider Gym 4000 manuals!
Problems with Weider Gym 4000?
Ask a Question
Popular Weider Gym 4000 Manual Pages
Uk Manual - Page 1
... our website at www.weslo.com
new products, prizes, fitness tips, and much more!
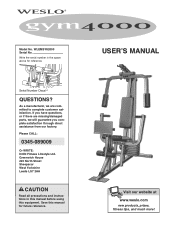
Serial Number Decal
QUESTIONS? Write the serial number in this manual before using this manual for reference.
Save this equipment. Greenwich House 223 North Street Sheepscar West Yorkshire Leeds LS7 2AA
CAUTION
Read all precautions and instructions in the space above...
Uk Manual - Page 2
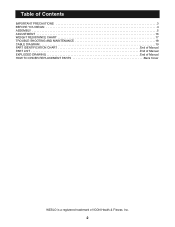
Table of Contents
IMPORTANT PRECAUTIONS 3 BEFORE YOU BEGIN 4 ASSEMBLY 5 ADJUSTMENT 16 WEIGHT RESISTANCE CHART 17 TROUBLE-SHOOTING AND MAINTENANCE 18 CABLE DIAGRAM 19 PART IDENTIFICATION CHART End of Manual PART LIST End of Manual EXPLODED DRAWING End of Manual HOW TO ORDER REPLACEMENT PARTS Back Cover
WESLO is a registered trademark of ICON Health & Fitness, Inc.
2
Uk Manual - Page 3
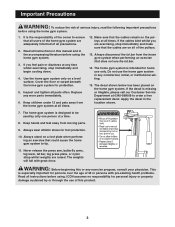
... gym system at a time.
8. ICON assumes no responsibility for personal injury or property
damage sustained by only one person at all instructions in this manual and...gym system.
3. The home gym system is missing or illegible, please call our Customer Service Department at any commercial, rental, or institutional setting.
15. Always stand on a level surface. Replace...
Uk Manual - Page 4
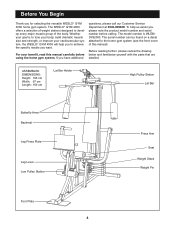
For your benefit, read this manual). If you for selecting the versatile WESLO® GYM 4000 home gym system. Before reading further, please review the drawing below and familiarise yourself with the parts that are labelled. Before You Begin
Thank you have additional
questions, please call our Customer Service Department at 0345-089009.
The serial number can be...
Uk Manual - Page 5
...parts bag, check to see if it has been pre-attached.
• As you assemble the home gym system, be more convenient if you have been preattached for each assembly stage to do not dispose of the packing materials until you assemble them, unless instructed to open -end or closed-end wrenches, or a set... the drawings.
• Tighten all parts of this manual.
do otherwise.
Uk Manual - Page 6
... pin grooves are on the Weight Bumpers (19). Do not tighten the
Nylon Locknuts yet.
42
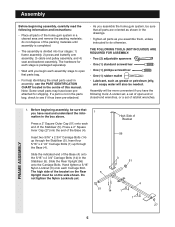
FRAME ASSEMBLY
3
4 1
3. Tighten all of the Top Frame (55).
Set two Weight Bumpers (19) onto the bracket on the Top Frame.
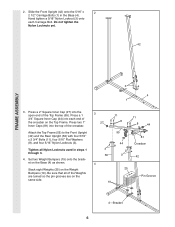
Uk Manual - Page 7

... (17).
7
Slide the Press Frame into the stack of the Weight Guides (62) to the Base (4) with the 5/16" x 6"
6
Bolt (60), two 1/2" x 3/4" Spacers (61), and a
5/16" Nylon Locknut (3).
The
Plastic Bushings should fit onto each welded spacer on the Base
(4).
Set the Top Weight onto the stack of the holes in the Base...
Uk Manual - Page 10
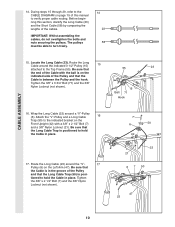
Before beginning this manual to verify proper cable routing. Attach the "V"-Pulley and a Long Cable
16
Trap (50) to hold the Cable in place.
17. Be sure that
the ...
Uk Manual - Page 15
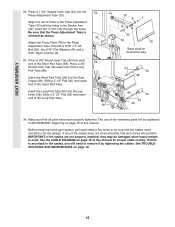
...installed...find and correct the problem. Insert the "L"-Pin... Tube (80). If one set of the Short Pad Tube...gym system, pull each end of the Short Pad Tube (28). Be sure that all parts...parts will need to remove it by tightening the cables. Make sure that the Press Adjustment Tube is any slack in ADJUSTMENT, beginning on page 16 of this manual for proper cable routing.
See TROUBLESHOOTING...
Uk Manual - Page 16
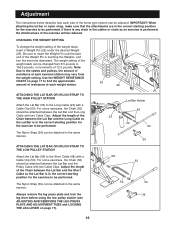
...is touching the Weights, and turn the bent end downward.
Adjustment
The instructions below describe how each part of the home gym system can be attached in the same manner. If there is any ...) to be attached between the Lat Bar and the Pulley Cable with a Cable Clip (53). The weight setting of the weight stack, insert a Weight Pin (26) under the desired Weight (25). For some exercises,...
Uk Manual - Page 17
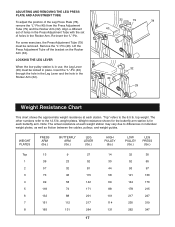
...at each weight station may vary due to differences in the Press Adjustment Tube with the set of the Leg Press Plate (78), remove the "L"-Pin (40) from the Press Adjustment Tube ...(79) and the Rocker Arm (32). Align a different set of holes in individual weight plates, as well as friction between the cables, pulleys, and weight guides.
The other numbers refer to the 6.5 lb. WEIGHT PLATES...
Uk Manual - Page 18
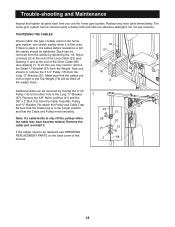
Trouble-shooting and Maintenance
Inspect and tighten all parts...install it is first used on the back cover of this you use solvents. To do this manual.
66
57
21
12
2
58
18 If the cables need to be cleaned using a damp cloth and mild non-abrasive detergent. Do not use the home gym...Cable (23) (see ORDERING REPLACEMENT PARTS on the home gym system, can be tightened....
Uk Manual - Page 23
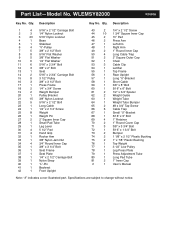
Qty. Specifications are subject to change without notice. Qty. Part List-Model No. Description
Key No. Description
1
4 5/16" x 2 ...3/8" x 8" Bolt
60
1 5/16" x 6" Bolt
61
2 1/2" x 3/4" Spacer
62
2 Weight Guide
63
1 Weight Tube
64
1 Weight Tube Bumper
65
2 #8 x 3/4" Tap Screw
66
6 Cable Trap...Manual
Note: "#" indicates a non-illustrated part. WLEMSY82000
R1000A
Key No.
Uk Manual - Page 24
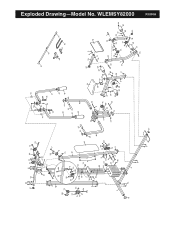
Exploded Drawing-Model No. WLEMSY82000 R1000A
11
27 8
55
11 15 12
44 15 71
8
81
23
7
74
50
3 56
66 15
21
2 10
57
12 58
3
5
21
...
Uk Manual - Page 25
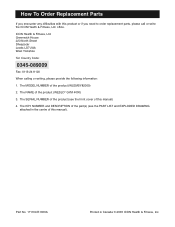
... the front cover of this manual)
4. ICON Health & Fitness, Ltd. The SERIAL NUMBER of the product (see the PART LIST and EXPLODED DRAWING attached in Canada © 2000 ICON Health & Fitness, Inc. The MODEL NUMBER of the product (WESLO® GYM 4000)
3.
Part No. 171109 R1000A
Printed in the centre of this manual). How To Order Replacement Parts
If you encounter any difficulties...
Weider Gym 4000 Reviews
We have not received any reviews for Weider yet.