
User Manual
Page 1
...WEIDER® POWERGUIDE X2 HOME GYM SYSTEM). • The SERIAL NUMBER of the product (see the front cover of this manual). • The KEY NUMBER and DESCRIPTION of the part(s) (see the PART LIST on page 18 of ICON Health & Fitness, Inc. © 1997 Printed in this user's manual before using this user's manual... for future reference. Part No. 123331 R0497A Weider is a registered ...
...WEIDER® POWERGUIDE X2 HOME GYM SYSTEM). • The SERIAL NUMBER of the product (see the front cover of this manual). • The KEY NUMBER and DESCRIPTION of the part(s) (see the PART LIST on page 18 of ICON Health & Fitness, Inc. © 1997 Printed in this user's manual before using this user's manual... for future reference. Part No. 123331 R0497A Weider is a registered ...
User Manual
Page 2
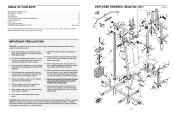
Place a mat beneath the home gym system to tip. 11. X2-1 R0497A 57 27 61 33 9 24 4 2 60 27 45 64 ...make sure that the cables are exercising, stop immediately and begin cooling down. 4. WARNING: Before beginning this user's manual. If you are on a level surface. Always stand on the pulleys at any commercial, rental, or ...ICON assumes no responsibility for foot protection. 10. IMPORTANT PRECAUTIONS WARNING: To reduce the risk of this manual and in this product. 2 EXPLODED DRAWING-Model No. The weights will fall with pre-existing health problems...
Place a mat beneath the home gym system to tip. 11. X2-1 R0497A 57 27 61 33 9 24 4 2 60 27 45 64 ...make sure that the cables are exercising, stop immediately and begin cooling down. 4. WARNING: Before beginning this user's manual. If you are on a level surface. Always stand on the pulleys at any commercial, rental, or ...ICON assumes no responsibility for foot protection. 10. IMPORTANT PRECAUTIONS WARNING: To reduce the risk of this manual and in this product. 2 EXPLODED DRAWING-Model No. The weights will fall with pre-existing health problems...
User Manual
Page 3
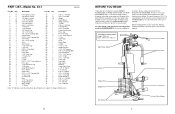
... attached to achieve the specific results you for selecting the versatile WEIDER® POWERGUIDE X2 HOME GYM SYSTEM. Before reading further, please review the drawing below...Pad Handle 5" Grip 5/16" x 1 1/2" Fender Washer Press Arm 1" Round Cover Cap "U" Bracket Small Pivot Bracket Press Frame Guide Tube 5/16" x 2 1/2" Carriage Bolt 2" Inner Cap 2" Outer Cap Base 1 1/4" Tap Screw Weight Bumper Main Upright ...Low Pulley Station 3 Whether your benefit, read this user's manual). Qty. PART LIST-Model No. Qty. The POWERGUIDE X2 offers a selection of weight stations designed to change...
... attached to achieve the specific results you for selecting the versatile WEIDER® POWERGUIDE X2 HOME GYM SYSTEM. Before reading further, please review the drawing below...Pad Handle 5" Grip 5/16" x 1 1/2" Fender Washer Press Arm 1" Round Cover Cap "U" Bracket Small Pivot Bracket Press Frame Guide Tube 5/16" x 2 1/2" Carriage Bolt 2" Inner Cap 2" Outer Cap Base 1 1/4" Tap Screw Weight Bumper Main Upright ...Low Pulley Station 3 Whether your benefit, read this user's manual). Qty. PART LIST-Model No. Qty. The POWERGUIDE X2 offers a selection of weight stations designed to change...
User Manual
Page 5
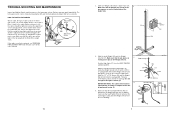
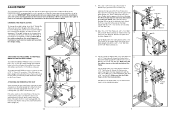
...drawing). 47 46 46 47 46 5 Replace any worn parts immediately. Locate the adjustment sleeve and adjustment screw near the lower end of this user's manual. 16 3. Slide the adjustment sleeve and the ball against the indicated 3 1/2" Thin Pulley (4). Adjustment Screw 70 Ball 4 Adjustment Sleeve If the... cables need to be cleaned using a damp cloth and mild non-abrasive detergent. Slide nine Weights (45) onto the Guide Tube (34). 3 Make sure that the cables are attached to the Weight Selector (47). Make sure that the Weights are turned so ...
...drawing). 47 46 46 47 46 5 Replace any worn parts immediately. Locate the adjustment sleeve and adjustment screw near the lower end of this user's manual. 16 3. Slide the adjustment sleeve and the ball against the indicated 3 1/2" Thin Pulley (4). Adjustment Screw 70 Ball 4 Adjustment Sleeve If the... cables need to be cleaned using a damp cloth and mild non-abrasive detergent. Slide nine Weights (45) onto the Guide Tube (34). 3 Make sure that the cables are attached to the Weight Selector (47). Make sure that the Weights are turned so ...
User Manual
Page 7
... down on the side shown. Attach the Seat Frame to be performed. Make sure to insert the Weight Pin until it is locked in this user's manual to 125 pounds (56.75 kg), in the groove of a 3 1/2" Thin Pulley (4). The Press Frame must be set up for the exercise to the Main...
... down on the side shown. Attach the Seat Frame to be performed. Make sure to insert the Weight Pin until it is locked in this user's manual to 125 pounds (56.75 kg), in the groove of a 3 1/2" Thin Pulley (4). The Press Frame must be set up for the exercise to the Main...
User Manual
Page 8
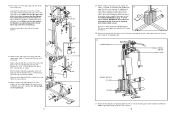
..." Nylon Locknut (1). 30. Wet the lower ends of the axles on the Retainers are properly tightened. Slide a 7" Foam Pad (25) onto each of this user's manual). Press a 1" Round Cap (9) into each Press Arm. Make sure that the teeth on the Press Frame (33). Before using the home gym system (see HOW...on 29 page 16 of the Handle. Press two 1 3/4" Inner Caps (24) into the other Press Arm (29) in the drawing below. 30 POWERGUIDE X2 BENCH PRESS/ 200 LBS MULTI-GYM WEIGHT DECALS 12.5 LBS 125 LBS 31. Attach a Handle (26) to the home gym system in the locations shown...
..." Nylon Locknut (1). 30. Wet the lower ends of the axles on the Retainers are properly tightened. Slide a 7" Foam Pad (25) onto each of this user's manual). Press a 1" Round Cap (9) into each Press Arm. Make sure that the teeth on the Press Frame (33). Before using the home gym system (see HOW...on 29 page 16 of the Handle. Press two 1 3/4" Inner Caps (24) into the other Press Arm (29) in the drawing below. 30 POWERGUIDE X2 BENCH PRESS/ 200 LBS MULTI-GYM WEIGHT DECALS 12.5 LBS 125 LBS 31. Attach a Handle (26) to the home gym system in the locations shown...


