Weider X2 Support and Manuals
Get Help and Manuals for this Weider item

Popular Weider X2 Manual Pages
Uk Manual - Page 1
... UK email: [email protected]
CAUTION
Read all precautions and instructions in the space above for future reference.
®
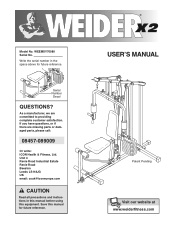
USERʼS MANUAL
Patent Pending
w Visit our website at
www.weiderfitness.com Serial Number Decal
QUESTIONS? As a manufacturer, we are missing parts or damaged parts, please call:
08457-089009
Or write: ICON Health & Fitness, Ltd...
Uk Manual - Page 2
®
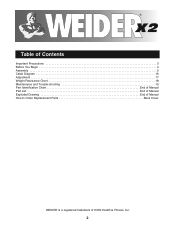
Table of Contents
Important Precautions 3 Before You Begin 4 Assembly 5 Cable Diagram 16 Adjustment 17 Weight Resistance Chart 18 Maintenance and Trouble-shooting 19 Part Identification Chart End of Manual Part List End of Manual Exploded Drawing End of Manual How to Order Replacement Parts Back Cover
WEIDER is a registered trademark of ICON Health & Fitness, Inc.
2
Uk Manual - Page 3
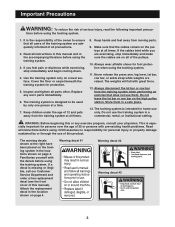
... beneath the training system for home use them in a commercial, rental, or institutional setting. ICON assumes no responsibility for persons over the age of 12 and pets away from the training system at a time.
7. The warning decals shown at all instructions before using the training system.
3. Make sure that does not use only. Attach the replacement decal...
Uk Manual - Page 4

... for selecting the versatile WEIDER® X2 Training System. The model number is to achieve the results you , please note the product model number and serial number before using the WEIDER® X2. Before reading further, please familiarise yourself with the parts that are labelled in the drawing below. Whether your benefit, read this manual). To help you to...
Uk Manual - Page 5
... assembly instructions, please call our Customer Service Department at 08457-089009. Make sure you identify the small parts used .
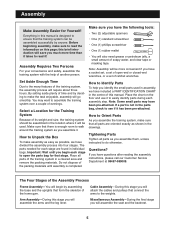
Assembly
Make Assembly Easier for each assembly step.
Note: Assembly will also need grease or petroleum jelly, a small amount of its weight and size, the training system should be more time than it . By setting aside...
Uk Manual - Page 8
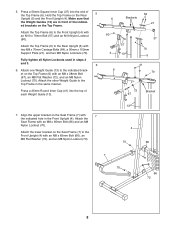
...front of the Top Frame (6). Press a 50mm Square Inner Cap (37) into the top of each Weight Guide (13).
64
6
Brackets
21
60
57
4
13
6
37
70 5
41 70
72 67
Bracket
7.
...Attach the
Seat Frame with two M8 x 70mm Carriage Bolts (64), a 50mm x 102mm Support Plate (21), and two M8 Nylon Locknuts (70).
Press a 25mm Round Inner Cap (41) into the end of...
Uk Manual - Page 9
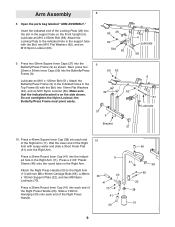
...37
6
51 Lubricate
10.
Attach the Right Press Handle (20) to the indicated holes in the support tube on the Front Upright (4). Make sure
39
62
that the indicated bracket is on the Right Arm...Insert the indicated end of the Right Arm (11). Do not overtighten the Nylon Locknut; Open the parts bag labelled "ARM ASSEMBLY." Lubricate an M10 x 65mm Bolt (58). Press two 50mm Square Inner ...
Uk Manual - Page 15
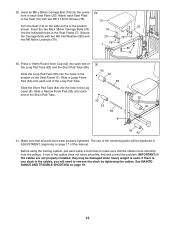
... (32) onto each end of the remaining parts will need to remove the slack by tightening...the cables move smoothly, find and correct the problem. Secure the Carriage Bolts with two M6 x...84
8
32 42
33 42
31. Before using the training system, pull each Seat Plate (23). Insert an ... that all parts have been properly tightened.
If one of this manual. See MAINTENANCE AND TROUBLE-SHOOTING on...
Uk Manual - Page 16
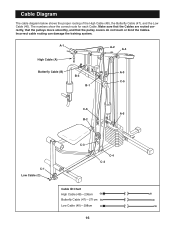
... below shows the proper routing of the High Cable (48), the Butterfly Cable (47), and the Low Cable (40). Incorrect cable routing can damage the training system. A-1 High Cable (A)
A-2 A-4
Butterfly Cable (B)
A-3
B-3
C-5 B-1
C-6 A-5
B-2
C-1 Low Cable (C)
C-3 C-4
C-2
Cable ID Chart High Cable (48)-236cm Butterfly Cable (47)-271cm Low Cable (40)-298cm
16
Make sure...
Uk Manual - Page 17
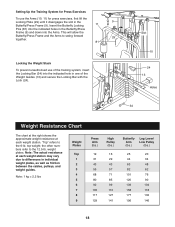
...instructions below describe how each part of the weight stack, insert the Weight Pin (75) under the desired Weight Plate (36). Changing the Weight Setting
To change the setting of the training system can be adjusted. The setting... vary from moving.
29 Slot 10
17 Refer to the exercise guide accompanying this manual to find the approximate amount of resistance at each exercise.
Adjust the...
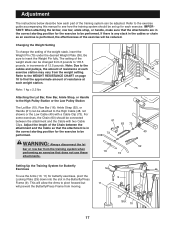
Uk Manual - Page 18
... until it disengages the slot in the
9
Butterfly/Press Frame (9). Setting Up the Training System for Press Exercises
To use of the training system, insert the Locking Bar (34) into the Arms. This ...indicated holes in the Butterfly/Press
Frame (9) and down into the indicated hole in one of the Weight Guides (13) and secure the Locking Bar with the Lock (24). the other numbers refer to the ...
Uk Manual - Page 19
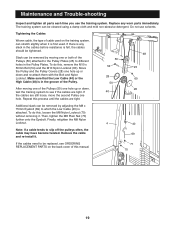
...a cable tends to see ORDERING REPLACEMENT PARTS on the training system, can be removed by adjusting...training system to slip off the pulleys often, the
cable may have become twisted. Remove the cable
69
and re-install it .
Slack can be tightened. To do this manual...training system.
Maintenance and Trouble-shooting
Inspect and tighten all parts each time you use solvents.
Uk Manual - Page 23
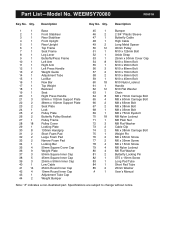
... Press Handle
13
2
Weight Guide
14
1
Adjustment Tube
15
1
Lat Bar
16
1
Row Bar
17
1
Top Weight
18
1
Backrest
19
1
Seat
20
1
Right Press Handle
21
3
50mm x 102mm Support Plate
22
2
38mm x 102mm Support Plate
23
2
Seat Plate...
84
1
Short Pad Tube
85
2
25mm Washer
#
1
Userʼs Manual
Note: "#" indicates a non-illustrated part. Part List-Model No. Qty.
Uk Manual - Page 24
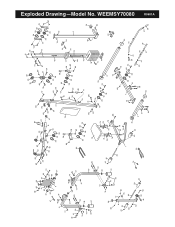
... 28
50 28
25 60
70 70
34
24
70
14
5
53 64
64 61
41 16 41
35 15
30
41 30
Exploded Drawing-Model No.
Uk Manual - Page 25
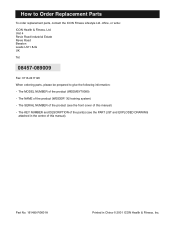
... be prepared to Order Replacement Parts
To order replacement parts, contact the ICON Fitness Lifestyle Ltd. How to give the following information:
• The MODEL NUMBER of the product (WEEMSY70080)
• The NAME of the product (WEIDER® X2 training system)
• The SERIAL NUMBER of the product (see the front cover of this manual)
• The KEY NUMBER...
Weider X2 Reviews
We have not received any reviews for Weider yet.