Weider Power Guide X2 Support and Manuals
Get Help and Manuals for this Weider item

View All Support Options Below
Free Weider Power Guide X2 manuals!
Problems with Weider Power Guide X2?
Ask a Question
Free Weider Power Guide X2 manuals!
Problems with Weider Power Guide X2?
Ask a Question
Popular Weider Power Guide X2 Manual Pages
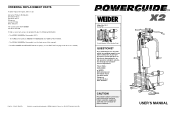
User Manual - Page 1
...LS7 2AA West Yorkshire
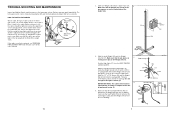
CAUTION
Read all precautions and instructions in the USA
home gym s
Model No. As a manufacturer, we will guarantee complete satisfaction through our Customer Service Department. Save this user's manual). Serial Number Decal (Under Seat)
QUESTIONS?
ORDERING REPLACEMENT PARTS
To order replacement parts, write or call:
Consumer Products Distribution Greenwich House...
User Manual - Page 2
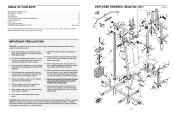
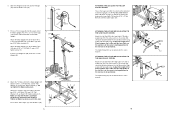
... reduce the risk of this user's manual. Read all parts often. Always stand on the pulleys at all instructions before using . Inspect and tighten all instructions in this product.
2
EXPLODED DRAWING-Model No. Keep children and pets away from the home gym system at all times. Always disconnect the lat bar from moving parts. If you are on a level...
User Manual - Page 3
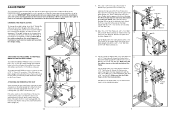
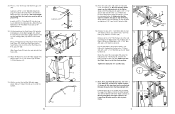
... WEIDER® POWERGUIDE X2 HOME GYM SYSTEM. If you to the POWERGUIDE X2 (see the front cover of the body.
ASSEMBLED DIMENSIONS: Height: 195,6 cm Base: 162,6 cm x 170,2 cm
Lat Bar
High Pulley Station
Press Arms
Backrest
Weight Stack Weight Pin
Foot Plates
Seat
Leg Lever Low Pulley Station 3
Specifications are labelled. For your benefit, read this user's manual...
User Manual - Page 4
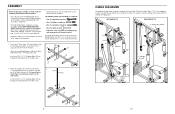
...POWERGUIDE X2 in a cleared area and remove the packing materials;
Note: Some small parts may have the following tools: A socket set, a set of open-end or closed-end wrenches, or a set...8226; Tighten all parts as grease or ...instructions:
• Place all parts...instructed to the two 5/16" x
2
2 1/2" Carriage Bolts (35) in the indicated locations. Attach the Guide Tube (34) to...
User Manual - Page 5
... be replaced, see ORDERING REPLACEMENT PARTS on the end of the
Guide Tube.
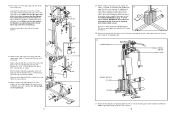
Insert the 5/16" x 2" Carriage Bolt (64) into the Weight Selector and through the eyelet on the back cover of the High Cable (71) inside the Weight Selector (47). Thread a 5/16" Nylon Locknut (1) onto the Carriage Bolt. Do not use the home gym system...
User Manual - Page 6
...) should be attached in the same manner. Slide the Weight Selector (47) and the Weight
6
(45) onto the Guide Tube (34).
34
Slot 45
Pin
47
Groove
7.
Attach the "V" Brace (42) to the Guide Tube (34) with two Cable Clips (57).
Attach the Main Upright (41) to the Base (38) with two...
User Manual - Page 7
... this user's manual to
insert the Weight Pin until it is on the Press Frame. ADJUSTMENT
The instructions below describe how each part of the home gym system can be changed from
the weight setting.
50... CHART accompanying this step have been pre-attached.
Make sure to see how the home gym system should be set up for the exercise to the Main Upright (41) with the 3/8" x 4...
User Manual - Page 8
...to one of this
user's manual).
IMPORTANT: If the cables are properly tightened. Make sure that the
cables move smoothly, locate and correct
the problem before using the home gym system, tighten the ...in the drawing below.
30 POWERGUIDE X2
BENCH PRESS/ 200 LBS
MULTI-GYM
WEIGHT DECALS 12.5 LBS
125 LBS
31. Make sure that all remaining parts will be damaged
when heavy weight...
User Manual - Page 9
...4
69
17. Lubricate the 5/16" x 3 1/4" Bolt (43). 25. Do not overtighten the Jam Nut; Set the bracket on the Seat Frame (18) onto the indicated pins on the indicated side of both Pad Tubes (22... (70) under the indicated 3 1/2" Thin Pulley (4), between the Spacer and the Pulley. Remove the parts from the indicated side. Press a 1 1/2" Inner Cap (19) into the Leg Lever (20).
Press...
User Manual - Page 11

... in assembly. "J" Pin (56)-1 4" Weight Pin (50)-1
4 1/2" "L" Pin (61)-2
Plastic Bushing (79)-2
1" Round Cap (9)-4
REMOVE THIS PART IDENTIFICATION CHART FROM THE MANUAL! This chart is provided to see if it has been preassembled.
Note: Some parts may have been preassembled for shipping purposes; Weight Bumper (40)-2
3/4" Round Cap (10)-4
1" Round Cover Cap (30...
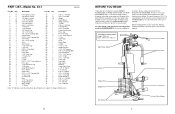
User Manual - Page 12
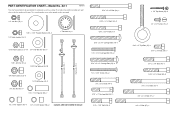
X2-1
RR00149977AA
This chart is provided to help you identify the small parts used in parenthesis below each part refers to the quantity used in assembly.
1/4" Jam Nut (75)-4
5/16" x 3 3/4" Bolt (49)-1 5/16" x 3 1/4" ...)-1 3/8" x 4 1/4" Bolt (77)-1 3/8" x 5" Bolt (67)-1 The number in assembly. The second number refers to the key number of the part. PART IDENTIFICATION CHART-Model No.
Weider Power Guide X2 Reviews
We have not received any reviews for Weider yet.