
English Manual
Page 1
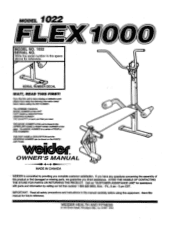
... missing parts, we guarantee you direct assistance. If you have ready the following information listed below before using this equipment Save this manual for future reference. THEMODEL NUMBER ofthis unitis foundIn the UPPERLEFT-HANDorRIGHT-HAND CORNER ofthis page. Call our 'CUSTOMER ASSISTANCE LINE' for reference. 00" O SERIAL NUMBER DECAL WAIT, READ THIS FIRST! MODEL 1022 FLEX MODEL NO. 1022 SERIAL NO. WEIDER HEALTH AND FITNESS 21100...
... missing parts, we guarantee you direct assistance. If you have ready the following information listed below before using this equipment Save this manual for future reference. THEMODEL NUMBER ofthis unitis foundIn the UPPERLEFT-HANDorRIGHT-HAND CORNER ofthis page. Call our 'CUSTOMER ASSISTANCE LINE' for reference. 00" O SERIAL NUMBER DECAL WAIT, READ THIS FIRST! MODEL 1022 FLEX MODEL NO. 1022 SERIAL NO. WEIDER HEALTH AND FITNESS 21100...
English Manual
Page 2
WBDER HEALTH and FITNESS TABLE OF CONTENTS Table of Contents Important Safety Precautions Introduction Unit Illustration Assembly Steps Maintenance Tips Parts List Ordering Parts 1 1 2 2 5-11 2 3 4 PAGE 1 IMPORTANT SAFETY PRECAUTIONS WARNING: To reduce the risk of the linking cable and adjust out excessive slack if it occurs. Inspect and tighten all instructions in this Owner's Guide. 3. Keep hands away from this equipment. 1. Check the tension of...
WBDER HEALTH and FITNESS TABLE OF CONTENTS Table of Contents Important Safety Precautions Introduction Unit Illustration Assembly Steps Maintenance Tips Parts List Ordering Parts 1 1 2 2 5-11 2 3 4 PAGE 1 IMPORTANT SAFETY PRECAUTIONS WARNING: To reduce the risk of the linking cable and adjust out excessive slack if it occurs. Inspect and tighten all instructions in this Owner's Guide. 3. Keep hands away from this equipment. 1. Check the tension of...

English Manual
Page 3
... the simple assembly, adjustments, and use of safe, enjoyable exercise. Please take the time to keep it also contains conditioning guides, maintenance tips, and parts information. Following an easy maintenance routine will help you many hours, of the Home Gym. Check all moving smoothly and to assembly instructions it for choosing the Weider FLEX 1000 HOME GYM. This manual is provided to see that they are tight and fitted properly. 2. Lubricate all...
... the simple assembly, adjustments, and use of safe, enjoyable exercise. Please take the time to keep it also contains conditioning guides, maintenance tips, and parts information. Following an easy maintenance routine will help you many hours, of the Home Gym. Check all moving smoothly and to assembly instructions it for choosing the Weider FLEX 1000 HOME GYM. This manual is provided to see that they are tight and fitted properly. 2. Lubricate all...

English Manual
Page 4
... CAP RUBBER FOOT - 1 1/2" X 3" PLASTIC FOOT 3/6" X 13/4" BEVELED PLASTIC SPACER PLASTIC BUMPER LARGE SPRING CUP - 3/4" SMALL SPRING CUP - 3/8" 3/6" X 4 1/2" ZINC PIN 3/8" X 31/4" ZINC PIN FLEX 1000 DECAL RESISTANCE SCALE DECAL ASSEMBLY MANUAL TRAINING MANUAL HARDWARE BAG (BOLT & NUTS) HARDWARE BAG (PLASTICS) QTY. FLEX BAND - BUTTERFLY ARM - DIAGRAM NO. 1 2 3 4 5 6 7 • 9 10 11 12 13 14 15 16 17 19 20 34 35 36 37 38 44...
... CAP RUBBER FOOT - 1 1/2" X 3" PLASTIC FOOT 3/6" X 13/4" BEVELED PLASTIC SPACER PLASTIC BUMPER LARGE SPRING CUP - 3/4" SMALL SPRING CUP - 3/8" 3/6" X 4 1/2" ZINC PIN 3/8" X 31/4" ZINC PIN FLEX 1000 DECAL RESISTANCE SCALE DECAL ASSEMBLY MANUAL TRAINING MANUAL HARDWARE BAG (BOLT & NUTS) HARDWARE BAG (PLASTICS) QTY. FLEX BAND - BUTTERFLY ARM - DIAGRAM NO. 1 2 3 4 5 6 7 • 9 10 11 12 13 14 15 16 17 19 20 34 35 36 37 38 44...
English Manual
Page 5
... product (FLEX 1000 HOME GYM) b. If you need parts or assistance do not return this information on front cover for one year if it becomes necessary to order replacement parts the following information to expedite your order by mail. John Street Olney, Illinois 62450 Weider provides replacement parts at 1-800-225-0653 Monday - Friday 8 a.m. - 5 p.m. Before ordering parts by calling our product service number: 1-800-225-0653. 3. Serial number of...
... product (FLEX 1000 HOME GYM) b. If you need parts or assistance do not return this information on front cover for one year if it becomes necessary to order replacement parts the following information to expedite your order by mail. John Street Olney, Illinois 62450 Weider provides replacement parts at 1-800-225-0653 Monday - Friday 8 a.m. - 5 p.m. Before ordering parts by calling our product service number: 1-800-225-0653. 3. Serial number of...
English Manual
Page 6
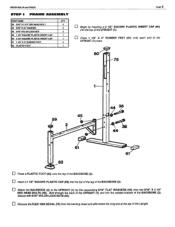
... 7, 75 • 1 • 45 • • 61 61 62 u Press a PLASTIC FOOT (62) onto the leg of the Upright. Bolt through the back of the UPRIGHT (1) and into the top of the leg of the BACKBONE (2). WBDER HEALTH and STRESS STEP I FRAME ASSEMBLY PART NAME 36 5/16" X 31/4" HEX HEAD BOLT 44 5/16" FLAT WASHER 45 5/16" NYLON LOCK NUT 59...
... 7, 75 • 1 • 45 • • 61 61 62 u Press a PLASTIC FOOT (62) onto the leg of the Upright. Bolt through the back of the UPRIGHT (1) and into the top of the leg of the BACKBONE (2). WBDER HEALTH and STRESS STEP I FRAME ASSEMBLY PART NAME 36 5/16" X 31/4" HEX HEAD BOLT 44 5/16" FLAT WASHER 45 5/16" NYLON LOCK NUT 59...
English Manual
Page 7
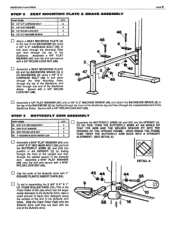
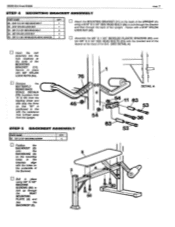
... of the end of the Butterfly Arm tubes. I :',117( :: : u 2 4 2 2 Assemble the BUTTERFLY ARMS (9) and (10) into position in assembling the 2 3/4" X 5" X 1" \ OB- WBDER HEALTH and FITNESS STEP 2 SEAT MOUNTING PLATE & BRACE ASSEMBLY PART NAME 46 1/4" X 2" CARRIAGE BOLT 47 1/4" FLAT WASHER 48 1/4" NYLON LOCK NUT 49 1/4" X 2" MACHINE SCREW QTY 2 2 3 1 O Attach a SEAT MOUNTING PLATE (4) to the rear of the BACKBONE (2) using a 1/4" X 2" CARRIAGE BOLT (46) to bolt down through the Mounting Plate and...
... of the end of the Butterfly Arm tubes. I :',117( :: : u 2 4 2 2 Assemble the BUTTERFLY ARMS (9) and (10) into position in assembling the 2 3/4" X 5" X 1" \ OB- WBDER HEALTH and FITNESS STEP 2 SEAT MOUNTING PLATE & BRACE ASSEMBLY PART NAME 46 1/4" X 2" CARRIAGE BOLT 47 1/4" FLAT WASHER 48 1/4" NYLON LOCK NUT 49 1/4" X 2" MACHINE SCREW QTY 2 2 3 1 O Attach a SEAT MOUNTING PLATE (4) to the rear of the BACKBONE (2) using a 1/4" X 2" CARRIAGE BOLT (46) to bolt down through the Mounting Plate and...
English Manual
Page 8
... (45). Remove the BUTTERFLY RESISTANCE SCALE DECALS (76) (numbers from the Upright. 76 45- WEIDER HEALTH and FITNESS PAGE 7 STEP 4 MOUNTING BRACKET ASSEMBLY PART NAME ' ' 36 5116" X 31/4" HEX HEAD BOLT 45 5/16' NYLON LOCK NUT 53 3/8" X 21/2" HEX HEAD BOLT 54 3/8' NYLON LOCK NUT 63 3/8" X 1 3/4" BEVELED PLASTIC SPACER QTY ' ' ' 1 1 2 2 2 Attach the MOUNTING BRACKET (11) to the back of the UPRIGHT (1) using 1/4' X 1/2" MACHINE SCREWS (50) to bolt up...
... (45). Remove the BUTTERFLY RESISTANCE SCALE DECALS (76) (numbers from the Upright. 76 45- WEIDER HEALTH and FITNESS PAGE 7 STEP 4 MOUNTING BRACKET ASSEMBLY PART NAME ' ' 36 5116" X 31/4" HEX HEAD BOLT 45 5/16' NYLON LOCK NUT 53 3/8" X 21/2" HEX HEAD BOLT 54 3/8' NYLON LOCK NUT 63 3/8" X 1 3/4" BEVELED PLASTIC SPACER QTY ' ' ' 1 1 2 2 2 Attach the MOUNTING BRACKET (11) to the back of the UPRIGHT (1) using 1/4' X 1/2" MACHINE SCREWS (50) to bolt up...
English Manual
Page 9
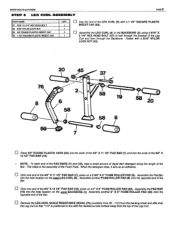
...WEIDER HEALTH and RTNESS STEP 6 LEG CURL ASSEMBLY PAGE PART NAME 37 5/16" X 2 1/4" HEX HEAD BOLT 45 5/16" NYLON LOCK NUT 58 3/4" ROUND PLASTIC INSERT CAP 59 11/2" SQUARE PLASTIC INSERT CAP QTY u Cap the end of the LEG CURL (6) with the resistance hole furthest away from the backing sheet and affix atop the Leg... CAP (59). 1 4 u Assemble the LEG CURL (6) to the BACKBONE (2) using a 5/16" X 1 2 1/4" HEX HEAD BOLT (37) to bolt through the Backbone. Assemble the PadBar Into the hole location on a 2" X 6" FOAM ROLLER PAD (20). u Onto one end of the Bar. Fasten with a 5/16" NYLON...
...WEIDER HEALTH and RTNESS STEP 6 LEG CURL ASSEMBLY PAGE PART NAME 37 5/16" X 2 1/4" HEX HEAD BOLT 45 5/16" NYLON LOCK NUT 58 3/4" ROUND PLASTIC INSERT CAP 59 11/2" SQUARE PLASTIC INSERT CAP QTY u Cap the end of the LEG CURL (6) with the resistance hole furthest away from the backing sheet and affix atop the Leg... CAP (59). 1 4 u Assemble the LEG CURL (6) to the BACKBONE (2) using a 5/16" X 1 2 1/4" HEX HEAD BOLT (37) to bolt through the Backbone. Assemble the PadBar Into the hole location on a 2" X 6" FOAM ROLLER PAD (20). u Onto one end of the Bar. Fasten with a 5/16" NYLON...
English Manual
Page 10
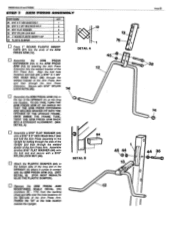
..., TURN THE ARM PRESS ARM AT AN ANGLE SO THAT THE ARM PRESS EXTENSION AND WELDED SPACER FIT INTO THE OPENING OF THE UPRIGHT FRAME. Attach the PLASTIC BUMPER (64) to the Upright by inserting the Arm Press Extension Into the welded bracket of the long slot in the UPRIGHT (1) where it comes in contact with a 5/16" NYLON LOCK NUT (45). WBDER HEALTH and FITNESS STEP 7 ARM PRESS ASSEMBLY PART NAME...
..., TURN THE ARM PRESS ARM AT AN ANGLE SO THAT THE ARM PRESS EXTENSION AND WELDED SPACER FIT INTO THE OPENING OF THE UPRIGHT FRAME. Attach the PLASTIC BUMPER (64) to the Upright by inserting the Arm Press Extension Into the welded bracket of the long slot in the UPRIGHT (1) where it comes in contact with a 5/16" NYLON LOCK NUT (45). WBDER HEALTH and FITNESS STEP 7 ARM PRESS ASSEMBLY PART NAME...
English Manual
Page 11
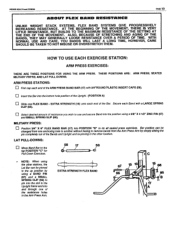
... Pull-Down Exercises. 58 17 1 'C NOTE: When using a 3/8" X 41/2' ZINC PIN (67) andSMALL SPRING SLIP (66). LAT PULL-DOWNS: u Move Band Bar to remove bands from the Arm Press Arm by simply sliding the pin completely out of the resistance holes In the Arm Press Arm. 1 ( _ 4. ) i_ + EXTRA STRENGTH FLEX BAND 61 65 13 0 1 15 65 17 A WELDER HEALTH and FITNESS PAGE 10 ABOUT FLEX BAND RESISTANCE UNLIKE WEIGHT STACK SYSTEMS, FLEX BAND...
... Pull-Down Exercises. 58 17 1 'C NOTE: When using a 3/8" X 41/2' ZINC PIN (67) andSMALL SPRING SLIP (66). LAT PULL-DOWNS: u Move Band Bar to remove bands from the Arm Press Arm by simply sliding the pin completely out of the resistance holes In the Arm Press Arm. 1 ( _ 4. ) i_ + EXTRA STRENGTH FLEX BAND 61 65 13 0 1 15 65 17 A WELDER HEALTH and FITNESS PAGE 10 ABOUT FLEX BAND RESISTANCE UNLIKE WEIGHT STACK SYSTEMS, FLEX BAND...
English Manual
Page 12
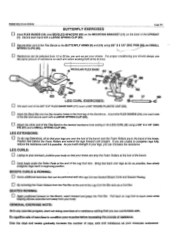
... of the Rex Bands to the desired resistance hole setting in the front leg of the knees. Over the days and weeks gradually increase the number of the Rex Band to the BUTTERFLY ARMS (9) and(10) using a 3/8" X 4 1/2" ZINC PIN (67) and a SMALL SPRING CLIP (66). WEIDER HEALTH and FITNESS BUTTERFLY EXERCISES PAGE 11 O Insert FLEX BANDS (16) onto BEVELED SPACERS (63) on...
... of the Rex Bands to the desired resistance hole setting in the front leg of the knees. Over the days and weeks gradually increase the number of the Rex Band to the BUTTERFLY ARMS (9) and(10) using a 3/8" X 4 1/2" ZINC PIN (67) and a SMALL SPRING CLIP (66). WEIDER HEALTH and FITNESS BUTTERFLY EXERCISES PAGE 11 O Insert FLEX BANDS (16) onto BEVELED SPACERS (63) on...


