
English Manual
Page 3
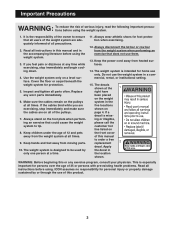
... all of the owner to ensure that could cause the weight system to tip. 8. Always stand on the foot plate when performing an exercise that all users of the weight system are on the front cover of serious injury, read the following important precautions before using the weight ...To reduce the risk of this manual to order a free replacement 2 decal. Cover the floor or carpet beneath the weight system for foot protection when exercising. 12. Make sure the cables remain on a level surface. Keep children under the age of 35 or persons with pre-existing health problems. Read...
... all of the owner to ensure that could cause the weight system to tip. 8. Always stand on the foot plate when performing an exercise that all users of the weight system are on the front cover of serious injury, read the following important precautions before using the weight ...To reduce the risk of this manual to order a free replacement 2 decal. Cover the floor or carpet beneath the weight system for foot protection when exercising. 12. Make sure the cables remain on a level surface. Keep children under the age of 35 or persons with pre-existing health problems. Read...
English Manual
Page 5
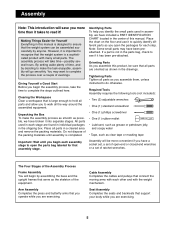
...Stages of the Assembly Process Frame Assembly You will begin by anyone. Seat Assembly Completes the seats and backrests that you operate while you are exercising. 5 Place the chart on the floor and use it to see if it is designed to complete the steps outlined here. If a part...to open the parts bag labeled for that assembly stage. Arm Assembly Completes the press and butterfly arms that support your body while you are exercising. Making Things Easier for each stage are oriented as clear tape or masking tape Important: Wait until assembly is a sophisticated product with the...
...Stages of the Assembly Process Frame Assembly You will begin by anyone. Seat Assembly Completes the seats and backrests that you operate while you are exercising. 5 Place the chart on the floor and use it to see if it is designed to complete the steps outlined here. If a part...to open the parts bag labeled for that assembly stage. Arm Assembly Completes the press and butterfly arms that support your body while you are exercising. Making Things Easier for each stage are oriented as clear tape or masking tape Important: Wait until assembly is a sophisticated product with the...
English Manual
Page 16
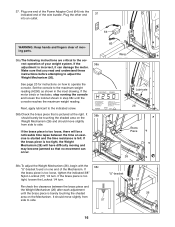
... is barely touching the shaded area on how to side. 57 57 26 16 It should barely be a noticeable time lapse between the time an exercise is started and the time resistance is too loose, tighten the indicated 3/8Ó Nylon Locknut (57) 1/4 turn . ÒUÓ-bracket Re-check the clearance between...
... is barely touching the shaded area on how to side. 57 57 26 16 It should barely be a noticeable time lapse between the time an exercise is started and the time resistance is too loose, tighten the indicated 3/8Ó Nylon Locknut (57) 1/4 turn . ÒUÓ-bracket Re-check the clearance between...
English Manual
Page 17
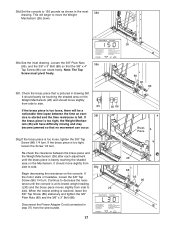
... have difficulty moving and may become jammed so that no movement can rotate freely. It should barely be a noticeable time lapse between the time an exercise is started and the time resistance is too loose, tighten the 3/8Ó Tap Screw (86) 1/4 turn. Re-check the clearance between the brass piece and...
... have difficulty moving and may become jammed so that no movement can rotate freely. It should barely be a noticeable time lapse between the time an exercise is started and the time resistance is too loose, tighten the 3/8Ó Tap Screw (86) 1/4 turn. Re-check the clearance between the brass piece and...
English Manual
Page 20
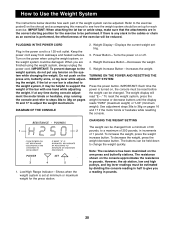
...: Each time the power is attached to the weight system, it may be adjusted. The buttons can be helpful to support the weight of the exercise will read ÒE---.Ó To reset the weight system, press the weight increase or decrease buttons until the display reads ÒH250Ó (maximum... increase button. Keep the power cord away from a minimum of 30 1 2 pounds, to a maximum of 250 pounds, in the correct starting position for the exercise to be set at any tension on , the console must be estimated by dividing the console reading in half to give you are in increments...
...: Each time the power is attached to the weight system, it may be adjusted. The buttons can be helpful to support the weight of the exercise will read ÒE---.Ó To reset the weight system, press the weight increase or decrease buttons until the display reads ÒH250Ó (maximum... increase button. Keep the power cord away from a minimum of 30 1 2 pounds, to a maximum of 250 pounds, in the correct starting position for the exercise to be set at any tension on , the console must be estimated by dividing the console reading in half to give you are in increments...
English Manual
Page 21
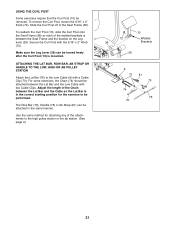
... Bar and the Cable so the Lat Bar is in the same manner. USING THE CURL POST Some exercises require that the Curl Post (10) be performed. To reattach the Curl Post (10), slide the ...the welded brackets is mounted. Slide the Curl Post off of the attachments to be removed. For some exercises, the Chain (74) should be attached in the correct starting position for attaching any of the Seat ...the Curl Post, loosen the 5/16Ó x 2Ó Knob (72). Use the same method for the exercise to the high pulley station or the ab station. (See page 4.) 72 36 10 Welded Brackets 29 9 73 ...
... Bar and the Cable so the Lat Bar is in the same manner. USING THE CURL POST Some exercises require that the Curl Post (10) be performed. To reattach the Curl Post (10), slide the ...the welded brackets is mounted. Slide the Curl Post off of the attachments to be removed. For some exercises, the Chain (74) should be attached in the correct starting position for attaching any of the Seat ...the Curl Post, loosen the 5/16Ó x 2Ó Knob (72). Use the same method for the exercise to the high pulley station or the ab station. (See page 4.) 72 36 10 Welded Brackets 29 9 73 ...
English Manual
Page 26
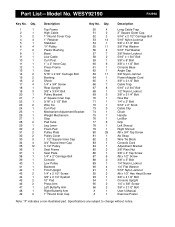
... 1/4Ó Flat Washer 5/16Ó Nylon Jamnut #8 x 1/2Ó Hex Head Screw 3/8Ó x 4 1/2Ó Bolt Console Upright 1/4Ó x 5/8Ó Screw 3/8Ó x 2 1/2Ó Bolt UserÕs Manual Exercise Poster Note: Ò#Ó indicates a non-illustrated part. Specifications are subject to change without notice.
... 1/4Ó Flat Washer 5/16Ó Nylon Jamnut #8 x 1/2Ó Hex Head Screw 3/8Ó x 4 1/2Ó Bolt Console Upright 1/4Ó x 5/8Ó Screw 3/8Ó x 2 1/2Ó Bolt UserÕs Manual Exercise Poster Note: Ò#Ó indicates a non-illustrated part. Specifications are subject to change without notice.


