
English Manual
Page 2
... year after discovery of enjoyment or use , operate, and maintain as a gift from our Customer Service Department; Limited Warranty WHAT IS COVEREDÑThe entire CLUB WEIDER 16.8ST Training System (ÒProductÓ) is limited in the Manual to the terms set out in the Manual; WHAT WE DO TO CORRECT COVERED DEFECTS...
... year after discovery of enjoyment or use , operate, and maintain as a gift from our Customer Service Department; Limited Warranty WHAT IS COVEREDÑThe entire CLUB WEIDER 16.8ST Training System (ÒProductÓ) is limited in the Manual to the terms set out in the Manual; WHAT WE DO TO CORRECT COVERED DEFECTS...

English Manual
Page 4
Before You Begin Thank you want. The CLUB WEIDER 16.8ST offers a selection of weight stations designed to develop every major muscle group of the training system. Mountain Time (excluding holidays). The model number is to ..., Monday through Friday, 6 a.m. The serial number can be found on a decal attached to achieve the results you for selecting the versatile CLUB WEIDER¨ 16.8ST training system. For your cardiovascular system, the CLUB WEIDER 16.8ST will help us assist you have additional yourself with the major parts of the body. Whether your goal is WESY69100. To...
Before You Begin Thank you want. The CLUB WEIDER 16.8ST offers a selection of weight stations designed to develop every major muscle group of the training system. Mountain Time (excluding holidays). The model number is to ..., Monday through Friday, 6 a.m. The serial number can be found on a decal attached to achieve the results you for selecting the versatile CLUB WEIDER¨ 16.8ST training system. For your cardiovascular system, the CLUB WEIDER 16.8ST will help us assist you have additional yourself with the major parts of the body. Whether your goal is WESY69100. To...
English Manual
Page 6
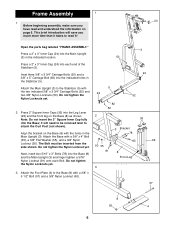
Press a 2Ó x 3Ó Inner Cap (24) into the Base (8) and the Main Upright (3) and finger tighten a 5/16Ó Nylon Locknut (81) onto each end of the Stabilizer (5). Open the parts bag labeled ÒFRAME ASSEMBLY.Ó Press a 2Ó x 3Ó Inner Cap (24)...yet. 2. Align the bracket on the Base (8) with the two indicated 3/8Ó x 3 3/4Ó Carriage Bolts (52) and two 3/8Ó Nylon Locknuts (50). Next, insert two 5/16Ó x 3Ó Bolts (78) into each Bolt. Attach the Main Upright (3) to the Stabilizer (5) with the holes in the Main Upright (3). The Bolt must be...
Press a 2Ó x 3Ó Inner Cap (24) into the Base (8) and the Main Upright (3) and finger tighten a 5/16Ó Nylon Locknut (81) onto each end of the Stabilizer (5). Open the parts bag labeled ÒFRAME ASSEMBLY.Ó Press a 2Ó x 3Ó Inner Cap (24)...yet. 2. Align the bracket on the Base (8) with the two indicated 3/8Ó x 3 3/4Ó Carriage Bolts (52) and two 3/8Ó Nylon Locknuts (50). Next, insert two 5/16Ó x 3Ó Bolts (78) into each Bolt. Attach the Main Upright (3) to the Stabilizer (5) with the holes in the Main Upright (3). The Bolt must be...
English Manual
Page 7
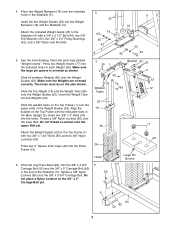
...; Bolts (45) into the Weights (26). Do not thread a Locknut onto the upper Bolt yet. 5 50 1 50 Bracket 45 33 3 Welded 60 12 Tubes 23 16 36 77 Attach the Weight Guides (23) to the Stabilizer (5) with a 3/8Ó x 2 1/2Ó Bolt (54), two 3/8Ó Flat Washers (55), two 5/8Ó x 1/2Ó Pulley...211; Nylon Locknuts (50). Insert the two Weight Guides (23) into the Press Frame (12). 26 Holes 26 Large Pin Groove 6. Slide the Top Weight (16) and the Weight Tube (36) onto the Weight Guides (23). Press two 2Ó Square Inner Caps (33) into the Weight Bumpers (19) and the ...
...; Bolts (45) into the Weights (26). Do not thread a Locknut onto the upper Bolt yet. 5 50 1 50 Bracket 45 33 3 Welded 60 12 Tubes 23 16 36 77 Attach the Weight Guides (23) to the Stabilizer (5) with a 3/8Ó x 2 1/2Ó Bolt (54), two 3/8Ó Flat Washers (55), two 5/8Ó x 1/2Ó Pulley...211; Nylon Locknuts (50). Insert the two Weight Guides (23) into the Press Frame (12). 26 Holes 26 Large Pin Groove 6. Slide the Top Weight (16) and the Weight Tube (36) onto the Weight Guides (23). Press two 2Ó Square Inner Caps (33) into the Weight Bumpers (19) and the ...

English Manual
Page 9
... Lever Lock must pivot easily. Tighten the Knob fully. Attach the Leg Lever Lock (11) to the Press Frame (12) 10 with a 5/16Ó x 3Ó Bolt (78), three 5/16Ó Flat Washers (80), and a 5/16Ó Nylon Locknut (81). Attach the Press Arm (46) to the front leg of the Press Arm (46).
... Lever Lock must pivot easily. Tighten the Knob fully. Attach the Leg Lever Lock (11) to the Press Frame (12) 10 with a 5/16Ó x 3Ó Bolt (78), three 5/16Ó Flat Washers (80), and a 5/16Ó Nylon Locknut (81). Attach the Press Arm (46) to the front leg of the Press Arm (46).
English Manual
Page 11
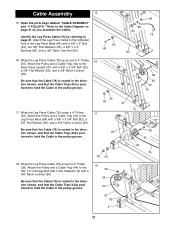
...; x 3Ó Bolt (45), two 3/8Ó Flat Washers (55), a 5/8Ó x 1/4Ó Bushing (90), and a 3/8Ó Nylon Jam Nut (63). 55 45 16. Wrap the Leg Press Cable (76) around a 4Ó Pulley 16 (35). Cable Assembly 15 15. Attach the Pulley and a Cable Trap (44) to the 3/8Ó x 5Ó Carriage Bolt (82) in the...
...; x 3Ó Bolt (45), two 3/8Ó Flat Washers (55), a 5/8Ó x 1/4Ó Bushing (90), and a 3/8Ó Nylon Jam Nut (63). 55 45 16. Wrap the Leg Press Cable (76) around a 4Ó Pulley 16 (35). Cable Assembly 15 15. Attach the Pulley and a Cable Trap (44) to the 3/8Ó x 5Ó Carriage Bolt (82) in the...
English Manual
Page 16
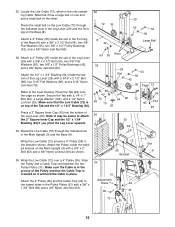
... the bottom of the Base (8) with a 3/8Ó x Holes 63 1 3/4Ó Bolt (60) and a 3/8Ó Nylon Jam Nut (63). 60 44 72 35 16 Locate the Low Cable (72), which is on the other. Wrap the Low Cable (72) over a 4Ó Pulley (35). Make sure the Cable is oriented...upward. 34. Slide the Pulley and a Cable Trap (44) between the two 35 Pulley Plates (31). Secure the Tab with a 5/16Ó x 2 1/2Ó Bolt (96), two 5/16Ó Flat Washers (80), and a 5/16Ó Nylon Jam Nut (79). Route the small ball on the Base (8). Attach the 1/2Ó x 1 3/4Ó Bushing (94...
... the bottom of the Base (8) with a 3/8Ó x Holes 63 1 3/4Ó Bolt (60) and a 3/8Ó Nylon Jam Nut (63). 60 44 72 35 16 Locate the Low Cable (72), which is on the other. Wrap the Low Cable (72) over a 4Ó Pulley (35). Make sure the Cable is oriented...upward. 34. Slide the Pulley and a Cable Trap (44) between the two 35 Pulley Plates (31). Secure the Tab with a 5/16Ó x 2 1/2Ó Bolt (96), two 5/16Ó Flat Washers (80), and a 5/16Ó Nylon Jam Nut (79). Route the small ball on the Base (8). Attach the 1/2Ó x 1 3/4Ó Bushing (94...

English Manual
Page 25
top weight. Weight Plates Top 1 2 3 4 5 6 7 8 9 10 11 12 13 14 15 16 17 18 19 Arm Press (lbs.) 24 35 46 57 68 79 90 102 113 124 135 146 157 168 179 190 201 213 224 ...
top weight. Weight Plates Top 1 2 3 4 5 6 7 8 9 10 11 12 13 14 15 16 17 18 19 Arm Press (lbs.) 24 35 46 57 68 79 90 102 113 124 135 146 157 168 179 190 201 213 224 ...
English Manual
Page 28
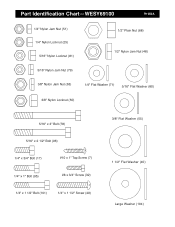
Part Identification ChartÑWESY69100 R1000A 1/4" Nylon Jam Nut (51) 1/4" Nylon Locknut (25) 5/16" Nylon Locknut (81) 1/2" Plain Nut (68) 1/2" Nylon Jam Nut (48) 5/16" Nylon Jam Nut (79) 3/8" Nylon Jam Nut (63) 1/4" Flat Washer (71) 5/16" Flat Washer (80) 3/8" Nylon Locknut (50) 5/16" x 3" Bolt (78) 5/16" x 2 1/2" Bolt (96) 1/4" x 3/4" Bolt (17) #10 x 1" Tap Screw (7) 1/4" x 1" Bolt (95) #8 x 3/4" Screw (32) 1/4" x 1 1/2" Bolt (101) 1/4" x 1 1/2" Screw (49) 3/8" Flat Washer (55) 1 1/2" Flat Washer (40) Large Washer (104)
Part Identification ChartÑWESY69100 R1000A 1/4" Nylon Jam Nut (51) 1/4" Nylon Locknut (25) 5/16" Nylon Locknut (81) 1/2" Plain Nut (68) 1/2" Nylon Jam Nut (48) 5/16" Nylon Jam Nut (79) 3/8" Nylon Jam Nut (63) 1/4" Flat Washer (71) 5/16" Flat Washer (80) 3/8" Nylon Locknut (50) 5/16" x 3" Bolt (78) 5/16" x 2 1/2" Bolt (96) 1/4" x 3/4" Bolt (17) #10 x 1" Tap Screw (7) 1/4" x 1" Bolt (95) #8 x 3/4" Screw (32) 1/4" x 1 1/2" Bolt (101) 1/4" x 1 1/2" Screw (49) 3/8" Flat Washer (55) 1 1/2" Flat Washer (40) Large Washer (104)
English Manual
Page 31
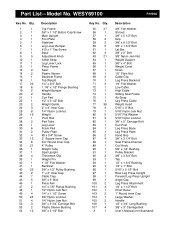
...1/4Ó Flat Washer Low Cable High Cable Sliding Seat Frame Ab Strap Leg Press Cable Weight Insert 5/16Ó x 3Ó Bolt 5/16Ó Nylon Jam Nut 5/16Ó Flat Washer 5/16Ó Nylon Locknut 3/8Ó x 5Ó Carriage Bolt Curl Post Leg Press Base Leg Press Plate... Bolt UserÕs Manual (not illustrated) Part ListÑModel No. Qty. 1 1 2 1 3 1 4 1 5 1 6 1 7 1 8 1 9 5 10 1 11 1 12 1 13 2 14 2 15 1 16 1 17 22 18 6 19 2 20 2 21 1 22 1 23 2 24 3 25 8 26 19 27 1 28 2 29 1 30 6 31 2 32 4 33 12 34 6 35 21 36 1 37...
...1/4Ó Flat Washer Low Cable High Cable Sliding Seat Frame Ab Strap Leg Press Cable Weight Insert 5/16Ó x 3Ó Bolt 5/16Ó Nylon Jam Nut 5/16Ó Flat Washer 5/16Ó Nylon Locknut 3/8Ó x 5Ó Carriage Bolt Curl Post Leg Press Base Leg Press Plate... Bolt UserÕs Manual (not illustrated) Part ListÑModel No. Qty. 1 1 2 1 3 1 4 1 5 1 6 1 7 1 8 1 9 5 10 1 11 1 12 1 13 2 14 2 15 1 16 1 17 22 18 6 19 2 20 2 21 1 22 1 23 2 24 3 25 8 26 19 27 1 28 2 29 1 30 6 31 2 32 4 33 12 34 6 35 21 36 1 37...
English Manual
Page 33
...-3756, Monday through Friday, 6 a.m. Part No. 168645 R1000A Printed in the center of ICON Health & Fitness, Inc. Mountain Time (excluding holidays). until 6 p.m. Weider¨ is a registered trademark of this manual) ¥ The KEY NUMBER and DESCRIPTION of the part(s) (see the PART LIST and EXPLODED DRAWING attached in..., please be prepared to give the following information: ¥ The MODEL NUMBER of the product (WESY69100) ¥ The NAME of the product (CLUB WEIDER¨ 16.8ST training system) ¥ The SERIAL NUMBER of the product (see the front cover of this manual).
...-3756, Monday through Friday, 6 a.m. Part No. 168645 R1000A Printed in the center of ICON Health & Fitness, Inc. Mountain Time (excluding holidays). until 6 p.m. Weider¨ is a registered trademark of this manual) ¥ The KEY NUMBER and DESCRIPTION of the part(s) (see the PART LIST and EXPLODED DRAWING attached in..., please be prepared to give the following information: ¥ The MODEL NUMBER of the product (WESY69100) ¥ The NAME of the product (CLUB WEIDER¨ 16.8ST training system) ¥ The SERIAL NUMBER of the product (see the front cover of this manual).