

Uk Manual
Page 2
TABLE OF CONTENTS IMPORTANT PRECAUTIONS 3 BEFORE YOU BEGIN 4 ASSEMBLY 5 ADJUSTMENTS 21 TROUBLESHOOTING AND MAINTENANCE 24 CABLE DIAGRAMS 25 EXERCISE GUIDELINES 26 ORDERING REPLACEMENT PARTS Back Cover Note: A PART IDENTIFICATION CHART and a PART LIST/EXPLODED DRAWING are attached in the centre of ICON Health & Fitness, Inc. 2 Remove the PART IDENTIFICATION CHART and PART LIST/EXPLODED DRAWING before beginning assembly. WEIDER is a registered trademark of this manual.
TABLE OF CONTENTS IMPORTANT PRECAUTIONS 3 BEFORE YOU BEGIN 4 ASSEMBLY 5 ADJUSTMENTS 21 TROUBLESHOOTING AND MAINTENANCE 24 CABLE DIAGRAMS 25 EXERCISE GUIDELINES 26 ORDERING REPLACEMENT PARTS Back Cover Note: A PART IDENTIFICATION CHART and a PART LIST/EXPLODED DRAWING are attached in the centre of ICON Health & Fitness, Inc. 2 Remove the PART IDENTIFICATION CHART and PART LIST/EXPLODED DRAWING before beginning assembly. WEIDER is a registered trademark of this manual.
Uk Manual
Page 11
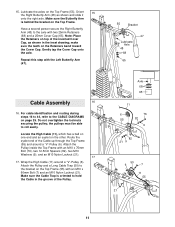
...with the Left Butterfly Arm (47). Repeat this step with two 25mm Retainers (68) and a 25mm Cover Cap (65). Route the eyelet end of the Cable up through the Top Frame (55) and around a "V"-Pulley (6). Make sure the Butterfly Arm is oriented to the bracket on the Top Frame (55)... 21 11 For cable identification and routing during steps 16 to 44, refer to roll easily. Attach the Pulley and a Long Cable Trap (50) to hold the Cable in the inset drawing; Cable Assembly 16 16. Lubricate the axles on page 25. the pulleys must be able to the CABLE DIAGRAMS on the Top ...
...with the Left Butterfly Arm (47). Repeat this step with two 25mm Retainers (68) and a 25mm Cover Cap (65). Route the eyelet end of the Cable up through the Top Frame (55) and around a "V"-Pulley (6). Make sure the Butterfly Arm is oriented to the bracket on the Top Frame (55)... 21 11 For cable identification and routing during steps 16 to 44, refer to roll easily. Attach the Pulley and a Long Cable Trap (50) to hold the Cable in the inset drawing; Cable Assembly 16 16. Lubricate the axles on page 25. the pulleys must be able to the CABLE DIAGRAMS on the Top ...
Uk Manual
Page 20
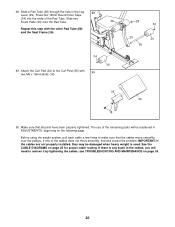
Press two 19mm Round Inner Caps (34) into the ends of the cables does not move smoothly over the pulleys. See the CABLE DIAGRAMS on the following page. Slide a Pad Tube (28) through the hole in the cables, you will be damaged when heavy weight is any slack in the Leg 48 Lever ... to make sure that all parts have been properly tightened. IMPORTANT: If the cables are not properly installed, they may be explained in ADJUSTMENTS, beginning on page 25 for proper cable routing. Make sure that the cables move smoothly, find and correct the problem. If one of the Pad Tube....
Press two 19mm Round Inner Caps (34) into the ends of the cables does not move smoothly over the pulleys. See the CABLE DIAGRAMS on the following page. Slide a Pad Tube (28) through the hole in the cables, you will be damaged when heavy weight is any slack in the Leg 48 Lever ... to make sure that all parts have been properly tightened. IMPORTANT: If the cables are not properly installed, they may be explained in ADJUSTMENTS, beginning on page 25 for proper cable routing. Make sure that the cables move smoothly, find and correct the problem. If one of the Pad Tube....

Uk Manual
Page 25
... Cable (11) 3 Low Cable (69) 8 4 6 4 7 2 5 1 7 1 2 3 5 Carriage Cable (83) Cable ID Chart High Cable (11); 2.86m Weight Cable (23); 3.69m Low Cable (69); 3.73m Carriage Cable (83); 7.3m 25 Make sure that the cables and the cable traps have not been correctly routed, the weight system will not function properly and damage may occur. If the cables have been assembled correctly. CABLE DIAGRAMS The cable diagrams...
... Cable (11) 3 Low Cable (69) 8 4 6 4 7 2 5 1 7 1 2 3 5 Carriage Cable (83) Cable ID Chart High Cable (11); 2.86m Weight Cable (23); 3.69m Low Cable (69); 3.73m Carriage Cable (83); 7.3m 25 Make sure that the cables and the cable traps have not been correctly routed, the weight system will not function properly and damage may occur. If the cables have been assembled correctly. CABLE DIAGRAMS The cable diagrams...


