

English Manual
Page 2
TABLE OF CONTENTS IMPORTANT PRECAUTIONS 3 BEFORE YOU BEGIN 4 ASSEMBLY 5 ADJUSTMENT 15 WEIGHT RESISTANCE CHART 17 TROUBLE-SHOOTING AND MAINTENANCE 18 CABLE DIAGRAM 19 EXERCISE GUIDELINES 20 PART LIST 22 EXPLODED DRAWING 23 ORDERING REPLACEMENT PARTS Back Cover FULL 90 DAY WARRANTY Back Cover Note: A PART IDENTIFICATION CHART is attached in the center of this manual. Remove the PART IDENTIFICATION CHART before beginning assembly. 2
TABLE OF CONTENTS IMPORTANT PRECAUTIONS 3 BEFORE YOU BEGIN 4 ASSEMBLY 5 ADJUSTMENT 15 WEIGHT RESISTANCE CHART 17 TROUBLE-SHOOTING AND MAINTENANCE 18 CABLE DIAGRAM 19 EXERCISE GUIDELINES 20 PART LIST 22 EXPLODED DRAWING 23 ORDERING REPLACEMENT PARTS Back Cover FULL 90 DAY WARRANTY Back Cover Note: A PART IDENTIFICATION CHART is attached in the center of this manual. Remove the PART IDENTIFICATION CHART before beginning assembly. 2
English Manual
Page 5
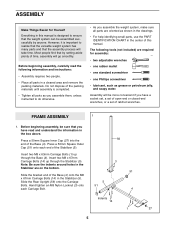
...the indents around holes in the Stabilizer are oriented as shown in the drawings. • For help identifying small parts, use the PART IDENTIFICATION CHART in the center of this manual is important to do otherwise. • As you have a socket set, a set of open-end ...bracket end of the Stabilizer (5). Insert two M8 x 67mm Carriage Bolts (14) up through the Stabilizer (5). Most people find that you assemble the weight system, make sure all parts are on the bottom. Do not dispose of ratchet wrenches. The following information and instructions: • Assembly requires ...
...the indents around holes in the Stabilizer are oriented as shown in the drawings. • For help identifying small parts, use the PART IDENTIFICATION CHART in the center of this manual is important to do otherwise. • As you have a socket set, a set of open-end ...bracket end of the Stabilizer (5). Insert two M8 x 67mm Carriage Bolts (14) up through the Stabilizer (5). Most people find that you assemble the weight system, make sure all parts are on the bottom. Do not dispose of ratchet wrenches. The following information and instructions: • Assembly requires ...

English Manual
Page 15
...exercise is in the same manner. The accessories can be reduced. Refer to the exercise guide accompanying this manual to see how the weight system should be attached in the correct starting position for each exercise. Make sure that the attachments are pushed against the stops. ...TO A PULLEY STATION Attach the Lat Bar (54) to be performed. Use the WEIGHT RESISTANCE CHART on page 17 to your workout, slide an equal amount of weight (not included) onto each side of the weight tube on the weight carriage. ADJUSTMENT The instructions below describe how each part of the...
...exercise is in the same manner. The accessories can be reduced. Refer to the exercise guide accompanying this manual to see how the weight system should be attached in the correct starting position for each exercise. Make sure that the attachments are pushed against the stops. ...TO A PULLEY STATION Attach the Lat Bar (54) to be performed. Use the WEIGHT RESISTANCE CHART on page 17 to your workout, slide an equal amount of weight (not included) onto each side of the weight tube on the weight carriage. ADJUSTMENT The instructions below describe how each part of the...

English Manual
Page 17
WEIGHT RESISTANCE CHART This chart shows the approximate weight resistance at each station may vary due to the amount of weight, in pounds, placed on the weight carriage. The column labeled "WEIGHT" refers to friction between the cables, pulleys, and weight carriage. The weight resistance shown for the butterfly arm station is for each weight station. WEIGHT 0 5 10 15 20 25 30...
WEIGHT RESISTANCE CHART This chart shows the approximate weight resistance at each station may vary due to the amount of weight, in pounds, placed on the weight carriage. The column labeled "WEIGHT" refers to friction between the cables, pulleys, and weight carriage. The weight resistance shown for the butterfly arm station is for each weight station. WEIGHT 0 5 10 15 20 25 30...

English Manual
Page 20
...sets of 8 repetitions for several exercises, and a list of the muscles affected. Exhale during the return stroke. Select a moderate amount of weight and increase the number of repetitions in any time while exercising, stop immediately and begin cooling down. WARMING UP Begin each set . Refer to... the muscle chart on page 21 to find photographs showing the correct form for each exercise, and moving only the appropriate parts of the body. formed....
...sets of 8 repetitions for several exercises, and a list of the muscles affected. Exhale during the return stroke. Select a moderate amount of weight and increase the number of repetitions in any time while exercising, stop immediately and begin cooling down. WARMING UP Begin each set . Refer to... the muscle chart on page 21 to find photographs showing the correct form for each exercise, and moving only the appropriate parts of the body. formed....

English Manual
Page 21
...• Rest for 30 seconds after each set for a toning work- Move slowly as you stretch and do not bounce. MUSCLE CHART A. Abductor (outer thigh) D H. Rhomboideus (upper back) P. Spinae Erectors (lower back) K T. Ease into each exercise. ... the end of every month. Quadriceps (front of thigh) I Q. Trapezius (upper back) H O. Gluteus Maximus (buttocks) V. Include stretches for both your weight and key body measurements at the end of each workout. Record your arms and legs. Obliques (waist) E. Pectoralis Major (chest) A C. Gluteus Medius (...
...• Rest for 30 seconds after each set for a toning work- Move slowly as you stretch and do not bounce. MUSCLE CHART A. Abductor (outer thigh) D H. Rhomboideus (upper back) P. Spinae Erectors (lower back) K T. Ease into each exercise. ... the end of every month. Quadriceps (front of thigh) I Q. Trapezius (upper back) H O. Gluteus Maximus (buttocks) V. Include stretches for both your weight and key body measurements at the end of each workout. Record your arms and legs. Obliques (waist) E. Pectoralis Major (chest) A C. Gluteus Medius (...


