
User Manual
Page 1
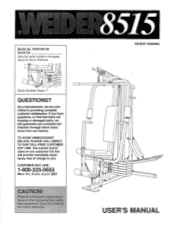
Read all precautions and instructions in the space above for futUre' reference. 8515 PATENT PENDING ) 00 00 0 USER'S MANUAL WESY85150 Serial No. Write the serial number in this manual before using this manual for future reference. 0 0 0 Serial Number Decal QUESTIONS? TO AVOID UNNECESSARY DELAYS, PLEASE CALL DIRECT TO OUR TOLL-FREE CUSTOMER HOT LINE. CUSTOMER...
Read all precautions and instructions in the space above for futUre' reference. 8515 PATENT PENDING ) 00 00 0 USER'S MANUAL WESY85150 Serial No. Write the serial number in this manual before using this manual for future reference. 0 0 0 Serial Number Decal QUESTIONS? TO AVOID UNNECESSARY DELAYS, PLEASE CALL DIRECT TO OUR TOLL-FREE CUSTOMER HOT LINE. CUSTOMER...

User Manual
Page 2
... to replacing or repairing, at ICON's option, the product at one of its authorized service centers. LIMITED WARRANTY ICON Health & Fitness, Inc. (ICON), warrants this manual. This warranty extends only to any and all freight and other transportation charges prepaid, accompanied by sufficient proof of incidental or consequential damages. ICON is...
... to replacing or repairing, at ICON's option, the product at one of its authorized service centers. LIMITED WARRANTY ICON Health & Fitness, Inc. (ICON), warrants this manual. This warranty extends only to any and all freight and other transportation charges prepaid, accompanied by sufficient proof of incidental or consequential damages. ICON is...
User Manual
Page 3
... or through the use of this or any exercise program, consult your physician. Always stand on all times. inspect and tighten all instructions in this manual and in the accompanying literature before using the home gym system. Always disconnect the lat bar from the home avm system when performing an exercise...
... or through the use of this or any exercise program, consult your physician. Always stand on all times. inspect and tighten all instructions in this manual and in the accompanying literature before using the home gym system. Always disconnect the lat bar from the home avm system when performing an exercise...
User Manual
Page 4
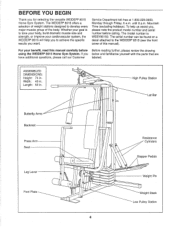
... specific results you , please note the product model number and serial number before Before reading further, please review the drawing using the WEIDER® 8515 Home Gym System. until 6 p.m. Mountain Time (excluding holidays). The serial number can be found on a decal attached to develop... every major muscle group of this manual carefully before calling. If you for selecting the versatile WEIDER® 8515 Home Gym System. BEFORE YOU BEGIN Thank you below and familiarize yourself with the parts that are...
... specific results you , please note the product model number and serial number before Before reading further, please review the drawing using the WEIDER® 8515 Home Gym System. until 6 p.m. Mountain Time (excluding holidays). The serial number can be found on a decal attached to develop... every major muscle group of this manual carefully before calling. If you for selecting the versatile WEIDER® 8515 Home Gym System. BEFORE YOU BEGIN Thank you below and familiarize yourself with the parts that are...
User Manual
Page 5
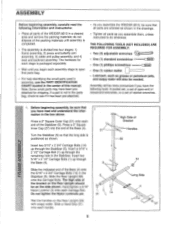
...(5) so that parts bag. • For help identifying the small parts used in assembly, use the PART IDENTIFICATION CHART located in the center of this manual. Do not tighten the Nylon Locknuts yet. Wet the handles on the side shown. Slide a Hand Grip (31) onto each end of the Stabilizer (5).... (56) with soapy water. Assembly will also be sure that all parts are oriented as shown in the drawings. • Tighten all parts of the WEIDER 8515 in the box above. Before beginning assembly, be needed. Press a 2" Square Outer Cap (51) onto each handle. 3 5 51 14 51 Or Long Side ,4 •...
...(5) so that parts bag. • For help identifying the small parts used in assembly, use the PART IDENTIFICATION CHART located in the center of this manual. Do not tighten the Nylon Locknuts yet. Wet the handles on the side shown. Slide a Hand Grip (31) onto each end of the Stabilizer (5).... (56) with soapy water. Assembly will also be sure that all parts are oriented as shown in the drawings. • Tighten all parts of the WEIDER 8515 in the box above. Before beginning assembly, be needed. Press a 2" Square Outer Cap (51) onto each handle. 3 5 51 14 51 Or Long Side ,4 •...
User Manual
Page 10
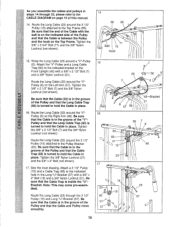
... the Cable is in the groove of the Pulley and that the Cable is between the Pulley and the hook on page 19 of this manual. 14. Tighten the 3/8" x 3 3/4" Bolt (71) and the 3/8" Nylon Locknut (not shown). 15. CO) Pulley and that the Cable Trap (66) is turned to the indicated...
... the Cable is in the groove of the Pulley and that the Cable is between the Pulley and the hook on page 19 of this manual. 14. Tighten the 3/8" x 3 3/4" Bolt (71) and the 3/8" Nylon Locknut (not shown). 15. CO) Pulley and that the Cable Trap (66) is turned to the indicated...
User Manual
Page 14
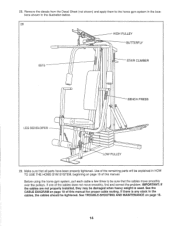
... home gym system, pull each cable a few times to the home gym system in the locations shown in the illustration below. 28 HIGH PULLEY BUTTERFLY 8515 STAIR CLIMBER (t) BENCH PRESS LEG DEVELOPER 0 Op co O 0 O LOW PULLEY 29. 28. IMPORTANT: If the cables are not properly installed, they may be damaged when... heavy weight is any slack in HOW TO USE THE HOME GYM SYSTEM, beginning on page 19 of this manual for proper cable routing. See the CABLE DIAGRAM on page 15 of this manual. If there is used. If one of the remaining parts will be sure that all parts have been...
... home gym system, pull each cable a few times to the home gym system in the locations shown in the illustration below. 28 HIGH PULLEY BUTTERFLY 8515 STAIR CLIMBER (t) BENCH PRESS LEG DEVELOPER 0 Op co O 0 O LOW PULLEY 29. 28. IMPORTANT: If the cables are not properly installed, they may be damaged when... heavy weight is any slack in HOW TO USE THE HOME GYM SYSTEM, beginning on page 19 of this manual for proper cable routing. See the CABLE DIAGRAM on page 15 of this manual. If there is used. If one of the remaining parts will be sure that all parts have been...
User Manual
Page 15
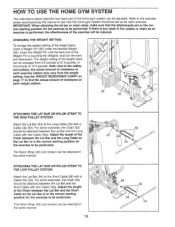
... describe how each part of the Weight Pin is touching the Weights, and turn the bent end downward. Refer to the exercise poster accompanying this manual to the Short Cable (58) with a Cable Clip (53). Insert the Weight Pin until the bent end of the home gym system can be performed...
... describe how each part of the Weight Pin is touching the Weights, and turn the bent end downward. Refer to the exercise poster accompanying this manual to the Short Cable (58) with a Cable Clip (53). Insert the Weight Pin until the bent end of the home gym system can be performed...
User Manual
Page 18
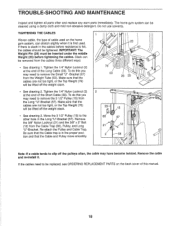
... the 3/8" Nylon Locknut (21) and the 3/8" x 2" Bolt (12) from the Long "U"-Bracket (57). The home gym system can stretch slightly when it . To do this manual. 18 If the cables need to be removed from the Weight Tube (63). Slack can be replaced, see ORDERING REPLACEMENT PARTS on the home gym...
... the 3/8" Nylon Locknut (21) and the 3/8" x 2" Bolt (12) from the Long "U"-Bracket (57). The home gym system can stretch slightly when it . To do this manual. 18 If the cables need to be removed from the Weight Tube (63). Slack can be replaced, see ORDERING REPLACEMENT PARTS on the home gym...


