

User Manual
Page 2
... not apply to you. TABLE OF CONTENTS LIMITED WARRANTY IMPORTANT PRECAUTIONS BEFORE YOU BEGIN ASSEMBLY HOW TO USE THE HOME GYM SYSTEM TROUBLESHOOTING AND MAINTENANCE CABLE DIAGRAM ORDERING REPLACEMENT PARTS 2 3 4 5 15 18 19 Back Cover Note: A PART IDENTIFICATION CHART and a PART LIST/EXPLODED DRAWING are attached to the center of this product...
... not apply to you. TABLE OF CONTENTS LIMITED WARRANTY IMPORTANT PRECAUTIONS BEFORE YOU BEGIN ASSEMBLY HOW TO USE THE HOME GYM SYSTEM TROUBLESHOOTING AND MAINTENANCE CABLE DIAGRAM ORDERING REPLACEMENT PARTS 2 3 4 5 15 18 19 Back Cover Note: A PART IDENTIFICATION CHART and a PART LIST/EXPLODED DRAWING are attached to the center of this product...
User Manual
Page 10
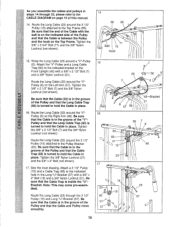
...See the inset drawing. ILI Pulley (6) on page 19 of the "V"- As you assemble the cables and pulleys in steps 14 through the 3 1/2" Pulley (15) and Long "U"-Bracket (57). Route the Long Cable (23) around the 3 1/2" Pulley (15) attached to the Pulley Bracket (20). Tighten ...(7) and a 3/8" Nylon Locknut (21). Be sure that the Cable is inside the "U"Bracket. Tighten the 3/8" Nylon Locknut (21) and the 3/8" x 2" Bolt (not shown). 17. Attach a 3 1/2" Pulley (15) and a Cable Trap (66) to the CABLE DIAGRAM on the Right Arm (48). Note: This may come pre-assembled...
...See the inset drawing. ILI Pulley (6) on page 19 of the "V"- As you assemble the cables and pulleys in steps 14 through the 3 1/2" Pulley (15) and Long "U"-Bracket (57). Route the Long Cable (23) around the 3 1/2" Pulley (15) attached to the Pulley Bracket (20). Tighten ...(7) and a 3/8" Nylon Locknut (21). Be sure that the Cable is inside the "U"Bracket. Tighten the 3/8" Nylon Locknut (21) and the 3/8" x 2" Bolt (not shown). 17. Attach a 3 1/2" Pulley (15) and a Cable Trap (66) to the CABLE DIAGRAM on the Right Arm (48). Note: This may come pre-assembled...
User Manual
Page 14
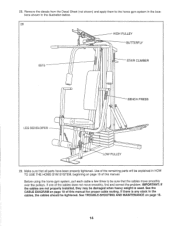
... in the locations shown in the illustration below. 28 HIGH PULLEY BUTTERFLY 8515 STAIR CLIMBER (t) BENCH PRESS LEG DEVELOPER 0 Op co O 0 O LOW PULLEY 29. Use of this manual for proper cable routing. Make sure that the cables move smoothly, find and correct the problem. Remove the decals from the... Decal Sheet (not shown) and apply them to be explained in the cables, the cables should be tightened. If one of this manual. See the CABLE DIAGRAM on page 18. 14 28. IMPORTANT: If the cables are not properly installed, they may be damaged when heavy weight is any slack...
... in the locations shown in the illustration below. 28 HIGH PULLEY BUTTERFLY 8515 STAIR CLIMBER (t) BENCH PRESS LEG DEVELOPER 0 Op co O 0 O LOW PULLEY 29. Use of this manual for proper cable routing. Make sure that the cables move smoothly, find and correct the problem. Remove the decals from the... Decal Sheet (not shown) and apply them to be explained in the cables, the cables should be tightened. If one of this manual. See the CABLE DIAGRAM on page 18. 14 28. IMPORTANT: If the cables are not properly installed, they may be damaged when heavy weight is any slack...
User Manual
Page 19
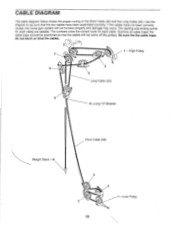
... correct route for each cable. Examine all cable traps; Be sure the the cable traps do not touch or bind the cables. 1 -High Pulley 7 3 5 4 Long Cable (23) 6 5-Long "U"-Bracket Weight Stack -8 Short Cable (58) 4 3 2 :11 -Low Pulley 19 CABLE DIAGRAM The cable diagram below shows the proper routing of the Short Cable (58) and the Long Cable (23). the cable traps should be...
... correct route for each cable. Examine all cable traps; Be sure the the cable traps do not touch or bind the cables. 1 -High Pulley 7 3 5 4 Long Cable (23) 6 5-Long "U"-Bracket Weight Stack -8 Short Cable (58) 4 3 2 :11 -Low Pulley 19 CABLE DIAGRAM The cable diagram below shows the proper routing of the Short Cable (58) and the Long Cable (23). the cable traps should be...


