
English Manual
Page 1
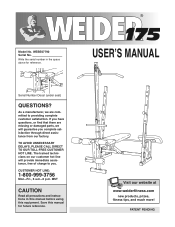
... ¨ Model No. As a manufacturer, we will provide immediate assistance, free of charge to you have questions, or find that there are missing or damaged parts, we are committed to providing complete customer satisfaction.
... ¨ Model No. As a manufacturer, we will provide immediate assistance, free of charge to you have questions, or find that there are missing or damaged parts, we are committed to providing complete customer satisfaction.
English Manual
Page 2
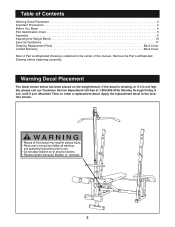
...Contents Warning Decal Placement 2 Important Precautions 3 Before You Begin 4 Part Identification Chart 5 Assembly 6 Adjusting the Weight Bench 13 Exercise Guidelines 17 Ordering Replacement Parts Back Cover Limited Warranty Back Cover Note: A Part List/Exploded Drawing is not legible, please call our Customer Service Department...decal. If the decal is missing, or if it is attached to the center of this manual. until 6 p.m. Remove the Part List/Exploded Drawing before beginning assembly. Mountain Time, to the location shown. 2 Warning Decal Placement The decal shown below has ...
...Contents Warning Decal Placement 2 Important Precautions 3 Before You Begin 4 Part Identification Chart 5 Assembly 6 Adjusting the Weight Bench 13 Exercise Guidelines 17 Ordering Replacement Parts Back Cover Limited Warranty Back Cover Note: A Part List/Exploded Drawing is not legible, please call our Customer Service Department...decal. If the decal is missing, or if it is attached to the center of this manual. until 6 p.m. Remove the Part List/Exploded Drawing before beginning assembly. Mountain Time, to the location shown. 2 Warning Decal Placement The decal shown below has ...
English Manual
Page 3
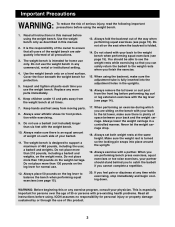
...complete a repetition. 12. Do not stand with pre-existing health problems. Read all parts each side of the way when performing squat exercises (see page 15). You should stand behind... you feel pain or dizziness at any worn parts immediately. 6. WARNING: Before beginning this product. 3 Do not place more than 210 pounds, including...use the weight bench in a controlled manner. Keep children under 12 and pets away from moving parts. 8. Keep hands and feet away from the weight bench at the same height. Do not use...
...complete a repetition. 12. Do not stand with pre-existing health problems. Read all parts each side of the way when performing squat exercises (see page 15). You should stand behind... you feel pain or dizziness at any worn parts immediately. 6. WARNING: Before beginning this product. 3 Do not place more than 210 pounds, including...use the weight bench in a controlled manner. Keep children under 12 and pets away from moving parts. 8. Keep hands and feet away from the weight bench at the same height. Do not use...

English Manual
Page 4
... If you have additional questions, please call our Customer Service Before reading further, please review the drawing below and familiarize yourself with the parts that are determined relative to a person sitting on the bench, and they do not correspond to what is a shapely figure, dramatic...excluding holidays). For your goal is right and left sideÓ are labeled. To help you for selecting the versatile WEIDER¨ 175 Weight Bench. The WEIDER¨ 175 is WEBE07790. Lat Bar Lat Tower Right Side Weight Carriage Leg Lever Seat Weight Tube Weight Rest Backrest Curl Pad ...
... If you have additional questions, please call our Customer Service Before reading further, please review the drawing below and familiarize yourself with the parts that are determined relative to a person sitting on the bench, and they do not correspond to what is a shapely figure, dramatic...excluding holidays). For your goal is right and left sideÓ are labeled. To help you for selecting the versatile WEIDER¨ 175 Weight Bench. The WEIDER¨ 175 is WEBE07790. Lat Bar Lat Tower Right Side Weight Carriage Leg Lever Seat Weight Tube Weight Rest Backrest Curl Pad ...

English Manual
Page 5
Part Identification Chart - WEBE07790 R1299A Leg Lever Spacer (50)-1 Pulley Spacer (41)-2 M6 x 16mm Screw (3)-4 16mm x 18.5mm Spacer (8)-2 M8 Washer (23)-2 M6 Washer (30)-5 M6 x 38mm Screw (4)-4 M6 x 63mm Screw (7)-1 M8 x 58mm Bolt (43)-1 M8 Nylon Locknut (13)-1 M10 x 19mm Bolt (46)-1 M10 Washer (6)-7 M10 Nylon Locknut (11)-20 M10 x 62mm Carriage Bolt (33)-8 M10 x 62mm Bolt (48)-1 M10 x 68mm Bolt (34)-9 M10 x 155mm Bolt (22)-1 5 Model No.
Part Identification Chart - WEBE07790 R1299A Leg Lever Spacer (50)-1 Pulley Spacer (41)-2 M6 x 16mm Screw (3)-4 16mm x 18.5mm Spacer (8)-2 M8 Washer (23)-2 M6 Washer (30)-5 M6 x 38mm Screw (4)-4 M6 x 63mm Screw (7)-1 M8 x 58mm Bolt (43)-1 M8 Nylon Locknut (13)-1 M10 x 19mm Bolt (46)-1 M10 Washer (6)-7 M10 Nylon Locknut (11)-20 M10 x 62mm Carriage Bolt (33)-8 M10 x 62mm Bolt (48)-1 M10 x 68mm Bolt (34)-9 M10 x 155mm Bolt (22)-1 5 Model No.
English Manual
Page 6
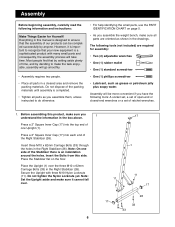
...(33) in the Right Stabilizer (26). Assembly will be completed successfully by deciding to do otherwise. ¥ For help identifying the small parts, use the PART IDENTIFICATION CHART on the floor. Press a 2Ó Square Inner Cap (17) into each end of ratchet wrenches. 1. Insert three M10...tools (not included) are oriented as grease or petroleum jelly plus soapy water. Insert the Bolts from this product, make sure all parts in a cleared area and remove the packing materials. Do not tighten the Nylon Locknuts yet. Assembly Before beginning assembly, carefully read...
...(33) in the Right Stabilizer (26). Assembly will be completed successfully by deciding to do otherwise. ¥ For help identifying the small parts, use the PART IDENTIFICATION CHART on the floor. Press a 2Ó Square Inner Cap (17) into each end of ratchet wrenches. 1. Insert three M10...tools (not included) are oriented as grease or petroleum jelly plus soapy water. Insert the Bolts from this product, make sure all parts in a cleared area and remove the packing materials. Do not tighten the Nylon Locknuts yet. Assembly Before beginning assembly, carefully read...
English Manual
Page 12
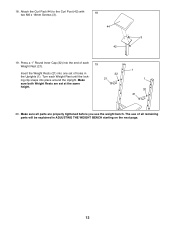
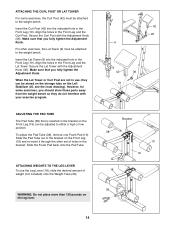
... set of holes in ADJUSTING THE WEIGHT BENCH starting on the next page. 12 Make sure all remaining parts will be explained in the Uprights (1). Turn each 19 Weight Rest (21). Make sure both Weight Rests are properly tightened before you use of each ...
... set of holes in ADJUSTING THE WEIGHT BENCH starting on the next page. 12 Make sure all remaining parts will be explained in the Uprights (1). Turn each 19 Weight Rest (21). Make sure both Weight Rests are properly tightened before you use of each ...

English Manual
Page 13
Adjusting the Weight Bench This section explains how to get the most benefit from the Weight Rests. Inspect and tighten all parts each exercise. Finally, slide the end with no locking clip partway through the right Upright. Then move the Adjustment Tube (29) to a ...decline positions and two incline positions. Make sure you use solvents. See the EXERCISE GUIDELINES on how to adjust the weight bench. Replace any worn parts immediately. Next, slide the end with no locking clip out of adjustment holes in the Uprights (1). To change the height of the Upright (1). ...
Adjusting the Weight Bench This section explains how to get the most benefit from the Weight Rests. Inspect and tighten all parts each exercise. Finally, slide the end with no locking clip partway through the right Upright. Then move the Adjustment Tube (29) to a ...decline positions and two incline positions. Make sure you use solvents. See the EXERCISE GUIDELINES on how to adjust the weight bench. Replace any worn parts immediately. Next, slide the end with no locking clip out of adjustment holes in the Uprights (1). To change the height of the Upright (1). ...
English Manual
Page 14
.... To adjust the Pad Tube (38), remove one Foam Pad (10). ATTACHING THE CURL POST OR LAT TOWER For some exercises, you should store these parts away from the weight bench so they can be adjusted to either a high or low position. Insert the Curl Post (42) into the indicated hole...
.... To adjust the Pad Tube (38), remove one Foam Pad (10). ATTACHING THE CURL POST OR LAT TOWER For some exercises, you should store these parts away from the weight bench so they can be adjusted to either a high or low position. Insert the Curl Post (42) into the indicated hole...

English Manual
Page 17
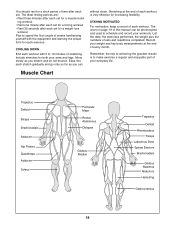
... as cycling, running or swimming on the areas that adequate rest and a proper diet are important factors in each exercise and moving only the appropriate parts of the muscles affected. Exercise for each exercise is also provided, along with emphasis on Tuesday and Thursday. ¥ Rest from exercising by using high...
... as cycling, running or swimming on the areas that adequate rest and a proper diet are important factors in each exercise and moving only the appropriate parts of the muscles affected. Exercise for each exercise is also provided, along with emphasis on Tuesday and Thursday. ¥ Rest from exercising by using high...
English Manual
Page 18
...; Rest three minutes after each workout. ing workout ¥ Rest one minute after each set for each workout with 5 to make exercise a regular and enjoyable part of your arms and legs. STAYING MOTIVATED For motivation, keep a record of each set for a weight loss workout Plan to spend the first couple of...
...; Rest three minutes after each workout. ing workout ¥ Rest one minute after each set for each workout with 5 to make exercise a regular and enjoyable part of your arms and legs. STAYING MOTIVATED For motivation, keep a record of each set for a weight loss workout Plan to spend the first couple of...
English Manual
Page 20
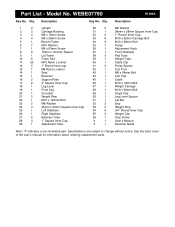
... No. Specifications are subject to change without notice. Qty. See the back cover of the userÕs manual for information about ordering replacement parts. Description Key No. WEBE07790 R1299A Key No. Description 1 2 Upright 30 5 M6 Washer 2 2 Carriage Bushing 31 1 38mm x 38mm Square Inner Cap 3 4 M6 x 16mm Screw 32 2 1Ó ... 27 2 Backrest Tube 56 1 Stop Screw 28 4 1Ó Square Inner Cap # 1 UserÕs Manual 29 1 Adjustment Tube # 1 Exercise Guide Note: Ò#Ó indicates a non-illustrated part. Qty.
... No. Specifications are subject to change without notice. Qty. See the back cover of the userÕs manual for information about ordering replacement parts. Description Key No. WEBE07790 R1299A Key No. Description 1 2 Upright 30 5 M6 Washer 2 2 Carriage Bushing 31 1 38mm x 38mm Square Inner Cap 3 4 M6 x 16mm Screw 32 2 1Ó ... 27 2 Backrest Tube 56 1 Stop Screw 28 4 1Ó Square Inner Cap # 1 UserÕs Manual 29 1 Adjustment Tube # 1 Exercise Guide Note: Ò#Ó indicates a non-illustrated part. Qty.

English Manual
Page 22
...(ICON), warrants this manual). This warranty gives you , please be free from defects in China © 1999 ICON Health & Fitness, Inc. Part No. 157574 J01899-C R1299A Printed in workmanship and material, under this manual). 4. No other transportation charges prepaid, accompanied by ICON. ICON is ... made must be received by ICON. Accordingly, the above limitation may not apply to you . The MODEL NUMBER of the product (WEIDER¨ 175 Weight Bench). 3. The warranty extended hereunder is limited to replacing or repairing, at ICON's option, the product at 1-800-999-...
...(ICON), warrants this manual). This warranty gives you , please be free from defects in China © 1999 ICON Health & Fitness, Inc. Part No. 157574 J01899-C R1299A Printed in workmanship and material, under this manual). 4. No other transportation charges prepaid, accompanied by ICON. ICON is ... made must be received by ICON. Accordingly, the above limitation may not apply to you . The MODEL NUMBER of the product (WEIDER¨ 175 Weight Bench). 3. The warranty extended hereunder is limited to replacing or repairing, at ICON's option, the product at 1-800-999-...


