
English Manual
Page 1
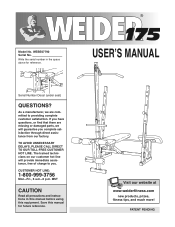
....weiderfitness.com new products, prizes, fitness tips, and much more! The trained technicians on our customer hot line will guarantee you . TO AVOID UNNECESSARY DELAYS, PLEASE CALL DIRECT TO OUR TOLL-FREE CUSTOMER HOT LINE. MST CAUTION Read all precautions and instructions in the space above for future reference. USERÕS MANUAL Serial Number Decal (under seat) QUESTIONS? CUSTOMER HOT LINE...
....weiderfitness.com new products, prizes, fitness tips, and much more! The trained technicians on our customer hot line will guarantee you . TO AVOID UNNECESSARY DELAYS, PLEASE CALL DIRECT TO OUR TOLL-FREE CUSTOMER HOT LINE. MST CAUTION Read all precautions and instructions in the space above for future reference. USERÕS MANUAL Serial Number Decal (under seat) QUESTIONS? CUSTOMER HOT LINE...
English Manual
Page 2
... is attached to the center of Contents Warning Decal Placement 2 Important Precautions 3 Before You Begin 4 Part Identification Chart 5 Assembly 6 Adjusting the Weight Bench 13 Exercise Guidelines 17 Ordering Replacement Parts Back Cover Limited Warranty Back Cover Note: A Part List/Exploded Drawing is not legible, please call our Customer Service Department toll-free at 1-800-999-3756, Monday through Friday, 6 a.m. Mountain Time, to the location shown. 2 Table of this manual. Remove the Part List...
... is attached to the center of Contents Warning Decal Placement 2 Important Precautions 3 Before You Begin 4 Part Identification Chart 5 Assembly 6 Adjusting the Weight Bench 13 Exercise Guidelines 17 Ordering Replacement Parts Back Cover Limited Warranty Back Cover Note: A Part List/Exploded Drawing is not legible, please call our Customer Service Department toll-free at 1-800-999-3756, Monday through Friday, 6 a.m. Mountain Time, to the location shown. 2 Table of this manual. Remove the Part List...
English Manual
Page 3
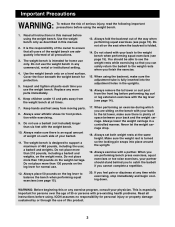
... pounds, including the user, a barbell and weights. Do not stand with pre-existing health problems. Read all users of this or any worn parts immediately. 6. When using the weight bench. Always exercise with the leg lever (see page 15). Always place 50 pounds on the leg lever for protection. 5. ICON assumes no responsibility for home use of the weight bench are sitting on the seat when the backrest...
... pounds, including the user, a barbell and weights. Do not stand with pre-existing health problems. Read all users of this or any worn parts immediately. 6. When using the weight bench. Always exercise with the leg lever (see page 15). Always place 50 pounds on the leg lever for protection. 5. ICON assumes no responsibility for home use of the weight bench are sitting on the seat when the backrest...

English Manual
Page 4
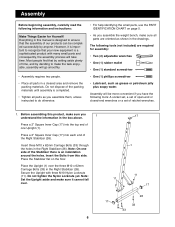
..., read this manual). The serial number can be found on a decal attached to the Weight Bench (see the front cover of the body. If you for selecting the versatile WEIDER¨ 175 Weight Bench. Department toll-free at 1-800-999-3756, Monday through Friday, 6 a.m. Before You Begin Thank you have additional questions, please call our Customer Service Before reading further, please review the drawing below...
..., read this manual). The serial number can be found on a decal attached to the Weight Bench (see the front cover of the body. If you for selecting the versatile WEIDER¨ 175 Weight Bench. Department toll-free at 1-800-999-3756, Monday through Friday, 6 a.m. Before You Begin Thank you have additional questions, please call our Customer Service Before reading further, please review the drawing below...

English Manual
Page 5
Model No. Part Identification Chart - WEBE07790 R1299A Leg Lever Spacer (50)-1 Pulley Spacer (41)-2 M6 x 16mm Screw (3)-4 16mm x 18.5mm Spacer (8)-2 M8 Washer (23)-2 M6 Washer (30)-5 M6 x 38mm Screw (4)-4 M6 x 63mm Screw (7)-1 M8 x 58mm Bolt (43)-1 M8 Nylon Locknut (13)-1 M10 x 19mm Bolt (46)-1 M10 Washer (6)-7 M10 Nylon Locknut (11)-20 M10 x 62mm Carriage Bolt (33)-8 M10 x 62mm Bolt (48)-1 M10 x 68mm Bolt (34)-9 M10 x 155mm Bolt (22)-1 5
Model No. Part Identification Chart - WEBE07790 R1299A Leg Lever Spacer (50)-1 Pulley Spacer (41)-2 M6 x 16mm Screw (3)-4 16mm x 18.5mm Spacer (8)-2 M8 Washer (23)-2 M6 Washer (30)-5 M6 x 38mm Screw (4)-4 M6 x 63mm Screw (7)-1 M8 x 58mm Bolt (43)-1 M8 Nylon Locknut (13)-1 M10 x 19mm Bolt (46)-1 M10 Washer (6)-7 M10 Nylon Locknut (11)-20 M10 x 62mm Carriage Bolt (33)-8 M10 x 62mm Bolt (48)-1 M10 x 68mm Bolt (34)-9 M10 x 155mm Bolt (22)-1 5
English Manual
Page 6
... PART IDENTIFICATION CHART on the floor. Insert three M10 x 62mm Carriage Bolts (33) through the holes in a cleared area and remove the packing materials. Note: On one Upright (1). Place the Stabilizer flat on page 5. ¥ As you assemble the weight bench, make sure you 1 understand the information in the Right Stabilizer (26). Insert the Bolts from this manual is completed. ¥ Tighten...
... PART IDENTIFICATION CHART on the floor. Insert three M10 x 62mm Carriage Bolts (33) through the holes in a cleared area and remove the packing materials. Note: On one Upright (1). Place the Stabilizer flat on page 5. ¥ As you assemble the weight bench, make sure you 1 understand the information in the Right Stabilizer (26). Insert the Bolts from this manual is completed. ¥ Tighten...

English Manual
Page 7
... Bolts (34). Note: On one Upright (1). Insert the Bolts from this storage tube on the right side of 2 one side of the tube on where you plan to place the weight bench, it may be more practical for you to the second Upright (1) in the Left Stabilizer (25). Attach the Crossbar (20) to store the Curl Pad and Lat...
... Bolts (34). Note: On one Upright (1). Insert the Bolts from this storage tube on the right side of 2 one side of the tube on where you plan to place the weight bench, it may be more practical for you to the second Upright (1) in the Left Stabilizer (25). Attach the Crossbar (20) to store the Curl Pad and Lat...
English Manual
Page 8
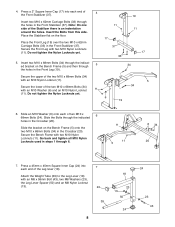
... (13). 24 39 8 18 23 13 50 24 24 23 43 Attach the Weight Tube (39) to the Leg Lever (18) with two M10 Nylon Locknuts (11). Insert two M10 x 68mm Bolts (34) through the indicat- 5 ed bracket on the Bench Frame (5) and then through the indicated holes in the Front...onto each end of 4 the Front Stabilizer (37). Go back and tighten all M10 Nylon Locknuts used in the Front Stabilizer (37). Place the Front Leg (19) over the two M10 x 62mm Carriage Bolts (33) in steps 1 through the holes in the Crossbar (20). Press a 2Ó Square Inner Cap (17) into 7 each of the...
... (13). 24 39 8 18 23 13 50 24 24 23 43 Attach the Weight Tube (39) to the Leg Lever (18) with two M10 Nylon Locknuts (11). Insert two M10 x 68mm Bolts (34) through the indicat- 5 ed bracket on the Bench Frame (5) and then through the indicated holes in the Front...onto each end of 4 the Front Stabilizer (37). Go back and tighten all M10 Nylon Locknuts used in the Front Stabilizer (37). Place the Front Leg (19) over the two M10 x 62mm Carriage Bolts (33) in steps 1 through the holes in the Crossbar (20). Press a 2Ó Square Inner Cap (17) into 7 each of the...
English Manual
Page 9
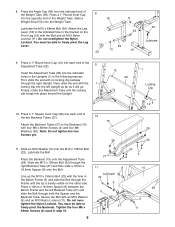
.... Slide a Weight Stop (53) onto the Weight Tube. Attach the Leg Lever (18) to the Backrest (15) with an M10 Washer (6) and an M10 Nylon Locknut (11). Lubricate the Bolt. Place a 16mm x 18.5mm Spacer (8) between the Bench Frame and the left Upright as far as...Screws (4) used in the bracket on the other side. Lubricate 22 6 5 27 29 6 11 9 Note: Do not tighten the four Screws yet. 28 30 11. 8. You must be able to freely pivot the Backrest. Secure the Bolt with four M6 x 38mm Screws (4) and four M6 28 Washers (30). Lubricate the M10 x 68mm Bolt (34). Press...
.... Slide a Weight Stop (53) onto the Weight Tube. Attach the Leg Lever (18) to the Backrest (15) with an M10 Washer (6) and an M10 Nylon Locknut (11). Lubricate the Bolt. Place a 16mm x 18.5mm Spacer (8) between the Bench Frame and the left Upright as far as...Screws (4) used in the bracket on the other side. Lubricate 22 6 5 27 29 6 11 9 Note: Do not tighten the four Screws yet. 28 30 11. 8. You must be able to freely pivot the Backrest. Secure the Bolt with four M6 x 38mm Screws (4) and four M6 28 Washers (30). Lubricate the M10 x 68mm Bolt (34). Press...
English Manual
Page 10
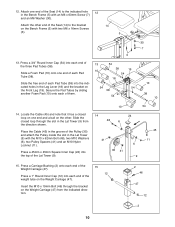
... x 63mm Screw (7) and an M6 Washer (30). Press a Carriage Bushing (2) onto each of the weight tube on the Weight Carriage (47) from the direction shown. Insert the M10 x 19mm Bolt (46) through the slot in the Bench Frame (5) with the M10 x 62mm Bolt (48), two M10 Washers (6), two Pulley Spacers (41) and an M10 Nylon Locknut (11). Attach the other...
... x 63mm Screw (7) and an M6 Washer (30). Press a Carriage Bushing (2) onto each of the weight tube on the Weight Carriage (47) from the direction shown. Insert the M10 x 19mm Bolt (46) through the slot in the Bench Frame (5) with the M10 x 62mm Bolt (48), two M10 Washers (6), two Pulley Spacers (41) and an M10 Nylon Locknut (11). Attach the other...

English Manual
Page 11
Secure the Lat Tower with an M10 Nylon Locknut (11). Slide the closed loop on the Cable (45) onto the M10 x 19mm Bolt (46) in the bracket on the Weight Carriage (47). 45 53 11 9 46 47 53 17. Secure the Cable with the Adjustment Knob (36). 9 36 19 11 Insert the Lat Tower (9) into the Front Leg (19). The 17 Lat Tower must be turned as shown. Slide the Weight Carriage (47) onto the Lat Tower (9). 16 Make sure the Weight Carriage is oriented as shown. Slide a Weight Stop (53) onto each end of the weight tube on the Weight Carriage (47). 16.
Secure the Lat Tower with an M10 Nylon Locknut (11). Slide the closed loop on the Cable (45) onto the M10 x 19mm Bolt (46) in the bracket on the Weight Carriage (47). 45 53 11 9 46 47 53 17. Secure the Cable with the Adjustment Knob (36). 9 36 19 11 Insert the Lat Tower (9) into the Front Leg (19). The 17 Lat Tower must be turned as shown. Slide the Weight Carriage (47) onto the Lat Tower (9). 16 Make sure the Weight Carriage is oriented as shown. Slide a Weight Stop (53) onto each end of the weight tube on the Weight Carriage (47). 16.
English Manual
Page 12
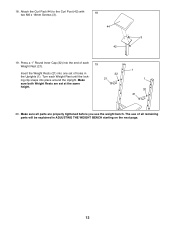
... be explained in the Uprights (1). 18. Insert the Weight Rests (21) into one set at the same height. 32 21 1 1 32 21 20. Make sure all parts are set of holes in ADJUSTING THE WEIGHT BENCH starting on the next page. 12 Attach the Curl Pad (44) to the Curl Post (42) with 18 two M6 x 16mm Screws (3). 44 3 42 19...
... be explained in the Uprights (1). 18. Insert the Weight Rests (21) into one set at the same height. 32 21 1 1 32 21 20. Make sure all parts are set of holes in ADJUSTING THE WEIGHT BENCH starting on the next page. 12 Attach the Curl Pad (44) to the Curl Post (42) with 18 two M6 x 16mm Screws (3). 44 3 42 19...

English Manual
Page 13
... far as it will go. WARNING: Always set of the Weight Rests (21), first remove your exercise program. To set the Backrest (15) to see the correct form for important information on page 17 for each time you turn the Weight Rest so the locking clip snaps into the left Upright. The weight bench can be cleaned with a damp cloth and a mild, non...
... far as it will go. WARNING: Always set of the Weight Rests (21), first remove your exercise program. To set the Backrest (15) to see the correct form for important information on page 17 for each time you turn the Weight Rest so the locking clip snaps into the left Upright. The weight bench can be cleaned with a damp cloth and a mild, non...
English Manual
Page 14
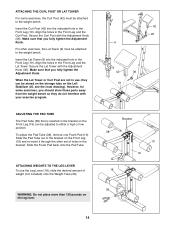
... drawing). Align the holes in the Front Leg (19). For other set of holes in the Front Leg and the Lat Tower. ATTACHING WEIGHTS TO THE LEG LEVER To use , they do not interfere with your exercise program. Secure the Curl Post with the Adjustment Knob (36). Insert the Lat Tower (9) into the indicated hole in use the Leg Lever (18), slide the desired amount...
... drawing). Align the holes in the Front Leg (19). For other set of holes in the Front Leg and the Lat Tower. ATTACHING WEIGHTS TO THE LEG LEVER To use , they do not interfere with your exercise program. Secure the Curl Post with the Adjustment Knob (36). Insert the Lat Tower (9) into the indicated hole in use the Leg Lever (18), slide the desired amount...
English Manual
Page 15
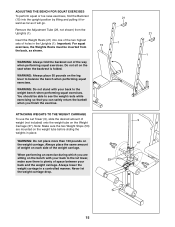
... of space between your back and the weight carriage. ATTACHING WEIGHTS TO THE WEIGHT CARRIAGE To use the Lat Tower (9), slide the desired amount of the way when performing squat exercises. ADJUSTING THE BENCH FOR SQUAT EXERCISES To perform squat or toe raise exercises, fold the Backrest (15) into one of the two highest sets of holes in the Uprights (1). Important: For squat exercises, the Weights Rests...
... of space between your back and the weight carriage. ATTACHING WEIGHTS TO THE WEIGHT CARRIAGE To use the Lat Tower (9), slide the desired amount of the way when performing squat exercises. ADJUSTING THE BENCH FOR SQUAT EXERCISES To perform squat or toe raise exercises, fold the Backrest (15) into one of the two highest sets of holes in the Uprights (1). Important: For squat exercises, the Weights Rests...

English Manual
Page 17
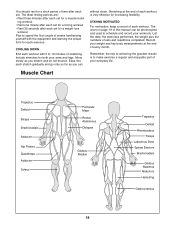
... your body for you progressively increase the intensity of stretching and light exercise to warm up . Select exercises for each exercise obviously depends upon the individual user. One example of a balanced program is also provided, along with 3 sets of 8 repetitions for several exercises. A description of each exercise you will find photographs showing the correct form for each exercise is : ¥ Plan weight training workouts...
... your body for you progressively increase the intensity of stretching and light exercise to warm up . Select exercises for each exercise obviously depends upon the individual user. One example of a balanced program is also provided, along with 3 sets of 8 repetitions for several exercises. A description of each exercise you will find photographs showing the correct form for each exercise is : ¥ Plan weight training workouts...
English Manual
Page 18
.... List the date, the exercises performed, the weight plus the numbers of each workout. The ideal resting periods are: ¥ Rest three minutes after each set for a toning workout ¥ Rest 30 seconds after each set for a weight loss workout Plan to spend the first couple of weeks familiarizing yourself with 5 to make exercise a regular and enjoyable part of your workouts. Muscle Chart Trapezius...
.... List the date, the exercises performed, the weight plus the numbers of each workout. The ideal resting periods are: ¥ Rest three minutes after each set for a toning workout ¥ Rest 30 seconds after each set for a weight loss workout Plan to spend the first couple of weeks familiarizing yourself with 5 to make exercise a regular and enjoyable part of your workouts. Muscle Chart Trapezius...
English Manual
Page 19
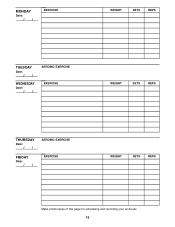
MONDAY Date: / / EXERCISE WEIGHT SETS REPS TUESDAY Date: / / WEDNESDAY Date: / / AEROBIC EXERCISE EXERCISE WEIGHT SETS REPS THURSDAY Date: / / FRIDAY Date: / / AEROBIC EXERCISE EXERCISE WEIGHT SETS REPS Make photocopies of this page for scheduling and recording your workouts. 19
MONDAY Date: / / EXERCISE WEIGHT SETS REPS TUESDAY Date: / / WEDNESDAY Date: / / AEROBIC EXERCISE EXERCISE WEIGHT SETS REPS THURSDAY Date: / / FRIDAY Date: / / AEROBIC EXERCISE EXERCISE WEIGHT SETS REPS Make photocopies of this page for scheduling and recording your workouts. 19
English Manual
Page 20
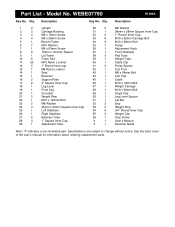
... Key No. Model No. Qty. Specifications are subject to change without notice. See the back cover of the userÕs manual for information about ordering replacement parts. Qty. Part List - Description 1 2 Upright 30 5 M6 Washer 2 2 Carriage Bushing 31 1 38mm x 38mm Square Inner Cap 3 4 M6 x 16mm Screw 32 2 1Ó Round Inner Cap 4 4 M6 x 38mm Screw 33 8 M10 x 62mm Carriage Bolt 5 1 Bench Frame 34 9 M10 x 68mm Bolt 6 7 M10 Washer 35 1 Pulley...
... Key No. Model No. Qty. Specifications are subject to change without notice. See the back cover of the userÕs manual for information about ordering replacement parts. Qty. Part List - Description 1 2 Upright 30 5 M6 Washer 2 2 Carriage Bushing 31 1 38mm x 38mm Square Inner Cap 3 4 M6 x 16mm Screw 32 2 1Ó Round Inner Cap 4 4 M6 x 38mm Screw 33 8 M10 x 62mm Carriage Bolt 5 1 Bench Frame 34 9 M10 x 68mm Bolt 6 7 M10 Washer 35 1 Pulley...

English Manual
Page 22
... other transportation charges prepaid, accompanied by an ICON authorized service center, products used as store display models. This warranty gives you . Part No. 157574 J01899-C R1299A Printed in connection with the use , costs of this product to you specific legal rights. The MODEL NUMBER of the product (WEIDER¨ 175 Weight Bench). 3. The SERIAL NUMBER of the product (see the PART LIST and the EXPLODED DRAWING at one of its...
... other transportation charges prepaid, accompanied by an ICON authorized service center, products used as store display models. This warranty gives you . Part No. 157574 J01899-C R1299A Printed in connection with the use , costs of this product to you specific legal rights. The MODEL NUMBER of the product (WEIDER¨ 175 Weight Bench). 3. The SERIAL NUMBER of the product (see the PART LIST and the EXPLODED DRAWING at one of its...


