
English Manual
Page 2
Table of Contents Warning Decal Placement 2 Important Precautions 3 Before You Begin 4 Part Identification Chart 5 Assembly 6 Adjusting the Weight Bench 13 Exercise Guidelines 17 Ordering Replacement Parts Back Cover Limited Warranty Back Cover Note: A Part List/Exploded Drawing is not legible, please call our Customer Service Department toll-free at 1-800-999-3756, Monday through Friday, 6 a.m. Remove the...
Table of Contents Warning Decal Placement 2 Important Precautions 3 Before You Begin 4 Part Identification Chart 5 Assembly 6 Adjusting the Weight Bench 13 Exercise Guidelines 17 Ordering Replacement Parts Back Cover Limited Warranty Back Cover Note: A Part List/Exploded Drawing is not legible, please call our Customer Service Department toll-free at 1-800-999-3756, Monday through Friday, 6 a.m. Remove the...
English Manual
Page 3
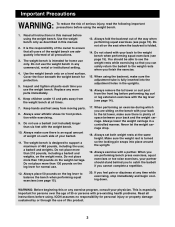
...lever (see the weight rests while exercising so that all users of the weight bench are sitting on a level surface. Replace any time while exercising, stop immediately and begin cooling down. Keep children under 12 and pets away from the weight bench at the same height. The weight bench is fully inserted ... the lat tower or curl post from moving parts. 8. Always set both weight rests at all parts each side of your partner should be able to catch the barbell if you use only. Always exercise with your back to the weight bench when performing squat exercises (see page 15). ...
...lever (see the weight rests while exercising so that all users of the weight bench are sitting on a level surface. Replace any time while exercising, stop immediately and begin cooling down. Keep children under 12 and pets away from the weight bench at the same height. The weight bench is fully inserted ... the lat tower or curl post from moving parts. 8. Always set both weight rests at all parts each side of your partner should be able to catch the barbell if you use only. Always exercise with your back to the weight bench when performing squat exercises (see page 15). ...

English Manual
Page 13
...two decline positions and two incline positions. To set of the right Upright. Replace any worn parts immediately. Do not use the weight bench. See the EXERCISE GUIDELINES on page 17 for each time you turn the Weight Rest so the locking clip snaps into place around the Upright. To remove... (29), follow this procedure: First, slide the end with no locking clip out of adjustment holes in the Uprights (1). Adjusting the Weight Bench This section explains how to the lowest decline position, remove the Adjustment Tube (29) and lower the Backrest directly onto the Crossbar (20...
...two decline positions and two incline positions. To set of the right Upright. Replace any worn parts immediately. Do not use the weight bench. See the EXERCISE GUIDELINES on page 17 for each time you turn the Weight Rest so the locking clip snaps into place around the Upright. To remove... (29), follow this procedure: First, slide the end with no locking clip out of adjustment holes in the Uprights (1). Adjusting the Weight Bench This section explains how to the lowest decline position, remove the Adjustment Tube (29) and lower the Backrest directly onto the Crossbar (20...
English Manual
Page 20
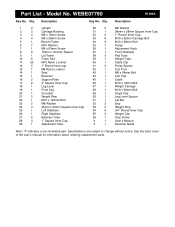
...for information about ordering replacement parts. Description Key No. Description 1 2 Upright 30 5 M6 Washer 2 2 Carriage Bushing 31 1 38mm x 38mm Square Inner Cap 3 4 M6 x 16mm Screw 32 2 1Ó Round Inner Cap 4 4 M6 x 38mm Screw 33 8 M10 x 62mm Carriage Bolt 5 1 Bench Frame 34 9 M10 ... Bar 23 2 M8 Washer 52 2 Grip 24 4 45mm x 45mm Square Inner Cap 53 3 Weight Stop 25 1 Left Stabilizer 54 6 3/4Ó Round Inner Cap 26 1 Right Stabilizer 55 2 Weight Clip 27 2 Backrest Tube 56 1 Stop Screw 28 4 1Ó Square Inner Cap # 1 User...
...for information about ordering replacement parts. Description Key No. Description 1 2 Upright 30 5 M6 Washer 2 2 Carriage Bushing 31 1 38mm x 38mm Square Inner Cap 3 4 M6 x 16mm Screw 32 2 1Ó Round Inner Cap 4 4 M6 x 38mm Screw 33 8 M10 x 62mm Carriage Bolt 5 1 Bench Frame 34 9 M10 ... Bar 23 2 M8 Washer 52 2 Grip 24 4 45mm x 45mm Square Inner Cap 53 3 Weight Stop 25 1 Left Stabilizer 54 6 3/4Ó Round Inner Cap 26 1 Right Stabilizer 55 2 Weight Clip 27 2 Backrest Tube 56 1 Stop Screw 28 4 1Ó Square Inner Cap # 1 User...

English Manual
Page 22
...particular purpose is authorized by ICON. The MODEL NUMBER of the product (WEIDER¨ 175 Weight Bench). 3. Part No. 157574 J01899-C R1299A Printed in workmanship and material, under this manual). This warranty extends only to replacing or repairing, at ICON's option, the product at 1-800-999-... by ICON at the center of this warranty is a registered trademark of incidental or consequential damages. Ordering Replacement Parts To order replacement parts, simply call our Customer Service Department toll-free at one of its authorized service centers with respect to...
...particular purpose is authorized by ICON. The MODEL NUMBER of the product (WEIDER¨ 175 Weight Bench). 3. Part No. 157574 J01899-C R1299A Printed in workmanship and material, under this manual). This warranty extends only to replacing or repairing, at ICON's option, the product at 1-800-999-... by ICON at the center of this warranty is a registered trademark of incidental or consequential damages. Ordering Replacement Parts To order replacement parts, simply call our Customer Service Department toll-free at one of its authorized service centers with respect to...


