
Weider 8520 Support Question
Weider 8520 Support Question
Find answers below for this question about Weider 8520.Need a Weider 8520 manual? We have 1 online manual for this item!
Question posted by pyoung0527 on January 6th, 2014
Replacement Parts
I am looking for replacement cable do you know what length I would need.
Current Answers
Answer #1: Posted by BusterDoogen on January 6th, 2014 6:46 PM
BusterDoogen

Member since:
October 30th, 2011 Points: 28,565,447

Member since:
October 30th, 2011 Points: 28,565,447
Go to this page to view the replacement cable.
I hope this is helpful to you!
Please respond to my effort to provide you with the best possible solution by using the "Acceptable Solution" and/or the "Helpful" buttons when the answer has proven to be helpful. Please feel free to submit further info for your question, if a solution was not provided. I appreciate the opportunity to serve you!

Related Weider 8520 Manual Pages
User Manual - Page 1
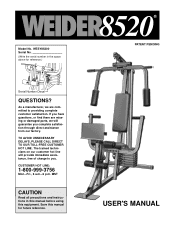
... DELAYS, PLEASE CALL DIRECT TO OUR TOLL-FREE CUSTOMER HOT LINE. Save this equipment. If you have questions, or find there are missing or damaged parts, we are committed to you complete satisfaction through direct assistance from our factory. CUSTOMER HOT LINE:
1-800-999-3756
Mon.-Fri., 6 a.m.-6 p.m. The trained technicians on...
User Manual - Page 2
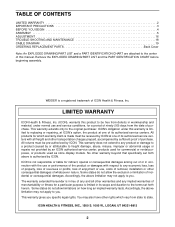
...allow limitations on how long an implied warranty lasts.
LIMITED WARRANTY
ICON Health & Fitness, Inc. (ICON), warrants this manual. Some states do not allow the exclusion...ASSEMBLY 5 ADJUSTMENT 16 TROUBLE-SHOOTING AND MAINTENANCE 18 CABLE DIAGRAM 19 ORDERING REPLACEMENT PARTS Back Cover
Note: An EXPLODED DRAWING/PART LIST and a PART IDENTIFICATION CHART are attached to the center of ...
User Manual - Page 3
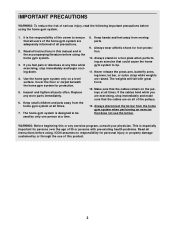
... and pets away from moving parts.
9. WARNING: Before beginning this or any worn parts immediately.
6. ICON assumes no responsibility for foot protection.
10. Replace any exercise program, consult your physician. ...using. Always stand on the pulleys at any time while exercising, stop immediately and make sure that the cables are raised. Never release the press arm, butterfly arms,...
User Manual - Page 4
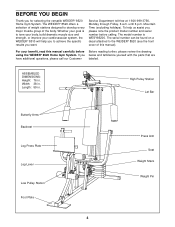
...8520 offers a selection of weight stations designed to tone your body, build dramatic muscle size and strength, or improve your benefit, read this manual). Whether your goal is WESY85200. The model number is to develop every major muscle group of this manual carefully before calling. Length... with the parts that are have additional questions, please call our Customer labeled.
User Manual - Page 5
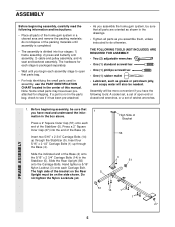
... Inner Cap (27) into four stages: 1) frame assembly, 2) press and butterfly arm assembly, 3) cable and pulley assembly, and 4) seat and backrest assembly. If a part is divided into the end of the bracket on the Rear Upright must be needed.
The high side of the Base (4). do otherwise.
Press a 2" Square Outer Cap (51) onto...
User Manual - Page 7
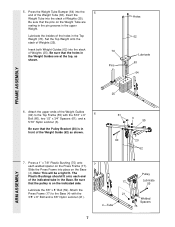
...both Weight Guides (62) into the stack of Weights (25). Note: This will be a tight fit.
5.
Pulley
17
Lubricate 59
Lubricate the 3/8" x 8" Bolt (59). Press a 1" x 7/8" Plastic Bushing ...(75) onto
7
each end
of Weights (25). The
Plastic Bushings should fit onto each welded spacer on the Base
(4).
Attach the upper ends of the holes in front ...
User Manual - Page 8
...
44 45
55
47
Bracket Lubricate Axle
69 70 45
55 69
70
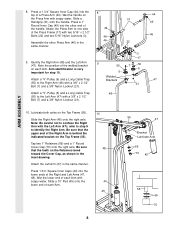
8 Attach a "V"-Pulley (6) and a Long Cable Trap (50) to the Left Arm (47) with a 3/8" x 2 1/2" Bolt (7) and a 3/8" Nylon Locknut (21). Attach a "V"-Pulley (6) and a Long Cable Trap (50) to the Right Arm (48) with a 3/8" x 2 1/2" Bolt (7) and a 3/8" Nylon Locknut (21).
8 31
44
49...
User Manual - Page 10
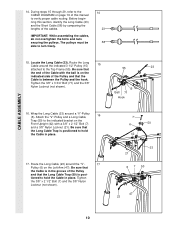
...) around the "V"-
17
Pulley (6) on page 19 of this section, identify the Long Cable (23) and the Short Cable (58) by comparing the lengths of the Pulley
and that
the Long Cable Trap is positioned to verify proper cable routing. Tighten
the 3/8" x 2 1/2" Bolt (7) and the 3/8" Nylon
Locknut (not shown).
7
6
50
42
23 21
6 7 50
47...
User Manual - Page 11
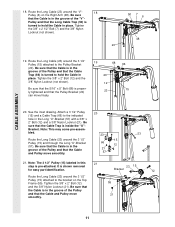
... to the indicated
hole in the groove of the "V"- Note: The 3 1/2" Pulley (15) labeled in place. Be sure that the Cable Trap is shown removed
for easy part identification.
23 15
Bracket
12
Route the Long Cable (23) around the 3 1/2" Pulley (15) and through the Long "U"-Bracket (57).
Attach a 3 1/2" Pulley
20
(15) and...
User Manual - Page 12
... sure that
the Cable Trap is turned to hold the Cable
in place and that the Cable is routed around the Pulley as shown. Wrap the Short Cable (58) around a "V"- Be sure that the Cable Trap (66) is turned to hold the Cable in place and that the Cable is shown removed for easy part identification. It is...
User Manual - Page 13
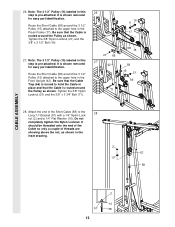
... the 3 1/2" Pulley (15) attached to the Long "U"-Bracket (57) with a 1/4" Nylon Lock-
28
nut (2) and a 1/4" Flat Washer (10). Be sure that the Cable is shown removed for easy part identification. 26.
Do not
completely tighten the Nylon Locknut. It is pre-attached. Tighten the 3/8" Nylon Locknut (21) and the 3/8" x 3 1/2" Bolt (16).
27...
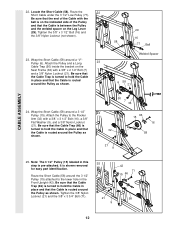
User Manual - Page 14

It
should be threaded onto the end of the
Cable only a couple of the Seat (13) to the Small "U"-
29
Bracket (67) with a 1/4" Flat Washer (10... center hole in
the inset drawing. Attach the other end of turns, as shown in the Seat Plate (37). CABLE ASSEMBLY
29.
Attach the Long Cable (23) to the Seat Frame (36) with a 1/4" Nylon Locknut (2)
and a 1/4" Flat Washer (10).
...
User Manual - Page 15

...a 5/16" x 2 1/2" Bolt (22), two 5/16" Flat Washers (8), and a 5/16" Nylon Locknut (3).
33. See the CABLE DIAGRAM on page 18.
32
44
79
8
3
8
22
40
32
78
Slant must be explained in the Rocker Arm (32). Press... parts will need to remove it to the Press Adjustment Tube (79) with the holes in ADJUSTMENT, beginning on page 16 of this way
33
34 30
28
36
30 34
80
30
34 29
8520
...
User Manual - Page 16
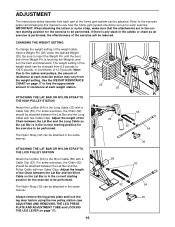
....5 pounds, in increments of the Chain between the Lat Bar and the Long Cable so the Lat Bar is performed, the effectiveness of resistance at each exercise. Note: Due to the Long Cable (23) with a Cable Clip (53).
Adjust the length of resistance at each weight station.
25 26
ATTACHING THE LAT BAR OR NYLON...
User Manual - Page 17
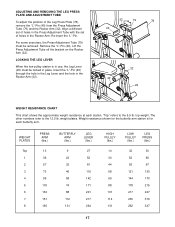
...
(lbs.)
LEG PRESS
(lbs.)
32
30
52
65
93
97
121
130
144
170
178
215
217
247
230
319
262
347
17 For some exercises, the Press Adjustment Tube (79) must be removed. Remove the "L"-Pin (40). ADJUSTING AND REMOVING THE LEG PRESS PLATE AND ADJUSTMENT TUBE
To adjust the...
User Manual - Page 18
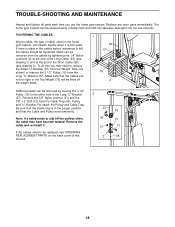
... it .
66 57
21
12
If the cables need to the other hole in the Long "U"-Bracket
2
(57).
Remove the cable and re-install it is felt, the cables should be cleaned using a damp cloth and... (2) at the end of the Long Cable (23) (see drawing 1) and at the end of the Short Cable (58) (see ORDERING REPLACEMENT PARTS on the back cover of cable used . Slack can be tightened. If...
User Manual - Page 20
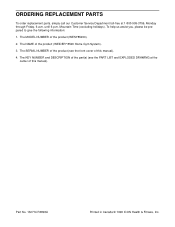
ORDERING REPLACEMENT PARTS
To order replacement parts, simply call our Customer Service Department toll-free at the center of the product (WEIDER® 8520 Home Gym System).
3. To help us assist you, please be prepared to give the following information:
1. Part No. 132714 R0896A
Printed in Canada © 1996 ICON Health & Fitness, Inc. Mountain Time (excluding holidays). The...
User Manual - Page 21
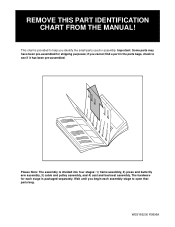
... Note: The assembly is provided to help you identify the small parts used in the parts bags, check to open that parts bag. The hardware for shipping purposes; This chart is divided into four stages: 1) frame assembly, 2) press and butterfly arm assembly, 3) cable and pulley assembly, and 4) seat and backrest assembly. if you begin...
User Manual - Page 25
REMOVE THIS PART LIST/EXPLODED DRAWING FROM THE MANUAL!
81
User Manual - Page 26
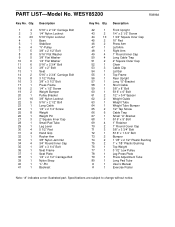
... Weight Tube Bumper 1/2" Tap Screw Cable Trap Small "U"-Bracket 5/16" x 5" Bolt 1" Retainer 1" Round Cover Cap 3/8" x 3 3/4" Bolt 5/16" x 1 3/4" Bolt Bumper 1 1/8" x 2 1/2" Plastic Bushing 1" x 7/8" Plastic Bushing Top Weight 3 1/2" Low Pulley Leg Press Plate Press Adjustment Tube Long Pad Tube User's Manual Exercise Poster
Note: "#" indicates a non-illustrated part. PART LIST-Model No.
Similar Questions

Where Do I Go To See Replacement Parts For The Joe Weider 9640 Pro?
I am looking for a replacement cable for the leg lift on my weider 9640 pro.
I am looking for a replacement cable for the leg lift on my weider 9640 pro.
(Posted by frankuchler 3 years ago)
I Need A Replacement Cable For My Welder Pro 8900 Do You Guys Carry One?
(Posted by mjdunkin21 3 years ago)

Weirder Pro 575 Replacement Cables
where can I order the replacement cables for this machine.
where can I order the replacement cables for this machine.
(Posted by Lilhoss 3 years ago)

I Need To Replace Cable For Chest And Leg Station. Both Use The Same Cable.
(Posted by vnvpirate 9 years ago)

To Move A Weider 8520
Hi I Have The Weider 8520 In My Basement Would Need To Just Move It To Other Room. Is There A Way To...
Hi I Have The Weider 8520 In My Basement Would Need To Just Move It To Other Room. Is There A Way To...
(Posted by delma99 10 years ago)