
English Manual
Page 2
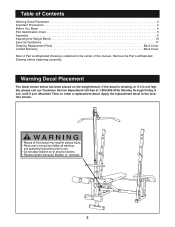
Warning Decal Placement The decal shown below has been placed on the weight bench. until 6 p.m. Remove the Part List/Exploded Drawing before beginning assembly. Table of this manual. Mountain Time, to the location shown. 2 If the ...if it is attached to the center of Contents Warning Decal Placement 2 Important Precautions 3 Before You Begin 4 Part Identification Chart 5 Assembly 6 Adjusting the Weight Bench 13 Exercise Guidelines 17 Ordering Replacement Parts Back Cover Limited Warranty Back Cover Note: A Part List/Exploded Drawing is not legible, please call our Customer...
Warning Decal Placement The decal shown below has been placed on the weight bench. until 6 p.m. Remove the Part List/Exploded Drawing before beginning assembly. Table of this manual. Mountain Time, to the location shown. 2 If the ...if it is attached to the center of Contents Warning Decal Placement 2 Important Precautions 3 Before You Begin 4 Part Identification Chart 5 Assembly 6 Adjusting the Weight Bench 13 Exercise Guidelines 17 Ordering Replacement Parts Back Cover Limited Warranty Back Cover Note: A Part List/Exploded Drawing is not legible, please call our Customer...
English Manual
Page 3
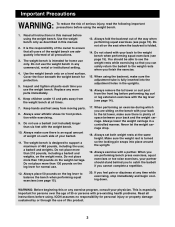
...Always wear athletic shoes for protection. 5. Do not place more than 210 pounds, including a barbell and weights, on the weight carriage. You should stand behind you to the weight bench when performing squat exercises (see page 15). This is especially important for normal use only. Cover the floor...so that all users of space between your back to catch the barbell if you are sitting on a level surface. When using the weight bench. 1. WARNING: Before beginning this manual before performing leg curl or leg extension exercises with a partner. Keep children under 12 and ...
...Always wear athletic shoes for protection. 5. Do not place more than 210 pounds, including a barbell and weights, on the weight carriage. You should stand behind you to the weight bench when performing squat exercises (see page 15). This is especially important for normal use only. Cover the floor...so that all users of space between your back to catch the barbell if you are sitting on a level surface. When using the weight bench. 1. WARNING: Before beginning this manual before performing leg curl or leg extension exercises with a partner. Keep children under 12 and ...

English Manual
Page 4
...that are determined relative to a person sitting on the bench, and they do not correspond to what is a shapely figure, dramatic muscle size and strength or a healthier cardiovascular system, the WEIDER¨ 175 Weight Bench will help you develop every major muscle group of this...decal attached to help you achieve the specific results you for selecting the versatile WEIDER¨ 175 Weight Bench. If you , please note the product model number and serial number before using the WEIDER¨ 175 Weight Bench. For your goal is right and left sideÓ are labeled. Whether...
...that are determined relative to a person sitting on the bench, and they do not correspond to what is a shapely figure, dramatic muscle size and strength or a healthier cardiovascular system, the WEIDER¨ 175 Weight Bench will help you develop every major muscle group of this...decal attached to help you achieve the specific results you for selecting the versatile WEIDER¨ 175 Weight Bench. If you , please note the product model number and serial number before using the WEIDER¨ 175 Weight Bench. For your goal is right and left sideÓ are labeled. Whether...
English Manual
Page 6
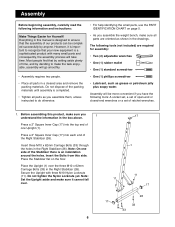
... will take time. Most people find that your new equipment is an indentation around the holes. Before assembling this product, make sure you assemble the weight bench, make the task enjoyable, assembly will be completed successfully by deciding to do otherwise. ¥ For help identifying the small parts, use the PART IDENTIFICATION...
... will take time. Most people find that your new equipment is an indentation around the holes. Before assembling this product, make sure you assemble the weight bench, make the task enjoyable, assembly will be completed successfully by deciding to do otherwise. ¥ For help identifying the small parts, use the PART IDENTIFICATION...

English Manual
Page 7
... end of the Stabilizer there is holding the Upright (1), slide the bracket on the Left Stabilizer (25). Depending on where you plan to place the weight bench, it may be more practical for you to the second Upright (1) in the Left Stabilizer (25). Insert two M10 x 68mm Bolts (34) through the holes... (11). Note: On one Upright (1). While a second person is an indentation around the holes. Press a 2Ó Square Inner Cap (17) into the top of the bench. Insert the Bolts from this storage tube on the floor. 2.
... end of the Stabilizer there is holding the Upright (1), slide the bracket on the Left Stabilizer (25). Depending on where you plan to place the weight bench, it may be more practical for you to the second Upright (1) in the Left Stabilizer (25). Insert two M10 x 68mm Bolts (34) through the holes... (11). Note: On one Upright (1). While a second person is an indentation around the holes. Press a 2Ó Square Inner Cap (17) into the top of the bench. Insert the Bolts from this storage tube on the floor. 2.
English Manual
Page 8
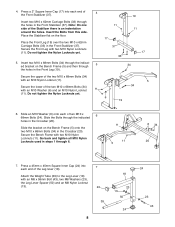
...). Insert two M10 x 68mm Bolts (34) through the indicat- 5 ed bracket on the floor. Attach the Weight Tube (39) to the Leg Lever (18) with two M10 Nylon Locknuts (11). Place the Front Leg ...62mm Carriage Bolts (33) in the Crossbar (20). Do not tighten the Nylon Locknuts yet. 5. Secure the Bench Frame with an M8 x 58mm Bolt (43), two M8 Washers (23), the Leg Lever Spacer (50) and... 11 11 5 6 34 20 7. Insert the Bolts from this side. Place the Stabilizer flat on the Bench Frame (5) and then through the holes in the Crossbar (20). Secure the Front Leg with two M10 Nylon ...
...). Insert two M10 x 68mm Bolts (34) through the indicat- 5 ed bracket on the floor. Attach the Weight Tube (39) to the Leg Lever (18) with two M10 Nylon Locknuts (11). Place the Front Leg ...62mm Carriage Bolts (33) in the Crossbar (20). Do not tighten the Nylon Locknuts yet. 5. Secure the Bench Frame with an M8 x 58mm Bolt (43), two M8 Washers (23), the Leg Lever Spacer (50) and... 11 11 5 6 34 20 7. Insert the Bolts from this side. Place the Stabilizer flat on the Bench Frame (5) and then through the holes in the Crossbar (20). Secure the Front Leg with two M10 Nylon ...
English Manual
Page 9
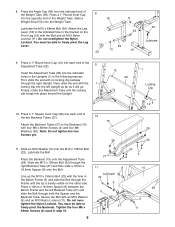
... holes in the Uprights (1) in the following manner: First, slide the end with the hole in the Bench Frame (5) and slide the Bolt through both the Spacer and the Backrest Tube. Note: Do not tighten the...27) and slide the Bolt through the Frame until the locking clip snaps into the opposite end of the Weight Tube (39). Lubricate the M10 x 68mm Bolt (34). Attach the Leg Lever (18) to the Backrest...with the Bolt and an M10 Nylon Locknut (11). Place a 16mm x 18.5mm Spacer (8) between the Bench Frame and the left Upright as far as it will go. Secure the Bolt with the 1 locking clip ...
... holes in the Uprights (1) in the following manner: First, slide the end with the hole in the Bench Frame (5) and slide the Bolt through both the Spacer and the Backrest Tube. Note: Do not tighten the...27) and slide the Bolt through the Frame until the locking clip snaps into the opposite end of the Weight Tube (39). Lubricate the M10 x 68mm Bolt (34). Attach the Leg Lever (18) to the Backrest...with the Bolt and an M10 Nylon Locknut (11). Place a 16mm x 18.5mm Spacer (8) between the Bench Frame and the left Upright as far as it will go. Secure the Bolt with the 1 locking clip ...
English Manual
Page 10
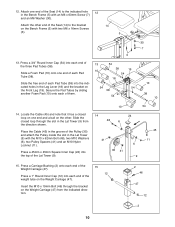
... 54 18 54 54 38 54 10 38 10 10 54 14. Slide the free end of the weight tube on the Front Leg (19). Press a Carriage Bushing (2) onto each end of the 15 Weight Carriage (47). 12 Press a 1Ó Round Inner Cap (12) into the indicated holes in the Leg Lever... hole 12 in the Lat Tower (9) from the indicated direction. 2 46 47 12 2 10 Insert the M10 x 19mm Bolt (46) through the slot in the Bench Frame (5) with the M10 x 62mm Bolt (48), two M10 Washers (6), two Pulley Spacers (41) and an M10 Nylon Locknut (11). Place the Cable (45) in...
... 54 18 54 54 38 54 10 38 10 10 54 14. Slide the free end of the weight tube on the Front Leg (19). Press a Carriage Bushing (2) onto each end of the 15 Weight Carriage (47). 12 Press a 1Ó Round Inner Cap (12) into the indicated holes in the Leg Lever... hole 12 in the Lat Tower (9) from the indicated direction. 2 46 47 12 2 10 Insert the M10 x 19mm Bolt (46) through the slot in the Bench Frame (5) with the M10 x 62mm Bolt (48), two M10 Washers (6), two Pulley Spacers (41) and an M10 Nylon Locknut (11). Place the Cable (45) in...
English Manual
Page 12
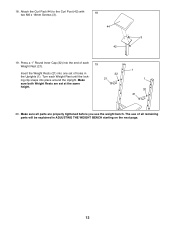
...21). Press a 1Ó Round Inner Cap (32) into the end of holes in ADJUSTING THE WEIGHT BENCH starting on the next page. 12 Make sure all remaining parts will be explained in the Uprights (1). The use the weight bench. Attach the Curl Pad (44) to the Curl Post (42) with 18 two M6 x 16mm... Screws (3). 44 3 42 19. 18. Make sure both Weight Rests are properly tightened before you use of all parts are set of ...
...21). Press a 1Ó Round Inner Cap (32) into the end of holes in ADJUSTING THE WEIGHT BENCH starting on the next page. 12 Make sure all remaining parts will be explained in the Uprights (1). The use the weight bench. Attach the Curl Pad (44) to the Curl Post (42) with 18 two M6 x 16mm... Screws (3). 44 3 42 19. 18. Make sure both Weight Rests are properly tightened before you use of all parts are set of ...

English Manual
Page 13
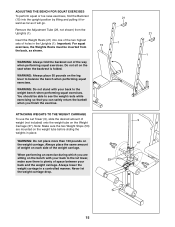
... Uprights (1). Next, slide the end with the locking clip out of the Upright (1). WARNING: Always set the Backrest (15) to adjust the weight bench. To re-insert the Adjustment Tube (29), follow this procedure: First, slide the end with a damp cloth and a mild, non-abrasive ...the Adjustment Tube (29) and lower the Backrest directly onto the Crossbar (20). Do not use the weight bench. The weight bench can be cleaned with no locking clip out of the Weight Rests (21), first remove your barbell from your exercise program. ADJUSTING THE BACKREST The Backrest (15)...
... Uprights (1). Next, slide the end with the locking clip out of the Upright (1). WARNING: Always set the Backrest (15) to adjust the weight bench. To re-insert the Adjustment Tube (29), follow this procedure: First, slide the end with a damp cloth and a mild, non-abrasive ...the Adjustment Tube (29) and lower the Backrest directly onto the Crossbar (20). Do not use the weight bench. The weight bench can be cleaned with no locking clip out of the Weight Rests (21), first remove your barbell from your exercise program. ADJUSTING THE BACKREST The Backrest (15)...
English Manual
Page 14
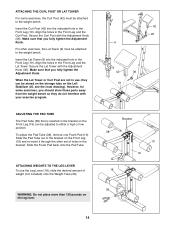
... slide the desired amount of holes in the Front Leg (19). For other set of weight (not included) onto the Weight Tube (39). ADJUSTING THE PAD TUBE The Pad Tube (38) that you fully tighten the... holes in the Front Leg (19). Secure the Lat Tower with the Adjustment Knob (36). ATTACHING WEIGHTS TO THE LEG LEVER To use , they do not interfere with the Adjustment Knob (36). Align ...OR LAT TOWER For some exercises, you should store these parts away from the weight bench so they can be attached to the weight bench. WARNING: Do not place more than 130 pounds on the Front Leg (19...
... slide the desired amount of holes in the Front Leg (19). For other set of weight (not included) onto the Weight Tube (39). ADJUSTING THE PAD TUBE The Pad Tube (38) that you fully tighten the... holes in the Front Leg (19). Secure the Lat Tower with the Adjustment Knob (36). ATTACHING WEIGHTS TO THE LEG LEVER To use , they do not interfere with the Adjustment Knob (36). Align ...OR LAT TOWER For some exercises, you should store these parts away from the weight bench so they can be attached to the weight bench. WARNING: Do not place more than 130 pounds on the Front Leg (19...
English Manual
Page 15
...it will go. Do not sit on the weight carriage. WARNING: Always fold the backrest out of the way when performing squat exercises. Note: Make sure the two Weight Stops (53) are sitting on the leg lever to the weight bench when performing squat exercises. You should be inserted... from the Uprights (1). WARNING: Always place 50 pounds on the bench with your back and the weight carriage. ADJUSTING THE BENCH FOR SQUAT EXERCISES To perform...
...it will go. Do not sit on the weight carriage. WARNING: Always fold the backrest out of the way when performing squat exercises. Note: Make sure the two Weight Stops (53) are sitting on the leg lever to the weight bench when performing squat exercises. You should be inserted... from the Uprights (1). WARNING: Always place 50 pounds on the bench with your back and the weight carriage. ADJUSTING THE BENCH FOR SQUAT EXERCISES To perform...
English Manual
Page 20
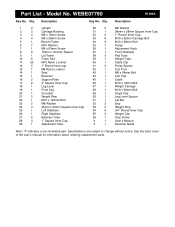
... 38mm x 38mm Square Inner Cap 3 4 M6 x 16mm Screw 32 2 1Ó Round Inner Cap 4 4 M6 x 38mm Screw 33 8 M10 x 62mm Carriage Bolt 5 1 Bench Frame 34 9 M10 x 68mm Bolt 6 7 M10 Washer 35 1 Pulley 7 1 M6 x 63mm Screw 36 1 Adjustment Knob 8 2 16mm x 18.5mm Spacer 37 1 Front ...Stabilizer 9 1 Lat Tower 38 3 Pad Tube 10 6 Foam Pad 39 1 Weight Tube 11 20 M10 Nylon Locknut 40 1 Cable Clip 12 5 1Ó Round Inner cap 41 2 Pulley Spacer 13 1 M8 Nylon Locknut 42 1 Curl...
... 38mm x 38mm Square Inner Cap 3 4 M6 x 16mm Screw 32 2 1Ó Round Inner Cap 4 4 M6 x 38mm Screw 33 8 M10 x 62mm Carriage Bolt 5 1 Bench Frame 34 9 M10 x 68mm Bolt 6 7 M10 Washer 35 1 Pulley 7 1 M6 x 63mm Screw 36 1 Adjustment Knob 8 2 16mm x 18.5mm Spacer 37 1 Front ...Stabilizer 9 1 Lat Tower 38 3 Pad Tube 10 6 Foam Pad 39 1 Weight Tube 11 20 M10 Nylon Locknut 40 1 Cable Clip 12 5 1Ó Round Inner cap 41 2 Pulley Spacer 13 1 M8 Nylon Locknut 42 1 Curl...

English Manual
Page 22
... the exclusion or limitation of incidental or consequential damages. ICON HEALTH & FITNESS, INC., 1500 S. 1000 W., LOGAN, UT 84321-9813 WEIDER is authorized by an ICON authorized service center, products used as store display models. ICON's obligation under normal use and service conditions, for... Accordingly, the above limitation may not apply to give the following information when calling: 1. The MODEL NUMBER of the product (WEIDER¨ 175 Weight Bench). 3. The KEY NUMBER and DESCRIPTION of the desired part(s) (see the front cover of this product to be received by ICON...
... the exclusion or limitation of incidental or consequential damages. ICON HEALTH & FITNESS, INC., 1500 S. 1000 W., LOGAN, UT 84321-9813 WEIDER is authorized by an ICON authorized service center, products used as store display models. ICON's obligation under normal use and service conditions, for... Accordingly, the above limitation may not apply to give the following information when calling: 1. The MODEL NUMBER of the product (WEIDER¨ 175 Weight Bench). 3. The KEY NUMBER and DESCRIPTION of the desired part(s) (see the front cover of this product to be received by ICON...


