

English Manual
Page 2
... 14 Exploded Drawing 15 Ordering Replacement Parts Back Cover Limited Warranty Back Cover Warning Decal Placement The decal shown below has been placed on the weight bench. Apply the replacement decal to order a replacement decal. until 6 p.m. If the decal is missing, or if it is not legible, please call our Customer Service...
... 14 Exploded Drawing 15 Ordering Replacement Parts Back Cover Limited Warranty Back Cover Warning Decal Placement The decal shown below has been placed on the weight bench. Apply the replacement decal to order a replacement decal. until 6 p.m. If the decal is missing, or if it is not legible, please call our Customer Service...
English Manual
Page 3
...before using the dip handles, always place 100 pounds on a level surface. Keep children under the age of all precautions. 4. Use the weight bench only on the leg lever to ensure that is fully seated in an inclined position, make sure that the support tube is longer than 110...the barbell (not included). 11. Do not use only. Read all users of 35 or persons with the weight bench. 9. The weight bench is especially important for persons over the age of the weight bench are using the backrest in the adjustment brackets on the leg lever for home use a barbell (not included)...
...before using the dip handles, always place 100 pounds on a level surface. Keep children under the age of all precautions. 4. Use the weight bench only on the leg lever to ensure that is fully seated in an inclined position, make sure that the support tube is longer than 110...the barbell (not included). 11. Do not use only. Read all users of 35 or persons with the weight bench. 9. The weight bench is especially important for persons over the age of the weight bench are using the backrest in the adjustment brackets on the leg lever for home use a barbell (not included)...
English Manual
Page 4
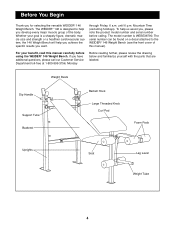
...dramatic muscle size and strength or a healthier cardiovascular system, the 146 Weight Bench will help you achieve the specific results you , please note the product model number and serial number before using the WEIDER¨ 146 Weight Bench. To help you have additional questions, please call our Customer ...major muscle group of this manual carefully before calling. The model number is designed to the WEIDER¨ 146 Weight Bench (see the front cover of the body. Weight Rests Dip Handle Support Tube Backrest Barbell Hook Large Threaded Knob Curl Pad Foam Pads Uprights Seat...
...dramatic muscle size and strength or a healthier cardiovascular system, the 146 Weight Bench will help you achieve the specific results you , please note the product model number and serial number before using the WEIDER¨ 146 Weight Bench. To help you have additional questions, please call our Customer ...major muscle group of this manual carefully before calling. The model number is designed to the WEIDER¨ 146 Weight Bench (see the front cover of the body. Weight Rests Dip Handle Support Tube Backrest Barbell Hook Large Threaded Knob Curl Pad Foam Pads Uprights Seat...
English Manual
Page 6
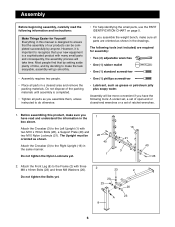
... for assembly: ¥ Two (2) adjustable wrenches ¥ One (1) rubber mallet ¥ One (1) standard screwdriver ¥ One (1) phillips screwdriver ¥ Lubricant, such as you assemble the weight bench, make sure you have read the following tools (not included) are oriented as shown in the drawings. Everything in the same manner. The Upright must...
... for assembly: ¥ Two (2) adjustable wrenches ¥ One (1) rubber mallet ¥ One (1) standard screwdriver ¥ One (1) phillips screwdriver ¥ Lubricant, such as you assemble the weight bench, make sure you have read the following tools (not included) are oriented as shown in the drawings. Everything in the same manner. The Upright must...
English Manual
Page 9
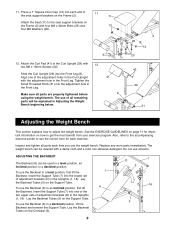
...parts will be cleaned with the adjustment hole in a level position, an inclined position or a declined position. The use the weight bench. The weight bench can be used in the Front Leg. Insert the Support Tube (7) into each exercise. Lay the Backrest Tubes on the Support ...Lay the Backrest Tubes (5) on the Crossbar (3). 1 6 D 7 5 16 3 9 Inspect and tighten all parts are properly tightened before using the weight bench. Slide the Curl Upright (29) into the adjustment hole in the Curl Upright with a damp cloth and a mild, non-abrasive detergent. Tighten the ...
...parts will be cleaned with the adjustment hole in a level position, an inclined position or a declined position. The use the weight bench. The weight bench can be used in the Front Leg. Insert the Support Tube (7) into each exercise. Lay the Backrest Tubes on the Support ...Lay the Backrest Tubes (5) on the Crossbar (3). 1 6 D 7 5 16 3 9 Inspect and tighten all parts are properly tightened before using the weight bench. Slide the Curl Upright (29) into the adjustment hole in the Curl Upright with a damp cloth and a mild, non-abrasive detergent. Tighten the ...

English Manual
Page 10
...Front Leg and the Curl Post. Align the holes in the Front Leg (8). Replace the Large Threaded Knobs. 19 WARNING: The Weight Rests must be attached to balance the weight bench. E WARNING: Do not place more comfortably with the Leg Lever (4) locked. When the Curl Post (29) is not in... 4 10 29 31 8 Secure the Curl Post with the Small Threaded Knob (31). ADJUSTING THE WEIGHT RESTS/DIP HANDLES To adjust the Weight Rests (19), remove the Large Threaded Knobs (32) from the weight bench so that you fully tighten the Threaded Knob. WARNING: When using the dip handles, always 1 19...
...Front Leg and the Curl Post. Align the holes in the Front Leg (8). Replace the Large Threaded Knobs. 19 WARNING: The Weight Rests must be attached to balance the weight bench. E WARNING: Do not place more comfortably with the Leg Lever (4) locked. When the Curl Post (29) is not in... 4 10 29 31 8 Secure the Curl Post with the Small Threaded Knob (31). ADJUSTING THE WEIGHT RESTS/DIP HANDLES To adjust the Weight Rests (19), remove the Large Threaded Knobs (32) from the weight bench so that you fully tighten the Threaded Knob. WARNING: When using the dip handles, always 1 19...
English Manual
Page 16
... give the following information when calling: ¥ The MODEL NUMBER of the product (WEBE36790). ¥ The NAME of the product (WEIDER¨ 146 Weight Bench). ¥ The SERIAL NUMBER of the product (see the front cover of this manual). ¥ The KEY NUMBER and DESCRIPTION of...To order replacement parts, simply call our Customer Service Department toll-free at one of this manual). until 6 p.m. Mountain Time (excluding holidays). WEIDER is limited in workmanship and material, under this product to be prepared to the original purchaser. Limited Warranty ICON Health & Fitness, Inc. (...
... give the following information when calling: ¥ The MODEL NUMBER of the product (WEBE36790). ¥ The NAME of the product (WEIDER¨ 146 Weight Bench). ¥ The SERIAL NUMBER of the product (see the front cover of this manual). ¥ The KEY NUMBER and DESCRIPTION of...To order replacement parts, simply call our Customer Service Department toll-free at one of this manual). until 6 p.m. Mountain Time (excluding holidays). WEIDER is limited in workmanship and material, under this product to be prepared to the original purchaser. Limited Warranty ICON Health & Fitness, Inc. (...


