

User Manual
Page 3
.... Replace any commercial, rental, or institutional setting. 13. Keep children under the age of weight on the weight bench in this manual. 12. The decals shown below have been placed on each time you feel pain or dizziness at any exercise program, ...exercising, stop immediately and begin cool- Do not place more than 110 pounds, including a barbell and weights, on page 4. Keep hands and fingers clear of this manual before using the weight bench. ICON assumes no responsibility for persons over the age of weight on each fly arm. IMPORTANT PRECAUTIONS WARNING: To reduce the ...
.... Replace any commercial, rental, or institutional setting. 13. Keep children under the age of weight on the weight bench in this manual. 12. The decals shown below have been placed on each time you feel pain or dizziness at any exercise program, ...exercising, stop immediately and begin cool- Do not place more than 110 pounds, including a barbell and weights, on page 4. Keep hands and fingers clear of this manual before using the weight bench. ICON assumes no responsibility for persons over the age of weight on each fly arm. IMPORTANT PRECAUTIONS WARNING: To reduce the ...
User Manual
Page 4
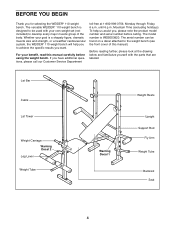
... cardiovascular system, the WEIDER® 110 weight bench will help us assist you for selecting the WEIDER® 110 weight bench. The serial number can be used with the parts that are labeled. BEFORE YOU BEGIN Thank you , please note the product model number and serial number before using the weight bench. Whether your own weight set (not included...
... cardiovascular system, the WEIDER® 110 weight bench will help us assist you for selecting the WEIDER® 110 weight bench. The serial number can be used with the parts that are labeled. BEFORE YOU BEGIN Thank you , please note the product model number and serial number before using the weight bench. Whether your own weight set (not included...
User Manual
Page 5
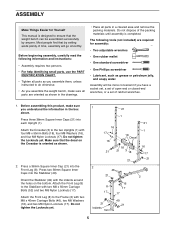
...-end or closed-end wrenches, or a set of the packing materials until assembly is oriented as you understand the information in a cleared area and remove the packing materials. Make sure that the weight bench can be assembled successfully by setting aside plenty of time, assembly will be... more convenient if you assemble the weight bench, make sure you assemble them, unless instructed to the two Uprights (1) ...
...-end or closed-end wrenches, or a set of the packing materials until assembly is oriented as you understand the information in a cleared area and remove the packing materials. Make sure that the weight bench can be assembled successfully by setting aside plenty of time, assembly will be... more convenient if you assemble the weight bench, make sure you assemble them, unless instructed to the two Uprights (1) ...
User Manual
Page 7
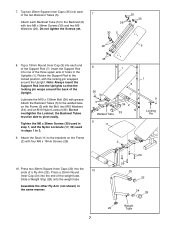
... 35 26 30 5 26 6 8. Attach the Seat (11) to the Backrest (6) with two M6 x 38mm Screws (30) and two M6 Washers (26). Slide a Weight Stop (28) onto the weight tube. Lubricate the M10 x 135mm Bolt (36) with four M6 x 16mm Screws (29). 35 8 1 9 36 34 7 5 34 2 Welded Tube 33 9 11 2 1 9 Locking... 7, and the Nylon Locknuts (17, 33) used in the same manner. 29 29 25 22 24 28 Weight 22 Tube 7 Tap two 25mm Square Inner Caps (35) into one of the three upper sets of the two Backrest Tubes (5). 7 Attach each of holes in the Uprights (1). the Backrest Tubes must be...
... 35 26 30 5 26 6 8. Attach the Seat (11) to the Backrest (6) with two M6 x 38mm Screws (30) and two M6 Washers (26). Slide a Weight Stop (28) onto the weight tube. Lubricate the M10 x 135mm Bolt (36) with four M6 x 16mm Screws (29). 35 8 1 9 36 34 7 5 34 2 Welded Tube 33 9 11 2 1 9 Locking... 7, and the Nylon Locknuts (17, 33) used in the same manner. 29 29 25 22 24 28 Weight 22 Tube 7 Tap two 25mm Square Inner Caps (35) into one of the three upper sets of the two Backrest Tubes (5). 7 Attach each of holes in the Uprights (1). the Backrest Tubes must be...
User Manual
Page 9
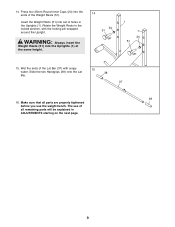
... same height. 14 24 51 1 1 24 51 15. Slide the two Handgrips (38) onto the Lat 38 Bar. 37 38 16. Insert the Weight Rests (51) into set of the Lat Bar (37) with the locking pin wrapped around the Upright. Wet the ends of holes in ADJUSTMENTS starting on the next... page. 9 14. Rotate the Weight Rests to the locked position, with soapy 15 water. The use of the Weight Rests (51). WARNING: Always insert the Weight Rests (51...
... same height. 14 24 51 1 1 24 51 15. Slide the two Handgrips (38) onto the Lat 38 Bar. 37 38 16. Insert the Weight Rests (51) into set of the Lat Bar (37) with the locking pin wrapped around the Upright. Wet the ends of holes in ADJUSTMENTS starting on the next... page. 9 14. Rotate the Weight Rests to the locked position, with soapy 15 water. The use of the Weight Rests (51). WARNING: Always insert the Weight Rests (51...
User Manual
Page 10
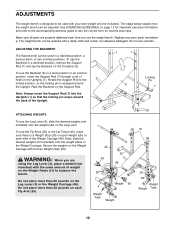
... the Crossbar (3). Replace any worn parts immediately. The weight bench can be cleaned with your own weight set of the Upright. 1 1 Locking Pin 6 7 3 ATTACHING WEIGHTS To use the Leg Lever (4), slide the desired weights (not included) onto the weight tube on each time you use the weight bench. Do not place more than 50 pounds on the...
... the Crossbar (3). Replace any worn parts immediately. The weight bench can be cleaned with your own weight set of the Upright. 1 1 Locking Pin 6 7 3 ATTACHING WEIGHTS To use the Leg Lever (4), slide the desired weights (not included) onto the weight tube on each time you use the weight bench. Do not place more than 50 pounds on the...
User Manual
Page 12
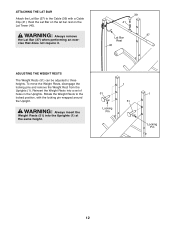
... into the Uprights (1) at the same height. 51 Locking Pin 1 51 1 Locking Pin 12 WARNING: Always insert the Weight Rests (51) into a set of holes in the Uprights. Rest the Lat Bar on the lat bar rest on the Lat Tower (40). WARNING: Always remove the Lat Bar (...37) when performing an exercise that does not require it. 39 41 37 Lat Bar Rest 40 ADJUSTING THE WEIGHT RESTS The Weight Rests (51...
... into the Uprights (1) at the same height. 51 Locking Pin 1 51 1 Locking Pin 12 WARNING: Always insert the Weight Rests (51) into a set of holes in the Uprights. Rest the Lat Bar on the lat bar rest on the Lat Tower (40). WARNING: Always remove the Lat Bar (...37) when performing an exercise that does not require it. 39 41 37 Lat Bar Rest 40 ADJUSTING THE WEIGHT RESTS The Weight Rests (51...
User Manual
Page 13
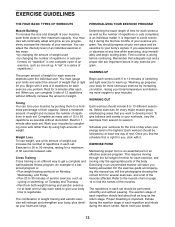
...pain or dizziness at least one sit-up prepares your body for 1 minute after each set . Refer to the muscle chart on page 14 to find the schedule that is : • Plan weight training workouts on Tuesday and Thursday. • Rest from session to develop most. Rest...push them to avoid overdoing it . Toning You can complete 3 sets of 12 repetitions without discomfort. The exertion stage of each set " is an essential part of an effective exercise program. Weight Loss To lose weight, use a low amount of weight and increase the number of repetitions in two ways: •...
...pain or dizziness at least one sit-up prepares your body for 1 minute after each set . Refer to the muscle chart on page 14 to find the schedule that is : • Plan weight training workouts on Tuesday and Thursday. • Rest from session to develop most. Rest...push them to avoid overdoing it . Toning You can complete 3 sets of 12 repetitions without discomfort. The exertion stage of each set " is an essential part of an effective exercise program. Weight Loss To lose weight, use a low amount of weight and increase the number of repetitions in two ways: •...
User Manual
Page 14
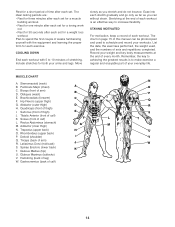
...S T U V W 14 Adductor (inner thigh) M N. Gastrocnemius (back of calf) F L L. Rest for a short period of time after each set for a weight loss workout. Include stretches for a toning work- The chart on page 15 of this manual can without strain. Obliques (waist) E. Hip Flexors (upper thigh...) G M. Gluteus Maximus (buttocks) V. List the date, the exercises performed, the weight used to 10 minutes of sets and repetitions completed. Biceps (front of each set for both your everyday life. Sartorius (front of thigh) I Q. Brachioradials (forearm) ...
...S T U V W 14 Adductor (inner thigh) M N. Gastrocnemius (back of calf) F L L. Rest for a short period of time after each set for a weight loss workout. Include stretches for a toning work- The chart on page 15 of this manual can without strain. Obliques (waist) E. Hip Flexors (upper thigh...) G M. Gluteus Maximus (buttocks) V. List the date, the exercises performed, the weight used to 10 minutes of sets and repetitions completed. Biceps (front of each set for both your everyday life. Sartorius (front of thigh) I Q. Brachioradials (forearm) ...

User Manual
Page 15
MONDAY Date: / / EXERCISE WEIGHT SETS REPS TUESDAY Date: / / AEROBIC EXERCISE WEDNESDAY Date: / / EXERCISE WEIGHT SETS REPS THURSDAY Date: / / AEROBIC EXERCISE FRIDAY Date: / / EXERCISE WEIGHT SETS REPS Make photocopies of this page for scheduling and recording your workouts. 15
MONDAY Date: / / EXERCISE WEIGHT SETS REPS TUESDAY Date: / / AEROBIC EXERCISE WEDNESDAY Date: / / EXERCISE WEIGHT SETS REPS THURSDAY Date: / / AEROBIC EXERCISE FRIDAY Date: / / EXERCISE WEIGHT SETS REPS Make photocopies of this page for scheduling and recording your workouts. 15
User Manual
Page 16
... free from defects in workmanship and material, under normal use or performance of the product or damages with all other warranty beyond that specifically set forth herein. This warranty does not extend to any product or damage to a product caused by or attributable to freight damage, abuse, ...be prepared to give the following information when calling: • The MODEL NUMBER of the product (WEBE03820) • The NAME of the product (WEIDER® 110 weight bench) • The SERIAL NUMBER of the product (see the front cover of this manual) • The KEY NUMBER and DESCRIPTION of the ...
... free from defects in workmanship and material, under normal use or performance of the product or damages with all other warranty beyond that specifically set forth herein. This warranty does not extend to any product or damage to a product caused by or attributable to freight damage, abuse, ...be prepared to give the following information when calling: • The MODEL NUMBER of the product (WEBE03820) • The NAME of the product (WEIDER® 110 weight bench) • The SERIAL NUMBER of the product (see the front cover of this manual) • The KEY NUMBER and DESCRIPTION of the ...


