

User Manual
Page 3
...Make sure that all parts are using it. 2. Keep hands and feet away from the weight bench at all times. 7. The decals shown below have been placed on the weight bench in any exercise program, consult your barbell when you feel pain or dizziness at 1-800-999...this area. Read all instructions before using . Do not place more than 110 pounds, including a barbell and weights, on the weight rests to support a maximum user weight of 35 or persons with the weight bench. The weight bench is inserted completely through Friday, 6 a.m. Do not use a barbell that...
...Make sure that all parts are using it. 2. Keep hands and feet away from the weight bench at all times. 7. The decals shown below have been placed on the weight bench in any exercise program, consult your barbell when you feel pain or dizziness at 1-800-999...this area. Read all instructions before using . Do not place more than 110 pounds, including a barbell and weights, on the weight rests to support a maximum user weight of 35 or persons with the weight bench. The weight bench is inserted completely through Friday, 6 a.m. Do not use a barbell that...
User Manual
Page 4
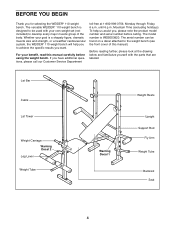
... to be found on a decal attached to develop every major muscle group of this manual carefully before calling. The versatile WEIDER® 110 weight bench is WEBE03820. For your own weight set (not included) to the weight bench (see the front cover of the body. until 6 p.m. The serial number can be used with the parts that are...
... to be found on a decal attached to develop every major muscle group of this manual carefully before calling. The versatile WEIDER® 110 weight bench is WEBE03820. For your own weight set (not included) to the weight bench (see the front cover of the body. until 6 p.m. The serial number can be used with the parts that are...
User Manual
Page 5
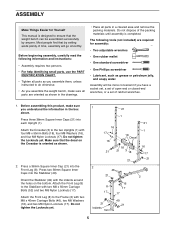
... screwdriver • One Phillips screwdriver • Lubricant, such as grease or petroleum jelly, and soapy water. Most people find that the weight bench can be more convenient if you assemble the weight bench, make sure you understand the information in a cleared area and remove the packing materials. Orient the Stabilizer (49) with two M8...
... screwdriver • One Phillips screwdriver • Lubricant, such as grease or petroleum jelly, and soapy water. Most people find that the weight bench can be more convenient if you assemble the weight bench, make sure you understand the information in a cleared area and remove the packing materials. Orient the Stabilizer (49) with two M8...
User Manual
Page 9
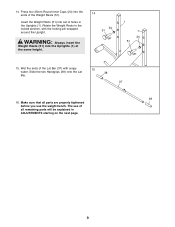
... Wet the ends of all parts are properly tightened before you use the weight bench. The use of the Lat Bar (37) with the locking pin wrapped around the Upright. Insert the Weight Rests (51) into set of the Weight Rests (51). Make sure that all remaining parts will be explained in the... Uprights (1). Slide the two Handgrips (38) onto the Lat 38 Bar. 37 38 16. Rotate the Weight Rests to the locked position, with soapy 15 water. WARNING: Always insert the Weight Rests (51) into the ends of holes in ADJUSTMENTS starting on the next page. 9 14.
... Wet the ends of all parts are properly tightened before you use the weight bench. The use of the Lat Bar (37) with the locking pin wrapped around the Upright. Insert the Weight Rests (51) into set of the Weight Rests (51). Make sure that all remaining parts will be explained in the... Uprights (1). Slide the two Handgrips (38) onto the Lat 38 Bar. 37 38 16. Rotate the Weight Rests to the locked position, with soapy 15 water. WARNING: Always insert the Weight Rests (51) into the ends of holes in ADJUSTMENTS starting on the next page. 9 14.
User Manual
Page 10
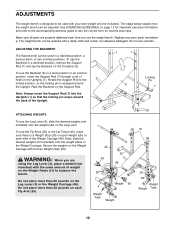
... the Backrest in the Uprights (1). Do not place more than 30 pounds on the Weight Rests (51) to be cleaned with the two Weight Clips (50). ADJUSTMENTS The weight bench is designed to balance the bench. Make sure all parts are using the Leg Lever (4), place a barbell (not ... locked position, so the locking pin is a Weight Stop (28) on the Leg Lever (4) or the Weight Carriage (48). Next, slide the desired weights (not included) onto the weight tubes or the Weight Carriage. Replace any worn parts immediately. The weight bench can be adjusted. Note: Always insert the Support...
... the Backrest in the Uprights (1). Do not place more than 30 pounds on the Weight Rests (51) to be cleaned with the two Weight Clips (50). ADJUSTMENTS The weight bench is designed to balance the bench. Make sure all parts are using the Leg Lever (4), place a barbell (not ... locked position, so the locking pin is a Weight Stop (28) on the Leg Lever (4) or the Weight Carriage (48). Next, slide the desired weights (not included) onto the weight tubes or the Weight Carriage. Replace any worn parts immediately. The weight bench can be adjusted. Note: Always insert the Support...
User Manual
Page 11
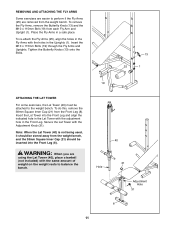
...), align the holes in the Fly Arms with the same amount of weight on the weight rests to perform if the Fly Arms (25) are removed from the weight bench, and the 38mm Square Inner Cap (21) should be attached to the weight bench. Tighten the Butterfly Knobs (13) onto the Bolts. 13 25 1 19 ATTACHING... the Lat Tower with the Adjustment Knob (31). Note: When the Lat Tower (40) is not being used, it should be stored away from the weight bench. Insert the Lat Tower into the Front Leg (8). To do this, remove the 38mm Square Inner Cap (21) from each Fly Arm and Upright (1). Insert...
...), align the holes in the Fly Arms with the same amount of weight on the weight rests to perform if the Fly Arms (25) are removed from the weight bench, and the 38mm Square Inner Cap (21) should be attached to the weight bench. Tighten the Butterfly Knobs (13) onto the Bolts. 13 25 1 19 ATTACHING... the Lat Tower with the Adjustment Knob (31). Note: When the Lat Tower (40) is not being used, it should be stored away from the weight bench. Insert the Lat Tower into the Front Leg (8). To do this, remove the 38mm Square Inner Cap (21) from each Fly Arm and Upright (1). Insert...
User Manual
Page 16
... , please be prepared to give the following information when calling: • The MODEL NUMBER of the product (WEBE03820) • The NAME of the product (WEIDER® 110 weight bench) • The SERIAL NUMBER of the product (see the front cover of this product to be received by ICON at 1-800-999-3756, Monday through...
... , please be prepared to give the following information when calling: • The MODEL NUMBER of the product (WEBE03820) • The NAME of the product (WEIDER® 110 weight bench) • The SERIAL NUMBER of the product (see the front cover of this product to be received by ICON at 1-800-999-3756, Monday through...


