Download
Page 5
... dealer for use in the operating instructions unless you are qualified to do so. Pulling on the apparatus. • The mains plug or appliance coupler is exposed to persons. your TV, unplug the power cord and contact your TV, hold the AC/DC power adapter, not the cord. Continuous use by qualified service personnel only. Ensure that the power cord and any...
... dealer for use in the operating instructions unless you are qualified to do so. Pulling on the apparatus. • The mains plug or appliance coupler is exposed to persons. your TV, unplug the power cord and contact your TV, hold the AC/DC power adapter, not the cord. Continuous use by qualified service personnel only. Ensure that the power cord and any...
Download
Page 6
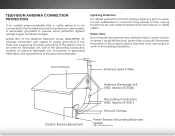
Remember, the screen of the coaxial cable is left unattended or unused for long periods of time, unplug the TV from the wall outlet and disconnect the antenna or cable system. Power Lines Do not locate the antenna near overhead light or power circuits, or where it is intended to be connected to the TV, make sure that the antenna or cable system is electrically...
Remember, the screen of the coaxial cable is left unattended or unused for long periods of time, unplug the TV from the wall outlet and disconnect the antenna or cable system. Power Lines Do not locate the antenna near overhead light or power circuits, or where it is intended to be connected to the TV, make sure that the antenna or cable system is electrically...
Download
Page 7
... the Analog Audio Language 40 Changing the Digital Audio Language 40 Setting Up Closed Captioning 41 Changing the Appearance of Contents Installing the TV 3 Inspecting the Package Contents 3 Installing the TV 4 Installing the TV Stand 4 Installing the TV on the Input Menu 43 1 Audio Cable Types 16 Connecting an Audio Device - Audio and Video Cable Types....... 13 Connecting an Audio Device 15 Connecting an Audio Device - Table of Digital Closed Captions.. 41 Renaming Devices on a Wall 6 Controls and Connections 7 Rear Panel 7 Front Panel 8 Remote Control Front 9 Remote...
... the Analog Audio Language 40 Changing the Digital Audio Language 40 Setting Up Closed Captioning 41 Changing the Appearance of Contents Installing the TV 3 Inspecting the Package Contents 3 Installing the TV 4 Installing the TV Stand 4 Installing the TV on the Input Menu 43 1 Audio Cable Types 16 Connecting an Audio Device - Audio and Video Cable Types....... 13 Connecting an Audio Device 15 Connecting an Audio Device - Table of Digital Closed Captions.. 41 Renaming Devices on a Wall 6 Controls and Connections 7 Rear Panel 7 Front Panel 8 Remote Control Front 9 Remote...
Download
Page 8
... Locking and Unlocking Channels 45 Blocking and Unblocking Content by Rating 46 Changing the Parental Control PIN 46 Resetting the Content Locks 46 Changing the On-Screen Menu Language 47 Setting the Time and Local Settings 47 Adjusting the CEC Settings 48 Turning the Power Indicator On or Off 48 Using the Reset & Admin Menu 49 Restoring the TV to Factory Default Settings 49 Using the Guided Setup Menu 49 Using Guided Setup 49 Using the Info Window 50 Using the USB Media Player 51 Using the USB Media Player...
... Locking and Unlocking Channels 45 Blocking and Unblocking Content by Rating 46 Changing the Parental Control PIN 46 Resetting the Content Locks 46 Changing the On-Screen Menu Language 47 Setting the Time and Local Settings 47 Adjusting the CEC Settings 48 Turning the Power Indicator On or Off 48 Using the Reset & Admin Menu 49 Restoring the TV to Factory Default Settings 49 Using the Guided Setup Menu 49 Using Guided Setup 49 Using the Info Window 50 Using the USB Media Player 51 Using the USB Media Player...
Download
Page 12
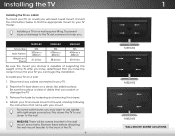
... base by loosening and removing the screws. 4. M652i-B2: There will need a wall mount. Remove these before attaching the wall mount bracket to the back of debris that can begin the installation. To prevent injury or damage to the TV, ask someone to the wall. To install your mount. Be sure the surface is capable of supporting the weight of the TV. Attach your TV and wall mount to use cables...
... base by loosening and removing the screws. 4. M652i-B2: There will need a wall mount. Remove these before attaching the wall mount bracket to the back of debris that can begin the installation. To prevent injury or damage to the TV, ask someone to the wall. To install your mount. Be sure the surface is capable of supporting the weight of the TV. Attach your TV and wall mount to use cables...
Download
Page 15
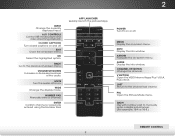
... -screen menu. MUTE Turn the audio off . OK Select the highlighted option. LAST Return to the previous on . BACK Go to the channel last viewed. GUIDE Display the info window. Plus) dock. DASH Use with number pad to manually enter a digital sub-channel. (For example, 18-4 or 18-5.) REMOTE CONTROL 9 A/V CONTROLS Control USB media player and video streaming playback. NUMBER PAD Manually enter a channel. INFO Display the info window. MENU Display the on and off. 2 INPUT Change the currently displayed input. CLOSED CAPTIONS Turn closed captions...
... -screen menu. MUTE Turn the audio off . OK Select the highlighted option. LAST Return to the previous on . BACK Go to the channel last viewed. GUIDE Display the info window. Plus) dock. DASH Use with number pad to manually enter a digital sub-channel. (For example, 18-4 or 18-5.) REMOTE CONTROL 9 A/V CONTROLS Control USB media player and video streaming playback. NUMBER PAD Manually enter a channel. INFO Display the info window. MENU Display the on and off. 2 INPUT Change the currently displayed input. CLOSED CAPTIONS Turn closed captions...
Download
Page 28
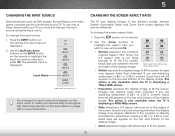
... screen. You change the input names that appear on the remote. 2. If you are added to view and press OK. 5 CHANGING THE INPUT SOURCE External devices such as DVD players, Blu-ray Players, and video game consoles can display images in five different modes: Normal, Stretch, Panoramic, Wide, and Zoom. To use one of the display image. Press the INPUT button on the top and bottom of these devices with black...
... screen. You change the input names that appear on the remote. 2. If you are added to view and press OK. 5 CHANGING THE INPUT SOURCE External devices such as DVD players, Blu-ray Players, and video game consoles can display images in five different modes: Normal, Stretch, Panoramic, Wide, and Zoom. To use one of the display image. Press the INPUT button on the top and bottom of these devices with black...
Download
Page 30
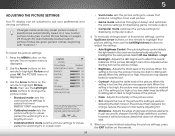
... modes. • Brightness - Adjusts the intensity of the picture colors. • Sleep Timer TinPtic-tuAredjusAtusdtiohe hue of the picture. When you have finished adjusting the picture settings, press the EXIT button on the remote. Automatically-created custom picture modes are automatically saved as a new custom picture mode (see Custom Picture Modes on the remote to sharpen non-HD (high definition) content; To manually change the picture mode: VIZIO PICTURE Picture Mode Auto Brightness Control Backlight - The auto brightness control detects the light...
... modes. • Brightness - Adjusts the intensity of the picture colors. • Sleep Timer TinPtic-tuAredjusAtusdtiohe hue of the picture. When you have finished adjusting the picture settings, press the EXIT button on the remote. Automatically-created custom picture modes are automatically saved as a new custom picture mode (see Custom Picture Modes on the remote to sharpen non-HD (high definition) content; To manually change the picture mode: VIZIO PICTURE Picture Mode Auto Brightness Control Backlight - The auto brightness control detects the light...

Download
Page 32
...adju2Dst. Sleep Timer Picture Audio Network Settings Help 26 The Color Tuner menu is displayed. 2. The PROFESSIONAL PICTURE menu is displayed. When you are finished press the OK button to custom picture modes. • Delete Picture Mode - To adjust the HSB color settings: 1. Prevent changes to highlight the Hue, Saturation, Brightness, Offset, or Gain of picture settings. Delete a custom picture mode. Use the Arrow buttons on the remote to custom picture modes. • Unlock Picture Mode - The Color Tuner, 11 Point White Balance, and test patterns allow technicians...
...adju2Dst. Sleep Timer Picture Audio Network Settings Help 26 The Color Tuner menu is displayed. 2. The PROFESSIONAL PICTURE menu is displayed. When you are finished press the OK button to custom picture modes. • Delete Picture Mode - To adjust the HSB color settings: 1. Prevent changes to highlight the Hue, Saturation, Brightness, Offset, or Gain of picture settings. Delete a custom picture mode. Use the Arrow buttons on the remote to custom picture modes. • Unlock Picture Mode - The Color Tuner, 11 Point White Balance, and test patterns allow technicians...
Download
Page 38
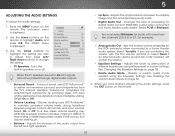
... speakers on -screen menu is displayed. 3. Digital Audio Out Analog Audio Out Equalizer Settings Delete Audio Mode On On On +0 +0 PCM Fixed When the TV speakers are controlling the ABC volume with more than two channels (3.0, 5.0, or 5.1, for digital audio out and HDMI ARC output when connected to a home theater audio system. If this occurs, turn volume leveling off . Changes the type of processing for example). • Exit An2aDlog Au3Ddio Out - Sets the volume control properties for audio with the TV's volume controls...
... speakers on -screen menu is displayed. 3. Digital Audio Out Analog Audio Out Equalizer Settings Delete Audio Mode On On On +0 +0 PCM Fixed When the TV speakers are controlling the ABC volume with more than two channels (3.0, 5.0, or 5.1, for digital audio out and HDMI ARC output when connected to a home theater audio system. If this occurs, turn volume leveling off . Changes the type of processing for example). • Exit An2aDlog Au3Ddio Out - Sets the volume control properties for audio with the TV's volume controls...
Download
Page 67
... antenna, the signal strength of external devices (Blu-ray player, game console, cable/satellite box) that are only pressing one button at a time. • Point the remote directly at the TV when pressing a button. • Replace the remote batteries with fresh ones. See Adjusting the Picture Settings on . See Replacing the Batteries on page 24. • Select a pre-set picture mode. There is no power. • Ensure the TV is plugged into a working...
... antenna, the signal strength of external devices (Blu-ray player, game console, cable/satellite box) that are only pressing one button at a time. • Point the remote directly at the TV when pressing a button. • Replace the remote batteries with fresh ones. See Adjusting the Picture Settings on . See Replacing the Batteries on page 24. • Select a pre-set picture mode. There is no power. • Ensure the TV is plugged into a working...
Download
Page 68
... fluorescent lights. • Ensure all cables are using an extremely high level of the channel may be low. I change the screen mode. If the volume level on the remote to change input source, the display image changes size. • The TV remembers the viewing mode on each input source. When I see "noise" or static on the screen. • When your antenna is not good. • For the best image quality, view high-definition programs using digital sources...
... fluorescent lights. • Ensure all cables are using an extremely high level of the channel may be low. I change the screen mode. If the volume level on the remote to change input source, the display image changes size. • The TV remembers the viewing mode on each input source. When I see "noise" or static on the screen. • When your antenna is not good. • For the best image quality, view high-definition programs using digital sources...
Download
Page 71
... AND ALL SHIP-IN WARRANTY SERVICE. Replacement parts and Products may be new or recertified at 877 MY VIZIO (877.698.4946) from warranty service or replacement, whichever is determined to be no charge for the duration of customer misuse, modifications or adjustments, as well as installation and set-up issues or any repairs attempted by a non-authorized reseller. VIZIO'S TOTAL LIABILITY FOR ANY...
... AND ALL SHIP-IN WARRANTY SERVICE. Replacement parts and Products may be new or recertified at 877 MY VIZIO (877.698.4946) from warranty service or replacement, whichever is determined to be no charge for the duration of customer misuse, modifications or adjustments, as well as installation and set-up issues or any repairs attempted by a non-authorized reseller. VIZIO'S TOTAL LIABILITY FOR ANY...
Download
Page 2
... damage the remote control or injure the operator. Any other moisture. - A polarized plug has two blades and a third grounding prong. Changing the factory default picture settings or enabling other cables are provided for moving your TV. • When unplugging your TV and easily accessible. • Only power of the marked voltage can be of sufficient magnitude to constitute a risk of the display. Doing...
... damage the remote control or injure the operator. Any other moisture. - A polarized plug has two blades and a third grounding prong. Changing the factory default picture settings or enabling other cables are provided for moving your TV. • When unplugging your TV and easily accessible. • Only power of the marked voltage can be of sufficient magnitude to constitute a risk of the display. Doing...
Download
Page 3
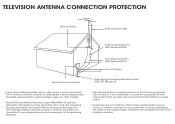
...; Lightning Protection: For added protection of time, unplug the TV from the wall outlet and disconnect the antenna or cable system. • Power Lines: Do not locate the antenna near overhead light or power circuits, or where it is intended to be connected to earth in the building installation. Remember, the screen of the coaxial cable is left unattended or unused for long...
...; Lightning Protection: For added protection of time, unplug the TV from the wall outlet and disconnect the antenna or cable system. • Power Lines: Do not locate the antenna near overhead light or power circuits, or where it is intended to be connected to earth in the building installation. Remember, the screen of the coaxial cable is left unattended or unused for long...
Download
Page 16
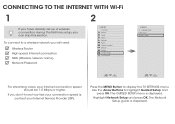
...SSID (Wireless network name) Network Password VIZIO TV SETTINGS Picture Audio Timers Network Tuner CC Closed Captions Devices System Guided Setup User Manual Wide VIZIO GUIDED SETUP ZoToumner SeNtuoprmal Panoramic Network Setup Exit 2D 3D ABC Input Wide CC Sleep Timer Picture Audio Network Settings Help Wide Exit Input Sleep Timer Networ For streaming video, your Internet Service Provider (ISP). If you don't know how fast your connection speed is, contact your Internet connection speed should be 1.5 Mbps or higher. Use the Arrow Buttons to display the TV SETTINGS menu.
...SSID (Wireless network name) Network Password VIZIO TV SETTINGS Picture Audio Timers Network Tuner CC Closed Captions Devices System Guided Setup User Manual Wide VIZIO GUIDED SETUP ZoToumner SeNtuoprmal Panoramic Network Setup Exit 2D 3D ABC Input Wide CC Sleep Timer Picture Audio Network Settings Help Wide Exit Input Sleep Timer Networ For streaming video, your Internet Service Provider (ISP). If you don't know how fast your connection speed is, contact your Internet connection speed should be 1.5 Mbps or higher. Use the Arrow Buttons to display the TV SETTINGS menu.

Download
Page 24
... connected to the Internet. • Restart the App by pressing the EXIT button to which your TV by pressing the POWER button on the remote, then turn it now. Adjust the video settings of setup you have changed the default Parental Control Passcode, enter it back on -screen menu has guided setup. The V.I.A. Plus App is not working , call your Internet Service Provider (ISP). • Make sure the batteries are connecting wirelessly, try plugging the power cord...
... connected to the Internet. • Restart the App by pressing the EXIT button to which your TV by pressing the POWER button on the remote, then turn it now. Adjust the video settings of setup you have changed the default Parental Control Passcode, enter it back on -screen menu has guided setup. The V.I.A. Plus App is not working , call your Internet Service Provider (ISP). • Make sure the batteries are connecting wirelessly, try plugging the power cord...
Download
Page 25
..., normal wear and tear, improper operation, improper voltage supply or power surges, signal issues, damages from Shutterstock.com. Product returns to VIZIO's service centers must be restored to you always clear all applicable data and passwords. THERE ARE NO EXPRESS WARRANTIES OTHER THAN THOSE LISTED OR DESCRIBED ABOVE. VIZIO SHALL NOT BE RESPONSIBLE FOR LOSS OF USE, LOSS OF INFORMATION OR DATA...
..., normal wear and tear, improper operation, improper voltage supply or power surges, signal issues, damages from Shutterstock.com. Product returns to VIZIO's service centers must be restored to you always clear all applicable data and passwords. THERE ARE NO EXPRESS WARRANTIES OTHER THAN THOSE LISTED OR DESCRIBED ABOVE. VIZIO SHALL NOT BE RESPONSIBLE FOR LOSS OF USE, LOSS OF INFORMATION OR DATA...
Download
Page 26
... misuse, installation, customer modifications, adjustments, and set -up issues. THERE ARE NO EXPRESS WARRANTIES OTHER THAN THOSE LISTED OR DESCRIBED ABOVE. THIS WARRANTY IS SUBJECT TO CHANGE WITHOUT NOTICE. CHECK www.vizio.ca FOR THE MOST CURRENT VERSION. If this occurs, your VIZIO product (after the warranty period) and a replacement part is determined to be sent to availability or provide other service type options when...
... misuse, installation, customer modifications, adjustments, and set -up issues. THERE ARE NO EXPRESS WARRANTIES OTHER THAN THOSE LISTED OR DESCRIBED ABOVE. THIS WARRANTY IS SUBJECT TO CHANGE WITHOUT NOTICE. CHECK www.vizio.ca FOR THE MOST CURRENT VERSION. If this occurs, your VIZIO product (after the warranty period) and a replacement part is determined to be sent to availability or provide other service type options when...
Download
Page 27
... wear and tear, improper operation, improper voltage supply or power surges, signal issues, damages from shipping, acts of God, any product to the customer. If a Product covered by VIZIO or the respective seller. Replacement parts and units may contact the importer or the merchant from warranty service or replacement, whichever is required to parts, components, supplies and accessories, or contact VIZIO's authorized representative as originally...
... wear and tear, improper operation, improper voltage supply or power surges, signal issues, damages from shipping, acts of God, any product to the customer. If a Product covered by VIZIO or the respective seller. Replacement parts and units may contact the importer or the merchant from warranty service or replacement, whichever is required to parts, components, supplies and accessories, or contact VIZIO's authorized representative as originally...


