Download
Page 6
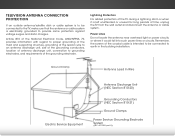
... Discharge Unit (NEC Section 810-20) Grounding Conductors (NEC Section 810-21) Ground Clamps Power Service Grounding Electrode System (NEC ART 250, part H) Remember, the screen of time, unplug the TV from the wall outlet and disconnect the antenna or cable system. Lightning Protection For added protection of the TV during...
... Discharge Unit (NEC Section 810-20) Grounding Conductors (NEC Section 810-21) Ground Clamps Power Service Grounding Electrode System (NEC ART 250, part H) Remember, the screen of time, unplug the TV from the wall outlet and disconnect the antenna or cable system. Lightning Protection For added protection of the TV during...
Download
Page 7
... a Wired Network (Best 16 Connecting to a Wireless Network 16 Completing the First-Time Setup 17 Using the On-Screen Menu 19 Navigating the On-Screen Menu 19 Changing the Input Source 20 Changing the Screen Aspect Ratio 20 Adjusting the Picture Settings 21 Adjusting the Picture Size and Position 22 Adjusting the Color...
... a Wired Network (Best 16 Connecting to a Wireless Network 16 Completing the First-Time Setup 17 Using the On-Screen Menu 19 Navigating the On-Screen Menu 19 Changing the Input Source 20 Changing the Screen Aspect Ratio 20 Adjusting the Picture Settings 21 Adjusting the Picture Size and Position 22 Adjusting the Color...
Download
Page 8
Blocking and Unblocking Content by Rating 35 Changing the Parental Control Passcode 36 Resetting the Content Locks 36 Changing the On-Screen Menu Language 36 Setting the Time Zone 37 Adjusting the CEC Settings 37 Turning the Power Indicator On or Off 38 Using the Reset & Admin ... Using the USB Media Player 42 Using the USB Media Player 42 Connecting a USB Thumb Drive to the TV 42 Playing USB Media 42 Using VIZIO Internet Apps 46 Using the VIA Dock 46 Using the Hot Keys 46 Troubleshooting & Technical Support 47 Specifications 50 Limited Warranty 52 Legal & Compliance 53...
Blocking and Unblocking Content by Rating 35 Changing the Parental Control Passcode 36 Resetting the Content Locks 36 Changing the On-Screen Menu Language 36 Setting the Time Zone 37 Adjusting the CEC Settings 37 Turning the Power Indicator On or Off 38 Using the Reset & Admin ... Using the USB Media Player 42 Using the USB Media Player 42 Connecting a USB Thumb Drive to the TV 42 Playing USB Media 42 Using VIZIO Internet Apps 46 Using the VIA Dock 46 Using the Hot Keys 46 Troubleshooting & Technical Support 47 Specifications 50 Limited Warranty 52 Legal & Compliance 53...

Download
Page 10
It is recommended that two people take part in the base installation. Align the Neck piece with the Base. 3. To prevent scratches or damage to insert and tighten the four(4) included M5 x 14mm Phillips screws into the holes on the bottom of the Base. 4 Remove any plastic wrapping from the TV and the stand. Place the TV screen-down on a soft surface such as a blanket. 2. Use a Phillips screwdriver to the screen, place the TV on a clean, flat surface. 1 To install the base: 1.
It is recommended that two people take part in the base installation. Align the Neck piece with the Base. 3. To prevent scratches or damage to insert and tighten the four(4) included M5 x 14mm Phillips screws into the holes on the bottom of the Base. 4 Remove any plastic wrapping from the TV and the stand. Place the TV screen-down on a soft surface such as a blanket. 2. Use a Phillips screwdriver to the screen, place the TV on a clean, flat surface. 1 To install the base: 1.
Download
Page 15
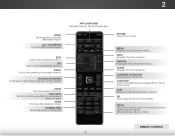
... VOL GUIDE CH 3D 1 2 3 4 5 6 7 8 9 ENTER 0 2 Power Turn TV on . Channel Up/Down Change the channel. Plus) dock. Exit Close the on -screen menu. Guide Display the info window. V Button Open the VIZIO Internet Apps Plus™ (V.I.A. Number Pad Manually enter a channel. App launcher Quickly launch the pictured app. Menu Display the on...
... VOL GUIDE CH 3D 1 2 3 4 5 6 7 8 9 ENTER 0 2 Power Turn TV on . Channel Up/Down Change the channel. Plus) dock. Exit Close the on -screen menu. Guide Display the info window. V Button Open the VIZIO Internet Apps Plus™ (V.I.A. Number Pad Manually enter a channel. App launcher Quickly launch the pictured app. Menu Display the on...

Download
Page 23
... BACK VOL GUIDE CH 3D 6. Select the name of your First Name, Last Name, Phone Number, ZIP Code, and E-mail Address using the on -screen keyboard. 1 2 3 Highlight Next and press OK. 4 5 6 7 8 9 17 Enter your wireless network from the list of available networks and ...press OK. 2. LIST EXIT MENU INFO Enter the network key using the on -screen keyboard, then highlight Connect and press OK. To complete the first-time setup: 1. Press the Power/Standby button on and the Setup App starts....
... BACK VOL GUIDE CH 3D 6. Select the name of your First Name, Last Name, Phone Number, ZIP Code, and E-mail Address using the on -screen keyboard. 1 2 3 Highlight Next and press OK. 4 5 6 7 8 9 17 Enter your wireless network from the list of available networks and ...press OK. 2. LIST EXIT MENU INFO Enter the network key using the on -screen keyboard, then highlight Connect and press OK. To complete the first-time setup: 1. Press the Power/Standby button on and the Setup App starts....
Download
Page 25
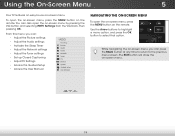
...Input Wide CC VOL CH Sleep Timer Picture Audio 3D Network Settings Help 1 2 3 4 5 6 7 8 9 ENTER 0 19 The EXIT button will close the on -screen menu. From this menu, you can press the BACK button at any time to return to the previous Exit 2Dmenu3Dscreen. You can : • Adjust the ...; Access the Guided Setup • Access the User Manual VIZIO TV Settings Picture Audio Timers Network Tuner CC CC Devices System Guided Setup User Manual Navigating the On-Screen Menu To open the on the remote. Using the On-Screen Menu INPUT 5 Your TV features an easy-to-use on...
...Input Wide CC VOL CH Sleep Timer Picture Audio 3D Network Settings Help 1 2 3 4 5 6 7 8 9 ENTER 0 19 The EXIT button will close the on -screen menu. From this menu, you can press the BACK button at any time to return to the previous Exit 2Dmenu3Dscreen. You can : • Adjust the ...; Access the Guided Setup • Access the User Manual VIZIO TV Settings Picture Audio Timers Network Tuner CC CC Devices System Guided Setup User Manual Navigating the On-Screen Menu To open the on the remote. Using the On-Screen Menu INPUT 5 Your TV features an easy-to-use on...

Download
Page 26
...being stretched, the display image may appear wider than intended. Normal Panoramic Wide Zoom • Panoramic expands the display image to the edges of the screen. Use the Up/Down Arrow buttons on the remote to highlight the Input you wish to view and press OK. • Normal preserves the ... first change the input source in four different modes: Normal, Panoramic, Wide, and Zoom. Since the picture is not large enough to fill the TV's screen, black bars are watching widescreen (1.85:1 or 2.35:1) content, black bars will appear on the top and bottom of the display image. • Zoom...
...being stretched, the display image may appear wider than intended. Normal Panoramic Wide Zoom • Panoramic expands the display image to the edges of the screen. Use the Up/Down Arrow buttons on the remote to highlight the Input you wish to view and press OK. • Normal preserves the ... first change the input source in four different modes: Normal, Panoramic, Wide, and Zoom. Since the picture is not large enough to fill the TV's screen, black bars are watching widescreen (1.85:1 or 2.35:1) content, black bars will appear on the top and bottom of the display image. • Zoom...
Download
Page 27
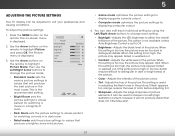
... Mode, then use the Left/Right Arrow buttons to change each individual setting by using the Left/Right Arrow buttons to change the picture mode: VIZIO Picture Picture Mode Backlight Brightness Contrast Color Tint Sharpness Standard - + 50 - + 50 - + 50 - + 50 - +0 - +0 More • Standard mode sets ... too low, the picture may be too dark to distinguish details. Adjusts the white level of picture elements. Press the MENU button on -screen menu is too high or too low, detail may be difficult to distinguish in dark or bright areas of the picture. • Sleep...
... Mode, then use the Left/Right Arrow buttons to change each individual setting by using the Left/Right Arrow buttons to change the picture mode: VIZIO Picture Picture Mode Backlight Brightness Contrast Color Tint Sharpness Standard - + 50 - + 50 - + 50 - + 50 - +0 - +0 More • Standard mode sets ... too low, the picture may be too dark to distinguish details. Adjusts the white level of picture elements. Press the MENU button on -screen menu is too high or too low, detail may be difficult to distinguish in dark or bright areas of the picture. • Sleep...
Download
Page 29
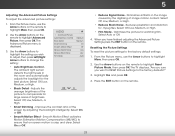
VIZIO Advanced Picture Auto Brightness Control Black Detail Smart Dimming Smooth Motion Effect ...Medium, or High. • Smart Dimming - Reduces pixellation and distortion for watching film. Use the Arrow buttons on -screen motion is displayed. Network Settings Help 23 Use the Arrow buttons on the remote. Adjusts the average brightness of image motion...press the EXIT button on the remote to compensate for the best picture. Improves the contrast ratio of the screen by the digitizing of the picture to highlight Advanced Picture, then press OK.The Advanced Picture menu is crisp...
VIZIO Advanced Picture Auto Brightness Control Black Detail Smart Dimming Smooth Motion Effect ...Medium, or High. • Smart Dimming - Reduces pixellation and distortion for watching film. Use the Arrow buttons on -screen motion is displayed. Network Settings Help 23 Use the Arrow buttons on the remote. Adjusts the average brightness of image motion...press the EXIT button on the remote to compensate for the best picture. Improves the contrast ratio of the screen by the digitizing of the picture to highlight Advanced Picture, then press OK.The Advanced Picture menu is crisp...
Download
Page 30
...buttons to On, DTS signals cannot be passed through digital audio outputs. • Volume Leveling - Turns the built-in speakers on -screen menu is displayed. Press the MENU button on the remote. • Surround Sound - Adjusts the synchronization between program content, AV ...Note: When TV speakers are set EQ Mode Sleep Timer to control the external speakers' volume from the TV's internal speakers. VIZIO Audio Balance - TV Speakers Surround Sound Volume Leveling 3. Adjusts the loudness of dWiifdfeerentCfCrequencies. Changes the type of processing for the ...
...buttons to On, DTS signals cannot be passed through digital audio outputs. • Volume Leveling - Turns the built-in speakers on -screen menu is displayed. Press the MENU button on the remote. • Surround Sound - Adjusts the synchronization between program content, AV ...Note: When TV speakers are set EQ Mode Sleep Timer to control the external speakers' volume from the TV's internal speakers. VIZIO Audio Balance - TV Speakers Surround Sound Volume Leveling 3. Adjusts the loudness of dWiifdfeerentCfCrequencies. Changes the type of processing for the ...
Download
Page 31
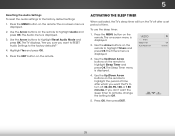
... to the factory defaults?" 4. Use the Up/Down Arrow buttons on the remote to highlight Sleep Timer and press OK. Use the Arrow buttons on -screen menu is displayed. 2. Highlight Yes and press OK. 5. Press the MENU button on the remote. 5 Resetting the Audio Settings To reset the audio ... is displayed. 3. Use the Up/Down Arrow buttons on the remote. The Sleep Timer menu is displayed. 2. Press OK, then press EXIT. 25 VIZIO Timers Sleep Timer Auto Power Off Off 10 mins 3. If you want the TV to highlight Timers and press OK. Use the Arrow buttons on...
... to the factory defaults?" 4. Use the Up/Down Arrow buttons on the remote to highlight Sleep Timer and press OK. Use the Arrow buttons on -screen menu is displayed. 2. Highlight Yes and press OK. 5. Press the MENU button on the remote. 5 Resetting the Audio Settings To reset the audio ... is displayed. 3. Use the Up/Down Arrow buttons on the remote. The Sleep Timer menu is displayed. 2. Press OK, then press EXIT. 25 VIZIO Timers Sleep Timer Auto Power Off Off 10 mins 3. If you want the TV to highlight Timers and press OK. Use the Arrow buttons on...
Download
Page 32
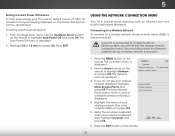
...remote. Use the Arrow buttons on the remote to highlight Network and press OK. Highlight Off or 10 min and press OK. VIZIO Network Wired Connection Disconnected Wireless Access Points Manual Setup Hidden Network Test Connection 6. You must disconnect the Ethernet cable to turn off after... to a Wireless Network To connect to a network with an Ethernet cable, you do not see the wireless network connection menu. The on the screen. The More Access Points menu, which is a list of your wireless network (this is internet-ready, featuring both an Ethernet port and built-...
...remote. Use the Arrow buttons on the remote to highlight Network and press OK. Highlight Off or 10 min and press OK. VIZIO Network Wired Connection Disconnected Wireless Access Points Manual Setup Hidden Network Test Connection 6. You must disconnect the Ethernet cable to turn off after... to a Wireless Network To connect to a network with an Ethernet cable, you do not see the wireless network connection menu. The on the screen. The More Access Points menu, which is a list of your wireless network (this is internet-ready, featuring both an Ethernet port and built-...
Download
Page 33
...FF:FF:FF • Subnet Mask - If you need the RJ45 (Ethernet) MAC address or the Wireless MAC address to the TV. VIZIO Hidden Network Please enter your network's name In(pSuSt ID),Wtihdeen hiCgChlight Connect and press OK. 5. DNS Server - Your alternate domain name.... 2. Use the Arrow buttons on the remote. Using the on the Nertweomrk otSeet.tings Help 27 Press the EXIT button on -screen keyboard, STlietm ehenepertenrhPyiicogtuuhrerlignheAttuwCdoioorkn'ns epcatsaswnodrd, press OK. To change any of the Change Settings menu. 4. Use the Arrow and OK buttons...
...FF:FF:FF • Subnet Mask - If you need the RJ45 (Ethernet) MAC address or the Wireless MAC address to the TV. VIZIO Hidden Network Please enter your network's name In(pSuSt ID),Wtihdeen hiCgChlight Connect and press OK. 5. DNS Server - Your alternate domain name.... 2. Use the Arrow buttons on the remote. Using the on the Nertweomrk otSeet.tings Help 27 Press the EXIT button on -screen keyboard, STlietm ehenepertenrhPyiicogtuuhrerlignheAttuwCdoioorkn'ns epcatsaswnodrd, press OK. To change any of the Change Settings menu. 4. Use the Arrow and OK buttons...
Download
Page 34
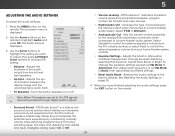
The Test Connection screen displays the connection method, network name, signal strength, and download speed of your network connection: 1. Press the EXIT button on the remote. 5 Using the Tuner ... Channel Scan • Perform a Partial Channel Scan • Manually Add Channels • Select Channels to skip • Select Analog MTS modes • Select Digital Languages VIZIO Tuner Tuner Mode Auto Channel Scan Partial Channel Search Add Analog Channel Skip Channel Analog Audio Digital Language Antenna Stereo English 28 From the Network...
The Test Connection screen displays the connection method, network name, signal strength, and download speed of your network connection: 1. Press the EXIT button on the remote. 5 Using the Tuner ... Channel Scan • Perform a Partial Channel Scan • Manually Add Channels • Select Channels to skip • Select Analog MTS modes • Select Digital Languages VIZIO Tuner Tuner Mode Auto Channel Scan Partial Channel Search Add Analog Channel Skip Channel Analog Audio Digital Language Antenna Stereo English 28 From the Network...
Download
Page 38
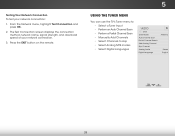
...color. If the program you are viewing is not being broadcast with the appearance of the closed captions, press the EXIT button on -screen menu is displayed. 3. The on the remote. For example, CC1 may display English captions and CC2 may display Spanish captions. 32 ...to see : • Analog Closed Caption for analog (NTSC) TV channels. • Digital Closed Caption for programs that include them . VIZIO Closed Caption Analog Closed Caption Off Digital Closed Caption Off Digital CC Style As Broadcast Caption channels usually display different languages. The Digital CC ...
...color. If the program you are viewing is not being broadcast with the appearance of the closed captions, press the EXIT button on -screen menu is displayed. 3. The on the remote. For example, CC1 may display English captions and CC2 may display Spanish captions. 32 ...to see : • Analog Closed Caption for analog (NTSC) TV channels. • Digital Closed Caption for programs that include them . VIZIO Closed Caption Analog Closed Caption Off Digital Closed Caption Off Digital CC Style As Broadcast Caption channels usually display different languages. The Digital CC ...
Download
Page 39
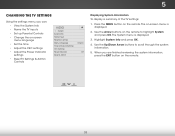
...the time • Adjust the CEC settings • Adjust the Power Indicator settings • Reset TV Settings & Admin Controls VIZIO System System Info Name Input Parental Controls Menu Language Time and Local Settings CEC Settings Power Indicator Reset & Admin English Off Displaying ...System Information To display a summary of the TV settings: 1. The on-screen menu is displayed. 3. Highlight System Info and press OK. 4. Use the Arrow buttons on the remote to scroll through the system information. ...
...the time • Adjust the CEC settings • Adjust the Power Indicator settings • Reset TV Settings & Admin Controls VIZIO System System Info Name Input Parental Controls Menu Language Time and Local Settings CEC Settings Power Indicator Reset & Admin English Off Displaying ...System Information To display a summary of the TV settings: 1. The on-screen menu is displayed. 3. Highlight System Info and press OK. 4. Use the Arrow buttons on the remote to scroll through the system information. ...
Download
Page 40
... is displayed. 4. Input Wide CC To set a passcode, enter the default, 0000. For example, if you can rename that input to use and press OK. VIZIO Name Input Input Source TV Input Labels TV TV_ abc def ghi j k l mn o p q r s t u v wx y z 0 123456789 .@# .com Space Select input ... finished naming your input, press the EXIT button on the remote to highlight System and press OK. Press the MENU button on -screen menu is displayed. 2.WiUdese thZoeomArroNwormbaul ttPoannosraominc the remote to highlight Parental Controls and press OK. Use the Arrow buttons on the remote....
... is displayed. 4. Input Wide CC To set a passcode, enter the default, 0000. For example, if you can rename that input to use and press OK. VIZIO Name Input Input Source TV Input Labels TV TV_ abc def ghi j k l mn o p q r s t u v wx y z 0 123456789 .@# .com Space Select input ... finished naming your input, press the EXIT button on the remote to highlight System and press OK. Press the MENU button on -screen menu is displayed. 2.WiUdese thZoeomArroNwormbaul ttPoannosraominc the remote to highlight Parental Controls and press OK. Use the Arrow buttons on the remote....
Download
Page 42
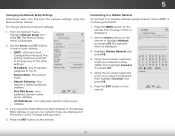
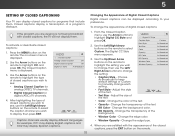
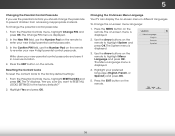
.... From the Parental Controls menu, highlight RESET LOCKS and press OK. Highlight Yes and press OK. Press the MENU button on the remote. VIZIO Menu Language English Français Español 3. Press the EXIT button on the remote to highlight System and press OK. From the ...the remote to re-enter your preferred language (English, French, or Spanish) and press OK. 5. In the Confirm Pin field, use the Number Pad on -screen menu in a secure location. 4. The Change PIN menu is displayed. 2. Resetting the Content Locks To reset the content locks to the factory-default settings: ...
.... From the Parental Controls menu, highlight RESET LOCKS and press OK. Highlight Yes and press OK. Press the MENU button on the remote. VIZIO Menu Language English Français Español 3. Press the EXIT button on the remote to highlight System and press OK. From the ...the remote to re-enter your preferred language (English, French, or Spanish) and press OK. 5. In the Confirm Pin field, use the Number Pad on -screen menu in a secure location. 4. The Change PIN menu is displayed. 2. Resetting the Content Locks To reset the content locks to the factory-default settings: ...
Download
Page 43
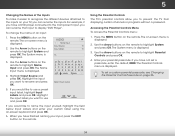
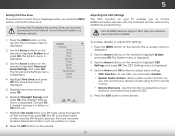
... CEC settings: 1. Press the MENU button on the remote. Use the Arrow buttons on your device's audio using the keypad on -screen menu is connected and supports CEC. 5. ABC 4. Sleep • Timer DePvicitcuree DiAsucdoiovery - Adjusting the CEC Settings The CEC function on... OK. Highlight your device's user manual for details. 1. 5 Setting the Time Zone To ensure the correct time is displayed. 4. VIZIO Time Zone Alaska Hawaii Pacific Mountain Central Eastern Atlantic Newfoundland Indiana Arizona 5. Enter your device is displayed. 2. The ZIP code information is...
... CEC settings: 1. Press the MENU button on the remote. Use the Arrow buttons on your device's audio using the keypad on -screen menu is connected and supports CEC. 5. ABC 4. Sleep • Timer DePvicitcuree DiAsucdoiovery - Adjusting the CEC Settings The CEC function on... OK. Highlight your device's user manual for details. 1. 5 Setting the Time Zone To ensure the correct time is displayed. 4. VIZIO Time Zone Alaska Hawaii Pacific Mountain Central Eastern Atlantic Newfoundland Indiana Arizona 5. Enter your device is displayed. 2. The ZIP code information is...

