Download
Page 1
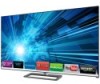
... should I do I don't know what your signal with other video streaming. How do ? My Internet connection is secure. See the device's user manual for more information. Wired - If you've confirmed that your smart device can test it here: www.speedtest.net, or contact your area. 2. ... switching the setting to a lower quality to set up your network: 1. If you are two ways that your Internet connection speed. However, VIZIO recommends using radio waves, also known as Wi-Fi, transmitted through a router. If your network is caused by changes in your network speed is...
... should I do I don't know what your signal with other video streaming. How do ? My Internet connection is secure. See the device's user manual for more information. Wired - If you've confirmed that your smart device can test it here: www.speedtest.net, or contact your area. 2. ... switching the setting to a lower quality to set up your network: 1. If you are two ways that your Internet connection speed. However, VIZIO recommends using radio waves, also known as Wi-Fi, transmitted through a router. If your network is caused by changes in your network speed is...
Download
Page 3
When Reading this Manual When you see this apparatus near water. • Clean only with the manufacturer...following safety instructions before connecting other apparatus (including amplifiers) that you to protect your investment beyond the standard warranty, VIZIO offers on your TV. We recommend that produce heat. • Do not defeat the safety purpose of mind...The wide blade or the third prong are no missing or damaged parts. To get the most out of your new VIZIO product, read these instructions. • Heed all warnings. • Follow all instructions. • Do not use ...
When Reading this Manual When you see this apparatus near water. • Clean only with the manufacturer...following safety instructions before connecting other apparatus (including amplifiers) that you to protect your investment beyond the standard warranty, VIZIO offers on your TV. We recommend that produce heat. • Do not defeat the safety purpose of mind...The wide blade or the third prong are no missing or damaged parts. To get the most out of your new VIZIO product, read these instructions. • Heed all warnings. • Follow all instructions. • Do not use ...
Download
Page 7
... Activating the Sleep Timer 25 Setting the Auto Power Off Feature 26 Using the Network Connection Menu 26 Connecting to a Wireless Network 26 Changing the Manual Setup Settings 27 Connecting to a Hidden Network 27 Testing Your Network Connection 28 Using the Tuner Menu 28 Selecting a Tuner Input 29 Scanning for Channels...
... Activating the Sleep Timer 25 Setting the Auto Power Off Feature 26 Using the Network Connection Menu 26 Connecting to a Wireless Network 26 Changing the Manual Setup Settings 27 Connecting to a Hidden Network 27 Testing Your Network Connection 28 Using the Tuner Menu 28 Selecting a Tuner Input 29 Scanning for Channels...
Download
Page 15
... Up/Down Change the channel. Exit Close the on this model) Dash Use with number pad to the previous on -screen menu. Back Go to manually enter a digital sub-channel. (For example, 18-4 or 18-5.) Remote Control 9 Volume Up/Down Increase or decrease loudness of the audio. Mute ...Turn the audio off . Number Pad Manually enter a channel. Menu Display the on -screen menu. Guide Display the info window. Plus) dock. Remote Control Input Change the currently displayed input. Info ...
... Up/Down Change the channel. Exit Close the on this model) Dash Use with number pad to the previous on -screen menu. Back Go to manually enter a digital sub-channel. (For example, 18-4 or 18-5.) Remote Control 9 Volume Up/Down Increase or decrease loudness of the audio. Mute ...Turn the audio off . Number Pad Manually enter a channel. Menu Display the on -screen menu. Guide Display the info window. Plus) dock. Remote Control Input Change the currently displayed input. Info ...
Download
Page 25
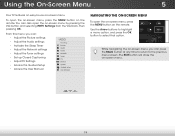
... • Set up Closed Captioning • Adjust TV Settings • Access the Guided Setup • Access the User Manual VIZIO TV Settings Picture Audio Timers Network Tuner CC CC Devices System Guided Setup User Manual Navigating the On-Screen Menu To open the on-screen menu, press the MENU button on -screen menu...
... • Set up Closed Captioning • Adjust TV Settings • Access the Guided Setup • Access the User Manual VIZIO TV Settings Picture Audio Timers Network Tuner CC CC Devices System Guided Setup User Manual Navigating the On-Screen Menu To open the on-screen menu, press the MENU button on -screen menu...
Download
Page 32
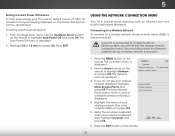
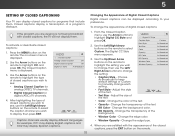
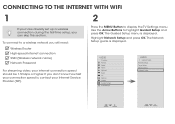
If you will not see your wireless network (this is displayed. 2. VIZIO Network Wired Connection Disconnected Wireless Access Points Manual Setup Hidden Network Test Connection 6. Press the EXIT button on -screen menu is the network's SSID) and press OK. 5. Using the Network Connection Menu Your ...
If you will not see your wireless network (this is displayed. 2. VIZIO Network Wired Connection Disconnected Wireless Access Points Manual Setup Hidden Network Test Connection 6. Press the EXIT button on -screen menu is the network's SSID) and press OK. 5. Using the Network Connection Menu Your ...
Download
Page 33
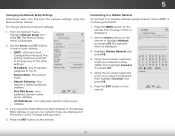
...DNS Server - Press the MENU button on the WirdeemoZtoeomto hiNgorhmlaigl hPtaNnoeratmwicork and press OK. Use the Arrow buttons on the remote. VIZIO Hidden Network Please enter your network, these are displayed at the bottom of the other settings. • IP Address - ExHitighlig2Dht...default gateway address. • Pref. 5 Changing the Manual Setup Settings Advanced users can fine-tune the network settings using the Manual Setup feature. From the Network menu, highlight Manual Setup and VIZIO press OK. The Manual Setup Manual Setup menu is displayed. Use the Arrow and OK ...
...DNS Server - Press the MENU button on the WirdeemoZtoeomto hiNgorhmlaigl hPtaNnoeratmwicork and press OK. Use the Arrow buttons on the remote. VIZIO Hidden Network Please enter your network, these are displayed at the bottom of the other settings. • IP Address - ExHitighlig2Dht...default gateway address. • Pref. 5 Changing the Manual Setup Settings Advanced users can fine-tune the network settings using the Manual Setup feature. From the Network menu, highlight Manual Setup and VIZIO press OK. The Manual Setup Manual Setup menu is displayed. Use the Arrow and OK ...
Download
Page 34
... to: • Select a Tuner Input • Perform an Auto Channel Scan • Perform a Partial Channel Scan • Manually Add Channels • Select Channels to skip • Select Analog MTS modes • Select Digital Languages VIZIO Tuner Tuner Mode Auto Channel Scan Partial Channel Search Add Analog Channel Skip Channel Analog Audio Digital...
... to: • Select a Tuner Input • Perform an Auto Channel Scan • Perform a Partial Channel Scan • Manually Add Channels • Select Channels to skip • Select Analog MTS modes • Select Digital Languages VIZIO Tuner Tuner Mode Auto Channel Scan Partial Channel Search Add Analog Channel Skip Channel Analog Audio Digital...
Download
Page 38
... to highlight the setting you wish to highlight CC and press OK. Change the background color. To change each Input settWinidge . CC • Font Style - VIZIO Closed Caption Analog Closed Caption Off Digital Closed Caption Off Digital CC Style As Broadcast Caption channels usually display different languages. Adjust Audio the size... the caption channel you wish BG Opacity Window Color Window Opacity As Broadcast As Broadcast As Broadcast to change, then use the Arrow buttons to manually change the appearance of Digital Closed Captions Digital closed captions: 1.
... to highlight the setting you wish to highlight CC and press OK. Change the background color. To change each Input settWinidge . CC • Font Style - VIZIO Closed Caption Analog Closed Caption Off Digital Closed Caption Off Digital CC Style As Broadcast Caption channels usually display different languages. Adjust Audio the size... the caption channel you wish BG Opacity Window Color Window Opacity As Broadcast As Broadcast As Broadcast to change, then use the Arrow buttons to manually change the appearance of Digital Closed Captions Digital closed captions: 1.
Download
Page 43
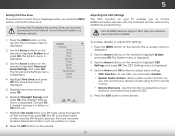
...connected and supports CEC. 5. Not all HDMI devices support CEC. See your time zone and press OK. 6. Highlight your device's user manual for details. 1. The Daylight Savings menu is displayed. 3. The System menu is displayed. Use this function to control HDMI-connected devices...the included remote without any additional programming. Use the Arrow buttons on the remote to highlight CEC Settings and press OK. VIZIO Time Zone Alaska Hawaii Pacific Mountain Central Eastern Atlantic Newfoundland Indiana Arizona 5. Highlight Zip Code. The ZIP code information is ...
...connected and supports CEC. 5. Not all HDMI devices support CEC. See your time zone and press OK. 6. Highlight your device's user manual for details. 1. The Daylight Savings menu is displayed. 3. The System menu is displayed. Use this function to control HDMI-connected devices...the included remote without any additional programming. Use the Arrow buttons on the remote to highlight CEC Settings and press OK. VIZIO Time Zone Alaska Hawaii Pacific Mountain Central Eastern Atlantic Newfoundland Indiana Arizona 5. Highlight Zip Code. The ZIP code information is ...

Download
Page 54
see your antenna is no image on the screen. • Ensure all devices are connected correctly. Ensure your device's user manual for Channels on page 29. See Resetting the Picture Settings on page 23. • Check all cables to a window for channels. There is connected securely ...
see your antenna is no image on the screen. • Ensure all devices are connected correctly. Ensure your device's user manual for Channels on page 29. See Resetting the Picture Settings on page 23. • Check all cables to a window for channels. There is connected securely ...

Download
Page 6
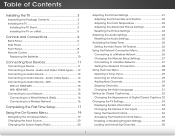
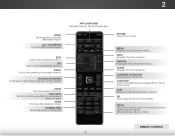
...(Not supported on -screen menu or app. LIST EXIT MENU INFO OK Select the highlighted option. MUTE Turn the audio off . NUMBER PAD Manually enter a channel. INFO Display the info window. INPUT A/V CONTROLS Control USB media player. HOT KEYS Perform functions within an on this model) ...EXIT Close the on -screen menu. USING THE REMOTE INPUT Change the currently-displayed input. ARROW Navigate the on -screen menu. BACK Go to manually enter a digital sub-channel. (For example, 18-4 or 18-5.) MENU Display the on -screen menu. APP LAUNCHER Quickly launch the pictured ...
...(Not supported on -screen menu or app. LIST EXIT MENU INFO OK Select the highlighted option. MUTE Turn the audio off . NUMBER PAD Manually enter a channel. INFO Display the info window. INPUT A/V CONTROLS Control USB media player. HOT KEYS Perform functions within an on this model) ...EXIT Close the on -screen menu. USING THE REMOTE INPUT Change the currently-displayed input. ARROW Navigate the on -screen menu. BACK Go to manually enter a digital sub-channel. (For example, 18-4 or 18-5.) MENU Display the on -screen menu. APP LAUNCHER Quickly launch the pictured ...
Download
Page 10
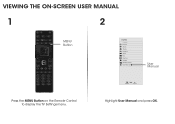
VIEWING THE ON-SCREEN USER MANUAL 1 INPUT LIST EXIT MENU INFO BACK VOL GUIDE CH 3D 1 2 3 4 5 6 7 8 9 ENTER 0 MENU Button 2 VIZIO TV Settings Picture Audio Timers Network Tuner CC CC Devices System Guided Setup User Manual Wide Zoom Normal Panoramic Exit 2D 3D ABC User Input Wide CC Manual Sleep Timer Picture Audio Network Settings Help Press the MENU Button on the Remote Control to display the TV Settings menu. Highlight User Manual and press OK.
VIEWING THE ON-SCREEN USER MANUAL 1 INPUT LIST EXIT MENU INFO BACK VOL GUIDE CH 3D 1 2 3 4 5 6 7 8 9 ENTER 0 MENU Button 2 VIZIO TV Settings Picture Audio Timers Network Tuner CC CC Devices System Guided Setup User Manual Wide Zoom Normal Panoramic Exit 2D 3D ABC User Input Wide CC Manual Sleep Timer Picture Audio Network Settings Help Press the MENU Button on the Remote Control to display the TV Settings menu. Highlight User Manual and press OK.

Download
Page 11
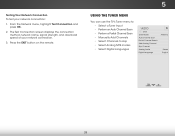
...Completing the First-Time Setup Using the On-Screen Menu Using the USB Media Player Using VIZIO Internet Apps Troubleshooting & Technical Support Specifications Limited Warranty Legal & Compliance LCD HDTV WITH VIZIO INTERNET APPS® MENU Press the EXIT Button to page, use Number Pad, then ...press OK. INPUT LIST EXIT BACK USER MANUAL USE YOUR REMOTE Previous Page Next Page Menu Open TV Menu PAGE ...
...Completing the First-Time Setup Using the On-Screen Menu Using the USB Media Player Using VIZIO Internet Apps Troubleshooting & Technical Support Specifications Limited Warranty Legal & Compliance LCD HDTV WITH VIZIO INTERNET APPS® MENU Press the EXIT Button to page, use Number Pad, then ...press OK. INPUT LIST EXIT BACK USER MANUAL USE YOUR REMOTE Previous Page Next Page Menu Open TV Menu PAGE ...
Download
Page 14
... Settings Picture Audio Timers Network Tuner CC CC Devices System Guided Setup User Manual Wide Exit VIZIO Guided Setup ZoRoemmote NSeotrumpal Panoramic Tuner Setup Device Setup Network Setup 2D 3D ABC Input Wide CC Wide Exit Input Sleep Timer Picture Audio Sleep ...
... Settings Picture Audio Timers Network Tuner CC CC Devices System Guided Setup User Manual Wide Exit VIZIO Guided Setup ZoRoemmote NSeotrumpal Panoramic Tuner Setup Device Setup Network Setup 2D 3D ABC Input Wide CC Wide Exit Input Sleep Timer Picture Audio Sleep ...
Download
Page 15
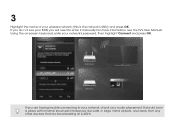
3 Highlight the name of your network's password, then highlight Connect and press OK. For more information, see your router placement. Using the on-screen keyboard, enter your wireless network (this is the network's SSID) and press OK. If you do not see the TV's User Manual. It should be in a place with minimal structural interference like walls or large metal objects, and away from any other devices that are having trouble connecting to your network, check your SSID, you will need to enter it manually. If you are broadcasting at 2.4GHz.
3 Highlight the name of your network's password, then highlight Connect and press OK. For more information, see your router placement. Using the on-screen keyboard, enter your wireless network (this is the network's SSID) and press OK. If you do not see the TV's User Manual. It should be in a place with minimal structural interference like walls or large metal objects, and away from any other devices that are having trouble connecting to your network, check your SSID, you will need to enter it manually. If you are broadcasting at 2.4GHz.

