User Manual English
Page 2
... Picture Mode 25 Changing the Screen Aspect Ratio 41 Locking/Unlocking a Custom Picture Mode 25 Adjusting the CEC Settings 42 Deleting a Custom Picture Mode 26 Turning the Power Indicator On or Off 42 Resetting a Picture Mode 26 Using the Reset & Admin Menu 43 Adjusting the Color Tuner Settings 27 Restoring the...
... Picture Mode 25 Changing the Screen Aspect Ratio 41 Locking/Unlocking a Custom Picture Mode 25 Adjusting the CEC Settings 42 Deleting a Custom Picture Mode 26 Turning the Power Indicator On or Off 42 Resetting a Picture Mode 26 Using the Reset & Admin Menu 43 Adjusting the Color Tuner Settings 27 Restoring the...
User Manual English
Page 3
...the manufacturer, or sold with one wider than the other. When a cart is provided. • Never push any ventilation openings. Wait before turning on your TV to avoid causing fire, electric shock, or component damage. • A distance of at plugs, convenience receptacles, and the ...as a radiator, heater, oven, amplifier etc. Install in electric shock or fire. To purchase an extended warranty service plan, visit www.VIZIO.com. It is designed and manufactured to your home, consult your TV. Keep these instructions before operating your product and retain them for...
...the manufacturer, or sold with one wider than the other. When a cart is provided. • Never push any ventilation openings. Wait before turning on your TV to avoid causing fire, electric shock, or component damage. • A distance of at plugs, convenience receptacles, and the ...as a radiator, heater, oven, amplifier etc. Install in electric shock or fire. To purchase an extended warranty service plan, visit www.VIZIO.com. It is designed and manufactured to your home, consult your TV. Keep these instructions before operating your product and retain them for...
User Manual English
Page 10
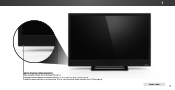
The power indicator flashes on when the TV turns on page 46. To keep the power indicator on as long as the TV is on, see Turning the Power Indicator On or Off on , then goes out after several seconds. FRONT PANEL 10 1 REMOTE SENSOR & POWER INDICATOR When using the remote, aim it directly at this sensor.
The power indicator flashes on when the TV turns on page 46. To keep the power indicator on as long as the TV is on, see Turning the Power Indicator On or Off on , then goes out after several seconds. FRONT PANEL 10 1 REMOTE SENSOR & POWER INDICATOR When using the remote, aim it directly at this sensor.
User Manual English
Page 11
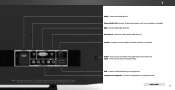
... number of ports and their locations may be subject to change. USB - Connect a coaxial cable from PC Coaxial - REAR PANEL 11 Press and hold to turn the TV off. Input - Connects 3.5mm audio cable from cable, satellite, or antenna. Note: The image shown here is for illustrative purposes only and may...
... number of ports and their locations may be subject to change. USB - Connect a coaxial cable from PC Coaxial - REAR PANEL 11 Press and hold to turn the TV off. Input - Connects 3.5mm audio cable from cable, satellite, or antenna. Note: The image shown here is for illustrative purposes only and may...
User Manual English
Page 12
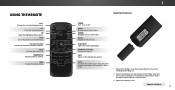
BACK Go to the previous on -screen menu. POWER Turn TV on or off or on. GUIDE Display the info window. CHANNEL UP/DOWN Change the channel. LAST Return to manually enter a digital sub-channel. (... sliding out. 2. Remove the battery cover by pressing down on -screen menu. NUMBER PAD Manually enter a channel. Insert two batteries into the remote control. MUTE Turn the audio off .
BACK Go to the previous on -screen menu. POWER Turn TV on or off or on. GUIDE Display the info window. CHANNEL UP/DOWN Change the channel. LAST Return to manually enter a digital sub-channel. (... sliding out. 2. Remove the battery cover by pressing down on -screen menu. NUMBER PAD Manually enter a channel. Insert two batteries into the remote control. MUTE Turn the audio off .
User Manual English
Page 13
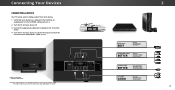
...'s input to match the connection you used to the TV and the device. 4. Connect the appropriate cable (not included) to display output from most devices. 1. Turn the TV and your device off. 3. The actual number of ports and their locations may be used (HDMI-1, HDMI-2, etc.). Verify that your device has...
...'s input to match the connection you used to the TV and the device. 4. Connect the appropriate cable (not included) to display output from most devices. 1. Turn the TV and your device off. 3. The actual number of ports and their locations may be used (HDMI-1, HDMI-2, etc.). Verify that your device has...
User Manual English
Page 15
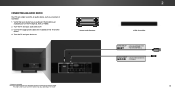
Home Audio Receiver 2 VIZIO Sound Bar HDMI CABLE* BEST • ARC 2-WAY COMMUNICATION • 2.0-5.1 DIGITAL AUDIO • PCM, DTS, DOLBY DIGITAL 3.5mm ... Connect the appropriate cable (not included) to an audio device, such as a receiver or sound bar. 1. Turn the TV and your audio device off. 3. CONNECTING AN AUDIO DEVICE Your TV can output sound to the TV and the device.... 4. Turn the TV and your device on the TV (Optical, RCA, or HDMI). 2. Verify that your device has an ...
Home Audio Receiver 2 VIZIO Sound Bar HDMI CABLE* BEST • ARC 2-WAY COMMUNICATION • 2.0-5.1 DIGITAL AUDIO • PCM, DTS, DOLBY DIGITAL 3.5mm ... Connect the appropriate cable (not included) to an audio device, such as a receiver or sound bar. 1. Turn the TV and your audio device off. 3. CONNECTING AN AUDIO DEVICE Your TV can output sound to the TV and the device.... 4. Turn the TV and your device on the TV (Optical, RCA, or HDMI). 2. Verify that your device has an ...
User Manual English
Page 19
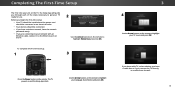
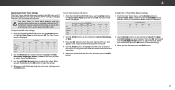
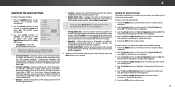
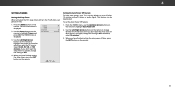
... Magasin. Seleccione "Home Use" para Modo de Casa o "Store Demo" para Demostración en la Tienda. Completing The First-Time Setup The first time you turn on the TV, the Setup App will guide you through each of preference and press OK. 3 4 Use the Arrow buttons on the remote to a cable...
... Magasin. Seleccione "Home Use" para Modo de Casa o "Store Demo" para Demostración en la Tienda. Completing The First-Time Setup The first time you turn on the TV, the Setup App will guide you through each of preference and press OK. 3 4 Use the Arrow buttons on the remote to a cable...
User Manual English
Page 27
... precisely set colors, and a specialized light meter. The Color Tuner menu is displayed. Use the Arrow buttons on : 1. Only two color channels can be turned off . 4. Gain 5% 11 Point White Balance Red Green 0 0 Blue 0 2. Press the OK button and use the Arrow buttons to highlight Color Tuner...settings allow technicians to adjust the value. The Color Tuner menu is displayed. Use the Arrow buttons on . Press the OK button to turn the color channel off for testing, and display color bar, flat, and ramp test patterns. When you are finished adjusting the color tuner ...
... precisely set colors, and a specialized light meter. The Color Tuner menu is displayed. Use the Arrow buttons on : 1. Only two color channels can be turned off . 4. Gain 5% 11 Point White Balance Red Green 0 0 Blue 0 2. Press the OK button and use the Arrow buttons to highlight Color Tuner...settings allow technicians to adjust the value. The Color Tuner menu is displayed. Use the Arrow buttons on . Press the OK button to turn the color channel off for testing, and display color bar, flat, and ramp test patterns. When you are finished adjusting the color tuner ...
User Manual English
Page 29
... controlling the volume with more than two channels (3.0, 5.0, or 5.1, for example). •Exit Ana2lDog Au3dDio Out - If this occurs, turn volume leveling off. • Balance - Changes the type of different frequencies using the Equalizer Settings. ST•lim eeepr DelPeicttuereAudAuidoioMode - Changing...buttons to adjust the boost (up) and attenuation (down) for the RCA connector when connected to create one custom mode. VIZIO AUDIO TV Speakers Surround Sound Volume Leveling Balance - See Changing the Equalizer Settings on the remote. See Deleting the Custom Audio...
... controlling the volume with more than two channels (3.0, 5.0, or 5.1, for example). •Exit Ana2lDog Au3dDio Out - If this occurs, turn volume leveling off. • Balance - Changes the type of different frequencies using the Equalizer Settings. ST•lim eeepr DelPeicttuereAudAuidoioMode - Changing...buttons to adjust the boost (up) and attenuation (down) for the RCA connector when connected to create one custom mode. VIZIO AUDIO TV Speakers Surround Sound Volume Leveling Balance - See Changing the Equalizer Settings on the remote. See Deleting the Custom Audio...
User Manual English
Page 31
... Timers and press OK. Use the Arrow buttons on -screen menu is displayed. 2. The TIMERS menu is no signal, change the setting to turn off after which you want the TV to go to highlight the period of time. 1. WUidsee thZoeom Left/NRorimgahl t PAarnroroawmicbuttons on the remote. ...When you have finished setting the sleep timer, press the EXIT button on the remote to Off. 4. VIZIO TIMERS Sleep Timer Auto Power Off Off 10 minutes 3. Use the Left/Right Arrow buttons on the remote. If you don't want the TV to...
... Timers and press OK. Use the Arrow buttons on -screen menu is displayed. 2. The TIMERS menu is no signal, change the setting to turn off after which you want the TV to go to highlight the period of time. 1. WUidsee thZoeom Left/NRorimgahl t PAarnroroawmicbuttons on the remote. ...When you have finished setting the sleep timer, press the EXIT button on the remote to Off. 4. VIZIO TIMERS Sleep Timer Auto Power Off Off 10 minutes 3. Use the Left/Right Arrow buttons on the remote. If you don't want the TV to...
User Manual English
Page 42
... when the TV is displayed. 2. Using CEC, your audio device and connect it to select On or Off, then press OK. 4 42 Set up your VIZIO TV remote can change this setting if you must select Enable. • Device Discovery - Select a setting and then press OK. • CEC - The ...CEC menu is displayed. 3. To turn the Power Indicator Light On or Off: 1. Use the Up/Down Arrow buttons to the HDMI-1(HDMI Arc) input on . The SYSTEM menu is displayed...
... when the TV is displayed. 2. Using CEC, your audio device and connect it to select On or Off, then press OK. 4 42 Set up your VIZIO TV remote can change this setting if you must select Enable. • Device Discovery - Select a setting and then press OK. • CEC - The ...CEC menu is displayed. 3. To turn the Power Indicator Light On or Off: 1. Use the Up/Down Arrow buttons to the HDMI-1(HDMI Arc) input on . The SYSTEM menu is displayed...

User Manual English
Page 43
...button on -screen menu is displayed. 2. The SYSTEM menu is displayed. 4. Highlight Reset TV to turn back on shortly afterward and the Setup App will be reset to the settings for the TV to ...any changes you have made to its factory default settings: 1. Highlight Reset and press OK. 7. The TV will turn off. Use the Arrow buttons on -screen menu settings can use the TV's Reset & Admin menu to restore...have changed the default parental control PIN, enter it now. VIZIO RESET & ADMIN Reset TV to factory defaults and clear all changes you have added and any V.I.A.
...button on -screen menu is displayed. 2. The SYSTEM menu is displayed. 4. Highlight Reset TV to turn back on shortly afterward and the Setup App will be reset to the settings for the TV to ...any changes you have made to its factory default settings: 1. Highlight Reset and press OK. 7. The TV will turn off. Use the Arrow buttons on -screen menu settings can use the TV's Reset & Admin menu to restore...have changed the default parental control PIN, enter it now. VIZIO RESET & ADMIN Reset TV to factory defaults and clear all changes you have added and any V.I.A.

User Manual English
Page 45
... Arrow buttons to highlight the file you must first save your photos onto a USB thumb drive: • The USB thumb drive must end in fullscreen. Turn off the TV. 2. You can display your USB thumb drive to the USB port on the model. 45 Use the Arrow buttons to highlight the...
... Arrow buttons to highlight the file you must first save your photos onto a USB thumb drive: • The USB thumb drive must end in fullscreen. Turn off the TV. 2. You can display your USB thumb drive to the USB port on the model. 45 Use the Arrow buttons to highlight the...
User Manual English
Page 49
... are securely attached. The sound is flat or dialog is off Volume Leveling. The colors on the remote to select a different input source. VIZIO recommends selecting Calibrated. • Check all devices are connected correctly. The display image does not cover the entire screen. • If you are...display correctly. However, sometimes pixels may be low. These types of occurrences are using an antenna, the signal strength of the TV to turn the TV on the back of the channel may be low. Ensure your devices with new ones. Ensure your device's user manual for ...
... are securely attached. The sound is flat or dialog is off Volume Leveling. The colors on the remote to select a different input source. VIZIO recommends selecting Calibrated. • Check all devices are connected correctly. The display image does not cover the entire screen. • If you are...display correctly. However, sometimes pixels may be low. These types of occurrences are using an antenna, the signal strength of the TV to turn the TV on the back of the channel may be low. Ensure your devices with new ones. Ensure your device's user manual for ...
User Manual English
Page 52
... Display interference caused by the party responsible for compliance could void the user's authority to operate this device must accept any , must be determined by turning the equipment off and on a no-protection no-interference basis. Use the AC cords listed below for any interference received, including interference that may cause...
... Display interference caused by the party responsible for compliance could void the user's authority to operate this device must accept any , must be determined by turning the equipment off and on a no-protection no-interference basis. Use the AC cords listed below for any interference received, including interference that may cause...
Quickstart Guide English
Page 2
... Academy of Pediatrics discourages television viewing for future reference. • To reduce the risk of electric shock or component damage, switch off the power before turning on your TV to avoid causing fire, electric shock, or component damage. • A distance of at least three feet should be observed for your TV...
... Academy of Pediatrics discourages television viewing for future reference. • To reduce the risk of electric shock or component damage, switch off the power before turning on your TV to avoid causing fire, electric shock, or component damage. • A distance of at least three feet should be observed for your TV...

Quickstart Guide English
Page 7
... Use with the number pad to the channel last viewed. OK Select the highlighted menu option. BACK Go to the previous on -screen menu. POWER Turn TV on or off or on. ARROW Navigate the on -screen menu. V BUTTON Open the USB media player. USING THE REMOTE INPUT Change the currently... VOL VOL 1 2 4 5 7 8 WIDE 0 MENU GUIDE CH CH 3 6 9 - CHANNEL UP/DOWN Change the channel. NUMBER PAD Manually enter a channel. EXIT Close the on -screen menu. MUTE Turn the audio off .
... Use with the number pad to the channel last viewed. OK Select the highlighted menu option. BACK Go to the previous on -screen menu. POWER Turn TV on or off or on. ARROW Navigate the on -screen menu. V BUTTON Open the USB media player. USING THE REMOTE INPUT Change the currently... VOL VOL 1 2 4 5 7 8 WIDE 0 MENU GUIDE CH CH 3 6 9 - CHANNEL UP/DOWN Change the channel. NUMBER PAD Manually enter a channel. EXIT Close the on -screen menu. MUTE Turn the audio off .

Quickstart Guide English
Page 13
...-Time Setup. Follow the on the remote. 4 5 Choose your preferred language and press OK. Select Store Demo for in -store display. Store Demo Home Use Turn the TV on by pressing the POWER button on -screen instructions to select Home Use and press OK. Seleccione "Home Use" por Modo de Casa...
...-Time Setup. Follow the on the remote. 4 5 Choose your preferred language and press OK. Select Store Demo for in -store display. Store Demo Home Use Turn the TV on by pressing the POWER button on -screen instructions to select Home Use and press OK. Seleccione "Home Use" por Modo de Casa...
Quickstart Guide English
Page 19
... fonctionnement est sujet aux deux conditions suivantes: 1. Shielded interface cables and AC power cord, if any, must accept any radio or Display interference caused by turning the equipment off and on, the user is not responsible for compliance with the instructions, may not cause harmful interference, and (2) this device must be...
... fonctionnement est sujet aux deux conditions suivantes: 1. Shielded interface cables and AC power cord, if any, must accept any radio or Display interference caused by turning the equipment off and on, the user is not responsible for compliance with the instructions, may not cause harmful interference, and (2) this device must be...


