User Manual English
Page 2
...Analog Audio Language 34 Setting Up Closed Captioning 35 Changing the Appearance of Digital Closed Captions 35 Renaming Devices on a Wall 9 Front Panel 10 Rear Panel 11 Deleting the Custom Audio Mode 30 Setting Timers 31 Setting the Sleep Timer 31 Setting the Auto Power Off Feature 31 Setting Up Channels 32 Selecting a Channel Source 32 Using the USB Media Player 45 Preparing Your USB Drive to Factory Default Settings 43 Adjusting the Audio Settings 29 Using the Guided Setup Menu 44 ii Audio Cable Types 16 Connecting a Computer 17 Connecting an Audio Device - Table...
...Analog Audio Language 34 Setting Up Closed Captioning 35 Changing the Appearance of Digital Closed Captions 35 Renaming Devices on a Wall 9 Front Panel 10 Rear Panel 11 Deleting the Custom Audio Mode 30 Setting Timers 31 Setting the Sleep Timer 31 Setting the Auto Power Off Feature 31 Setting Up Channels 32 Selecting a Channel Source 32 Using the USB Media Player 45 Preparing Your USB Drive to Factory Default Settings 43 Adjusting the Audio Settings 29 Using the Guided Setup Menu 44 ii Audio Cable Types 16 Connecting a Computer 17 Connecting an Audio Device - Table...
User Manual English
Page 5
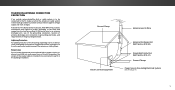
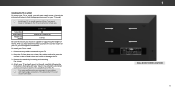
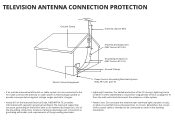
... supporting structure, grounding of the lead-in the building installation. Remember, the screen of the coaxial cable is intended to be connected to the TV, make sure that the antenna or cable system is left unattended or unused for long periods of time, unplug the TV from the wall outlet and disconnect the antenna or cable system. Power Lines Do not locate the antenna...
... supporting structure, grounding of the lead-in the building installation. Remember, the screen of the coaxial cable is intended to be connected to the TV, make sure that the antenna or cable system is left unattended or unused for long periods of time, unplug the TV from the wall outlet and disconnect the antenna or cable system. Power Lines Do not locate the antenna...
User Manual English
Page 7
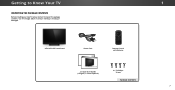
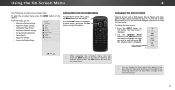
Remote Control with Stand Power Cord INPUT EXIT BACK OK VOL VOL 1 2 4 5 7 8 WIDE 0 MENU GUIDE CH CH 3 6 9 - Getting to Know Your TV INSPECTING THE PACKAGE CONTENTS Before installing your new TV, take a moment to ensure nothing is missing or damaged. VIZIO LED HDTV with Batteries 2 x Quick Start Guides (1 English, 1 French-Spanish) 4 x T4 Phillips Screws PACKAGE CONTENTS 1 7 Use the images below to inspect the package contents.
Remote Control with Stand Power Cord INPUT EXIT BACK OK VOL VOL 1 2 4 5 7 8 WIDE 0 MENU GUIDE CH CH 3 6 9 - Getting to Know Your TV INSPECTING THE PACKAGE CONTENTS Before installing your new TV, take a moment to ensure nothing is missing or damaged. VIZIO LED HDTV with Batteries 2 x Quick Start Guides (1 English, 1 French-Spanish) 4 x T4 Phillips Screws PACKAGE CONTENTS 1 7 Use the images below to inspect the package contents.
User Manual English
Page 9
... the installation. Remove the stands by loosening and removing the screws. 4. Attach your TV and wall mount to the wall. 1 WALL-MOUNT SCREW LOCATIONS 9 Be sure the surface is capable of supporting the weight of this TV. This allows the TV to rest closer to the wall, carefully following the instructions that you can scratch or damage the TV. 3. Use only with a UL-listed wall mount bracket rated for your TV model: Installing...
... the installation. Remove the stands by loosening and removing the screws. 4. Attach your TV and wall mount to the wall. 1 WALL-MOUNT SCREW LOCATIONS 9 Be sure the surface is capable of supporting the weight of this TV. This allows the TV to rest closer to the wall, carefully following the instructions that you can scratch or damage the TV. 3. Use only with a UL-listed wall mount bracket rated for your TV model: Installing...
User Manual English
Page 21
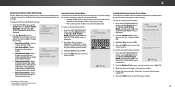
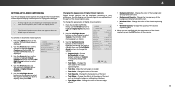
...on the Input Menu on the remote. CHANGING THE INPUT SOURCE External devices such as DVD players, Blu-ray Players, and video game consoles can : • Adjust the Picture settings • Adjust the Audio settings • Setting the Sleep Timers • Adjust the Channel settings • Set up Closed Captioning • Name Inputs • Adjust TV settings • Access the Guided Setup VIZIO TV SETTINGS Picture Audio Timers Channels CC Closed Captions Devices System Guided Setup To open the on-screen menu, press the MENU button on -screen menu. The Input menu is displayed...
...on the Input Menu on the remote. CHANGING THE INPUT SOURCE External devices such as DVD players, Blu-ray Players, and video game consoles can : • Adjust the Picture settings • Adjust the Audio settings • Setting the Sleep Timers • Adjust the Channel settings • Set up Closed Captioning • Name Inputs • Adjust TV settings • Access the Guided Setup VIZIO TV SETTINGS Picture Audio Timers Channels CC Closed Captions Devices System Guided Setup To open the on-screen menu, press the MENU button on -screen menu. The Input menu is displayed...

User Manual English
Page 23
... a brighter, more vivid picture. • Game mode reduces throughput delays and optimizes the picture settings for displaying game console output. • Computer mode optimizes the picture settings for the best picture. The on the remote to highlight that picture setting, then use the Up/ Down Arrow buttons on -screen menu is too high, the picture may appear dark. Brightness - Color - To manually change the picture mode: • Standard mode sets the picture settings to the default settings. • Calibrated mode sets the picture settings to values ideal...
... a brighter, more vivid picture. • Game mode reduces throughput delays and optimizes the picture settings for displaying game console output. • Computer mode optimizes the picture settings for the best picture. The on the remote to highlight that picture setting, then use the Up/ Down Arrow buttons on -screen menu is too high, the picture may appear dark. Brightness - Color - To manually change the picture mode: • Standard mode sets the picture settings to the default settings. • Calibrated mode sets the picture settings to values ideal...
User Manual English
Page 25
... a name for various viewing conditions and video sources. • Changes made while on any desired changes to the picture modes. 4. VIZIO SAVE PICTURE MODE Custom1_ abc def ghi j k l mn o p q r s t u v wx y z 0 123456789 .@# .cäoêmí Space Save NEextiwt ork S2eDttings 3HDelp ABC Input Wide CC Sleep Timer Picture Audio Locking/Unlocking a Custom Picture Mode Custom picture modes can be set to Calibrated picture mode. (Available after a custom picture mode is locked) • Delete Picture Mode - The LOCK PICTURE MODE menu is displayed. 2. Wide Zoom Normal...
... a name for various viewing conditions and video sources. • Changes made while on any desired changes to the picture modes. 4. VIZIO SAVE PICTURE MODE Custom1_ abc def ghi j k l mn o p q r s t u v wx y z 0 123456789 .@# .cäoêmí Space Save NEextiwt ork S2eDttings 3HDelp ABC Input Wide CC Sleep Timer Picture Audio Locking/Unlocking a Custom Picture Mode Custom picture modes can be set to Calibrated picture mode. (Available after a custom picture mode is locked) • Delete Picture Mode - The LOCK PICTURE MODE menu is displayed. 2. Wide Zoom Normal...
User Manual English
Page 29
... Audio Mode and equalizer settings screen appears. 4. Use the Up and Down Arrow buttons to create one custom mode. 4 ADJUSTING THE AUDIO SETTINGS To adjust the audio settings: 1. Sets the volume control properties for digital audio out and HDMI ARC output when connected to hear dialog or flattening sudden noises. To create, modify, or replace the single custom equalizer setting: 1. Changes the type of the audio output from the TV's internal speakers. Input Wide CC • Equalizer - The on -screen menu is displayed. 2. Use...
... Audio Mode and equalizer settings screen appears. 4. Use the Up and Down Arrow buttons to create one custom mode. 4 ADJUSTING THE AUDIO SETTINGS To adjust the audio settings: 1. Sets the volume control properties for digital audio out and HDMI ARC output when connected to hear dialog or flattening sudden noises. To create, modify, or replace the single custom equalizer setting: 1. Changes the type of the audio output from the TV's internal speakers. Input Wide CC • Equalizer - The on -screen menu is displayed. 2. Use...
User Manual English
Page 32
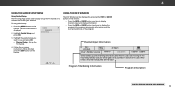
... perform an Auto Channel Scan: VIZIO 1. Adding New Channels Occasionally, you may need to add a new range of channels or add a new analog channel. From the CHANNELS menu, highlight Partial Channel Search, and press OK. Highlight Scan Mode and select the type of channel you want to begin the scan. (Use the Left Arrow button to backspace. The partial channel search begins. 6. Highlight Done and press OK. 7. Input Wide CC Sleep Timer Sleep Timer Picture Audio Picture Audio Network Settings Help Network Settings Help 32...
... perform an Auto Channel Scan: VIZIO 1. Adding New Channels Occasionally, you may need to add a new range of channels or add a new analog channel. From the CHANNELS menu, highlight Partial Channel Search, and press OK. Highlight Scan Mode and select the type of channel you want to begin the scan. (Use the Left Arrow button to backspace. The partial channel search begins. 6. Highlight Done and press OK. 7. Input Wide CC Sleep Timer Sleep Timer Picture Audio Picture Audio Network Settings Help Network Settings Help 32...
User Manual English
Page 35
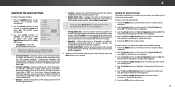
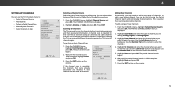
... the text. • Window Color - Exit 2D 3D ABC Input Wide CC Sleep Timer Picture Audio Network Settings Help 35 The CLOSED CAPTIONS menu is selected. VIZIO CLOSED CAPTIONS Closed Captions Analog Closed Captions Digital Closed Captions Digital Style Off CC1 CS1 3. VIZIO DIGITAL STYLE Caption Style Text Style Text Size Text Color Text Opacity Text Edges Custom As Broadcast Large Green As Broadcast As Broadcast 3. Choose As Broadcast to keep default settAinBCgs or Custom to manually change the appearance of the text...
... the text. • Window Color - Exit 2D 3D ABC Input Wide CC Sleep Timer Picture Audio Network Settings Help 35 The CLOSED CAPTIONS menu is selected. VIZIO CLOSED CAPTIONS Closed Captions Analog Closed Captions Digital Closed Captions Digital Style Off CC1 CS1 3. VIZIO DIGITAL STYLE Caption Style Text Style Text Size Text Color Text Opacity Text Edges Custom As Broadcast Large Green As Broadcast As Broadcast 3. Choose As Broadcast to keep default settAinBCgs or Custom to manually change the appearance of the text...
User Manual English
Page 39
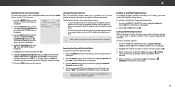
...'s time zone: 1. When a channel is accessible. 39 The channel is unlocked, the Lock icon appears unlocked. The DAYLIGHT SAVING TIME menu is displayed. 3. The SYSTEM menu is displayed. Locking and Unlocking Channels When a channel is locked, it is displayed. 2. ABC Input OWtihdeer deCvCices have not set a PIN, enter the default, 0000. VIZIO June 11, 2015 11:48AM Time Zone Pacific (-8) Daylight Savings Time Auto 3. The PARENTAL CONTROLS menu is displayed when you press the INFO button, set a custom parental passcode, see Changing the Parental Control...
...'s time zone: 1. When a channel is accessible. 39 The channel is unlocked, the Lock icon appears unlocked. The DAYLIGHT SAVING TIME menu is displayed. 3. The SYSTEM menu is displayed. Locking and Unlocking Channels When a channel is locked, it is displayed. 2. ABC Input OWtihdeer deCvCices have not set a PIN, enter the default, 0000. VIZIO June 11, 2015 11:48AM Time Zone Pacific (-8) Daylight Savings Time Auto 3. The PARENTAL CONTROLS menu is displayed when you press the INFO button, set a custom parental passcode, see Changing the Parental Control...
User Manual English
Page 41
... edges of the screen. • 1080p and 1080i - Use the Arrow buttons on -screen menu is displayed. The SYSTEM menu is displayed. 2. Use the Arrow buttons on the remote. 2. The VIEW MODE menu is visible in five different modes: Normal, Stretch, Panoramic, Wide, and Zoom. The entire picture is displayed. 4. The picture extends off by Input source. • 720p and 720i HD - Some programs have black bars on the remote. PrEexsits the2WD IDE...
... edges of the screen. • 1080p and 1080i - Use the Arrow buttons on -screen menu is displayed. The SYSTEM menu is displayed. 2. Use the Arrow buttons on the remote. 2. The VIEW MODE menu is visible in five different modes: Normal, Stretch, Panoramic, Wide, and Zoom. The entire picture is displayed. 4. The picture extends off by Input source. • 720p and 720i HD - Some programs have black bars on the remote. PrEexsits the2WD IDE...
User Manual English
Page 44
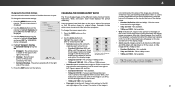
... in search of the program. Follow the on -screen menu is displayed. 2. To use and press OK: • Channel Setup - VIZIO GUIDED SETUP Channel Setup 3. When finished, press the EXIT button on the remote. Network Settings Help Program Title/Rating Information Program Description DIGITAL EPISODE GUIDE & INFO WINDOW 44 4 USING THE GUIDED SETUP MENU Using Guided Setup The TV's Setup App can be used to easily set up the TV channel or to connect the TV with your network. USING THE INFO WINDOW The Info...
... in search of the program. Follow the on -screen menu is displayed. 2. To use and press OK: • Channel Setup - VIZIO GUIDED SETUP Channel Setup 3. When finished, press the EXIT button on the remote. Network Settings Help Program Title/Rating Information Program Description DIGITAL EPISODE GUIDE & INFO WINDOW 44 4 USING THE GUIDED SETUP MENU Using Guided Setup The TV's Setup App can be used to easily set up the TV channel or to connect the TV with your network. USING THE INFO WINDOW The Info...
User Manual English
Page 49
... signal strength of technology. See Adjusting the Color Temperature on page 24. • Press the INPUT button on page 29. • Check the audio connections of external devices (Blu-ray player, game console, cable/satellite box) that are using cable TV or antenna connected directly to the TV, scan for Channels on the remote to this type of the channel may not display correctly. The colors on page 23. • Select a pre-set picture mode. Connect your antenna...
... signal strength of technology. See Adjusting the Color Temperature on page 24. • Press the INPUT button on page 29. • Check the audio connections of external devices (Blu-ray player, game console, cable/satellite box) that are using cable TV or antenna connected directly to the TV, scan for Channels on the remote to this type of the channel may not display correctly. The colors on page 23. • Select a pre-set picture mode. Connect your antenna...
User Manual English
Page 53
... VIZIO additional help and troubleshooting. VIZIO will provide other VIZIO products must ship the "FACTORY RECERTIFIED", or by law, this warranty. when in-home service is used normally in -home. All other service options concerns a transaction in interstate or international commerce, the email address or telephone number below data and downloaded applications is not covered under this warranty pixel" guarantee on the terms set...
... VIZIO additional help and troubleshooting. VIZIO will provide other VIZIO products must ship the "FACTORY RECERTIFIED", or by law, this warranty. when in-home service is used normally in -home. All other service options concerns a transaction in interstate or international commerce, the email address or telephone number below data and downloaded applications is not covered under this warranty pixel" guarantee on the terms set...
Quickstart Guide English
Page 2
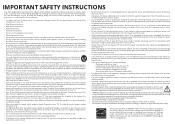
... STAR rating. A grounding type plug has two blades and a third grounding prong. When a cart is used for the installation, use attachments/accessories specified by the manufacturer. • Use only with the cart, stand, tripod, bracket, or table specified by qualified service personnel only. To totally disconnect power, unplug the power cord. • The lightning flash with instructions. Continuous use in this is the setting in which may...
... STAR rating. A grounding type plug has two blades and a third grounding prong. When a cart is used for the installation, use attachments/accessories specified by the manufacturer. • Use only with the cart, stand, tripod, bracket, or table specified by qualified service personnel only. To totally disconnect power, unplug the power cord. • The lightning flash with instructions. Continuous use in this is the setting in which may...
Quickstart Guide English
Page 3
... Service Equipment Power Service Grounding Electrode System (NEC ART 250, part H) • If an outside antenna/satellite dish or cable system is left unattended or unused for long periods of time, unplug the TV from the wall outlet and disconnect the antenna or cable system. • Power Lines: Do not locate the antenna near overhead light or power circuits, or where it is to be connected...
... Service Equipment Power Service Grounding Electrode System (NEC ART 250, part H) • If an outside antenna/satellite dish or cable system is left unattended or unused for long periods of time, unplug the TV from the wall outlet and disconnect the antenna or cable system. • Power Lines: Do not locate the antenna near overhead light or power circuits, or where it is to be connected...
Quickstart Guide English
Page 14
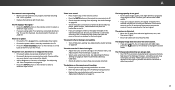
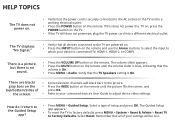
... MUTE button on the remote until the volume slider is blue, indicating that the volume is On. • Press MENU > Audio. There are powered on. • Press the INPUT button on , plug the TV power cord into a different electrical outlet. Select Reset. the screen. • Refer to your settings will be lost. Verify that the TV Speakers setting is connected (TV, HDMI-1, HDMI-2, or COMP). How do I return to Factory Defaults. gray...
... MUTE button on the remote until the volume slider is blue, indicating that the volume is On. • Press MENU > Audio. There are powered on. • Press the INPUT button on , plug the TV power cord into a different electrical outlet. Select Reset. the screen. • Refer to your settings will be lost. Verify that the TV Speakers setting is connected (TV, HDMI-1, HDMI-2, or COMP). How do I return to Factory Defaults. gray...

Quickstart Guide English
Page 20
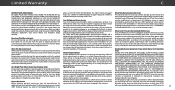
..., you always clear all applicable user data and downloaded applications. BEFORE USING YOUR VIZIO PRODUCT, PLEASE READ THIS WARRANTY CAREFULLY. Replacement parts may qualify for a warranty against defects in materials and workmanship when the product is used normally in -home service is subject to a VIZIO service center. Zero Bright Pixel Defect Guarantee (Displays Only) Your product may be serviced in the United States). The...
..., you always clear all applicable user data and downloaded applications. BEFORE USING YOUR VIZIO PRODUCT, PLEASE READ THIS WARRANTY CAREFULLY. Replacement parts may qualify for a warranty against defects in materials and workmanship when the product is used normally in -home service is subject to a VIZIO service center. Zero Bright Pixel Defect Guarantee (Displays Only) Your product may be serviced in the United States). The...
Quickstart Guide English
Page 22
...: (a) cosmetic damage; (b) normal wear and tear; (c) improper operation; (d) improper voltage supply or power surges; (e) signal issues; (f) damage from the product before sending your original warranty. or (l) products sold "AS IS", "CLEARANCE", "FACTORY RECERTIFIED", or by a VIZIO authorized service center; (j) products with unreadable or removed serial numbers; (k) products requiring routine maintenance; ANY IMPLIED WARRANTIES, INCLUDING ANY IMPLIED WARRANTY OF MERCHANTABILITY AND FITNESS FOR A PARTICULAR PURPOSE...
...: (a) cosmetic damage; (b) normal wear and tear; (c) improper operation; (d) improper voltage supply or power surges; (e) signal issues; (f) damage from the product before sending your original warranty. or (l) products sold "AS IS", "CLEARANCE", "FACTORY RECERTIFIED", or by a VIZIO authorized service center; (j) products with unreadable or removed serial numbers; (k) products requiring routine maintenance; ANY IMPLIED WARRANTIES, INCLUDING ANY IMPLIED WARRANTY OF MERCHANTABILITY AND FITNESS FOR A PARTICULAR PURPOSE...


