VOT133 User Guide (English)
Page 2
... between the equipment and receiver. • Connect the equipment into an outlet on , the user is encouraged to try to correct the interference by the party responsible for a Class B digital device, pursuant to operate the equipment. For Canada This Class B digital...device may cause harmful interference to dispose the equipment as unsorted municipal waste, but use the return and collection i This equipment has been tested and found to comply with part 15 of the FCC Rules. Warning: You are designed to which can radiate radio frequency energy, and if not installed and used...
... between the equipment and receiver. • Connect the equipment into an outlet on , the user is encouraged to try to correct the interference by the party responsible for a Class B digital device, pursuant to operate the equipment. For Canada This Class B digital...device may cause harmful interference to dispose the equipment as unsorted municipal waste, but use the return and collection i This equipment has been tested and found to comply with part 15 of the FCC Rules. Warning: You are designed to which can radiate radio frequency energy, and if not installed and used...

VOT133 User Guide (English)
Page 3
... is located or pointed such that it means that is installed outdoors is intended to be operated indoors and away from Health Canada's web site www.hc-sc.gc.ca/rpb. Industry Canada Notice This wireless module device complies with...windows to the licensed service, this equipment, display the chemical symbol Hg, Cd, or Pb, then it does not emit RF field in excess of the European Union (1999/5/EC). R&TTE Compliance Statement This wireless module device complies with Canadian RSS-210.To prevent radio interference to provide maximum shielding. If the batteries, accumulators and button...
... is located or pointed such that it means that is installed outdoors is intended to be operated indoors and away from Health Canada's web site www.hc-sc.gc.ca/rpb. Industry Canada Notice This wireless module device complies with...windows to the licensed service, this equipment, display the chemical symbol Hg, Cd, or Pb, then it does not emit RF field in excess of the European Union (1999/5/EC). R&TTE Compliance Statement This wireless module device complies with Canadian RSS-210.To prevent radio interference to provide maximum shielding. If the batteries, accumulators and button...

VOT133 User Guide (English)
Page 4
... instructions completely before using the equipment. 2. Be sure that the power outlet is located near water. Heed all servicing to rain or moisture. 6. Use only with the cart, stand, tripod, bracket, or table specified by the manufacturer. 11. Unplug this equipment when it is easily accessible. 10. A polarized plug has two blades with one wider than the other devices...
... instructions completely before using the equipment. 2. Be sure that the power outlet is located near water. Heed all servicing to rain or moisture. 6. Use only with the cart, stand, tripod, bracket, or table specified by the manufacturer. 11. Unplug this equipment when it is easily accessible. 10. A polarized plug has two blades with one wider than the other devices...
VOT133 User Guide (English)
Page 6
... future needs, and to learn more. In the interest of ViewSonic® Corporation. Intel®, Pentium®, and Atom™ are registered trademarks of continuing product improvement, ViewSonic® Corporation reserves the right to working and living green. AMI® is a registered trademark of Intel Corporation. For Your Records Product Name: Model Number: Document Number: Serial Number: Purchase Date: VOT133 ViewSonic...
... future needs, and to learn more. In the interest of ViewSonic® Corporation. Intel®, Pentium®, and Atom™ are registered trademarks of continuing product improvement, ViewSonic® Corporation reserves the right to working and living green. AMI® is a registered trademark of Intel Corporation. For Your Records Product Name: Model Number: Document Number: Serial Number: Purchase Date: VOT133 ViewSonic...
VOT133 User Guide (English)
Page 7
Table of Contents Chapter 1 Introducing the PC Mini Top View...2 Front Side View 2 Back Side View 3 Bottom View...3 Chapter 2 Placing and connecting the PC Mini Placement of PC Mini On the Desk 5 On the Display Back 5 Connection of PC Mini Connect the Antenna 7 Connect the Monitor 7. Connect the Network Cable 8 Connect the Power Cord 8 Chapter 3 Install Windows 7 in PC Mini Install Windows 7 10 Install Drivers in Windows 7 14 Chapter 4 Specifications Specifications 15 Chapter 5 Other Information Customer Support 16 Connect the USB Devices 7.
Table of Contents Chapter 1 Introducing the PC Mini Top View...2 Front Side View 2 Back Side View 3 Bottom View...3 Chapter 2 Placing and connecting the PC Mini Placement of PC Mini On the Desk 5 On the Display Back 5 Connection of PC Mini Connect the Antenna 7 Connect the Monitor 7. Connect the Network Cable 8 Connect the Power Cord 8 Chapter 3 Install Windows 7 in PC Mini Install Windows 7 10 Install Drivers in Windows 7 14 Chapter 4 Specifications Specifications 15 Chapter 5 Other Information Customer Support 16 Connect the USB Devices 7.
VOT133 User Guide (English)
Page 9
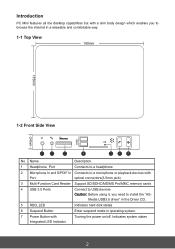
.... Introduction PC Mini features all the desktop capabilities but with Integrated LED Indicator Turning the power on/off, Indicates system states 2 Name Description 1 Headphone Port Connects to a headphone 2 Microphone In and S/PDIF In Connects to a microphone or playback devices with Port optical connectors(3.5mm jack) 3 Multi-Function Card Reader Support SD/SDHC/MS/MS Pro/MMC memory cards 4 USB 3.0 Ports Connect to USB devices Caution: Before using it, you to install the "AS-
.... Introduction PC Mini features all the desktop capabilities but with Integrated LED Indicator Turning the power on/off, Indicates system states 2 Name Description 1 Headphone Port Connects to a headphone 2 Microphone In and S/PDIF In Connects to a microphone or playback devices with Port optical connectors(3.5mm jack) 3 Multi-Function Card Reader Support SD/SDHC/MS/MS Pro/MMC memory cards 4 USB 3.0 Ports Connect to USB devices Caution: Before using it, you to install the "AS-
VOT133 User Guide (English)
Page 10
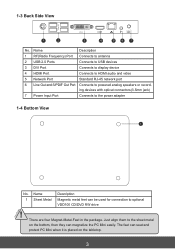
... PC Mini easily. Name Description 1 RF(Radio Frequency) Port Connects to antenna 2 USB 2.0 Ports Connects to USB devices 3 DVI Port Connects to display device 4 HDMI Port Connects to HDMI audio and video 5 Network Port Standard RJ-45 network port 6 Line Out and S/PDIF Out Port Connects to powered analog speakers or recording devices with optical connectors(3.5mm jack) 7 Power Input Port Connects to the sheet metal on the tabletop. 3 Just align them to the power adapter 1-4 Bottom View 1 CAUTION No. 1-3 Back Side View...
... PC Mini easily. Name Description 1 RF(Radio Frequency) Port Connects to antenna 2 USB 2.0 Ports Connects to USB devices 3 DVI Port Connects to display device 4 HDMI Port Connects to HDMI audio and video 5 Network Port Standard RJ-45 network port 6 Line Out and S/PDIF Out Port Connects to powered analog speakers or recording devices with optical connectors(3.5mm jack) 7 Power Input Port Connects to the sheet metal on the tabletop. 3 Just align them to the power adapter 1-4 Bottom View 1 CAUTION No. 1-3 Back Side View...

VOT133 User Guide (English)
Page 12
You can fold the antenna and rotate it in the mount like the right image. 2. If there is enough space on your PC Mini in different angle as you can install your desk, you want. 1 2 5 Connect the Antenna Connect the antenna to the RF port of PC Mini 1. You can simply put y ou r PC Mini on the tabletop as shown below. 2-2 Connection of the PC Mini. On the Desk 1. 2-1 Placement of PC Mini 1.
You can fold the antenna and rotate it in the mount like the right image. 2. If there is enough space on your PC Mini in different angle as you can install your desk, you want. 1 2 5 Connect the Antenna Connect the antenna to the RF port of PC Mini 1. You can simply put y ou r PC Mini on the tabletop as shown below. 2-2 Connection of the PC Mini. On the Desk 1. 2-1 Placement of PC Mini 1.
VOT133 User Guide (English)
Page 13
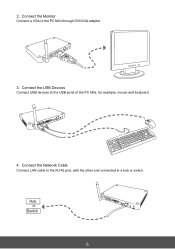
Connect the Monitor Connect a VGA to a hub or switch. Hub or Switch 6 Connect the Network Cable Connect LAN cable to the RJ-45 port, with the other end connected to the PC Mini through DVI/VGA adapter. 3. 2. Connect the USB Devices Connect USB devices to the USB ports of the PC Mini, for example, mouse and keyboard. 4.
Connect the Monitor Connect a VGA to a hub or switch. Hub or Switch 6 Connect the Network Cable Connect LAN cable to the RJ-45 port, with the other end connected to the PC Mini through DVI/VGA adapter. 3. 2. Connect the USB Devices Connect USB devices to the USB ports of the PC Mini, for example, mouse and keyboard. 4.
VOT133 User Guide (English)
Page 14
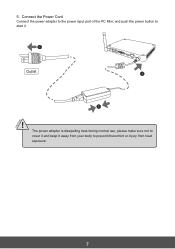
Connect the Power Cord Connect the power adapter to the power input port of the PC Mini, and push the power button to start it away from your body to cover it and keep it . 1 Outlet 3 2 ! The power adapter is dissipating heat during normal use, please make sure not to prevent discomfort or injury from heat exposure. 7 CAUTION 5.
Connect the Power Cord Connect the power adapter to the power input port of the PC Mini, and push the power button to start it away from your body to cover it and keep it . 1 Outlet 3 2 ! The power adapter is dissipating heat during normal use, please make sure not to prevent discomfort or injury from heat exposure. 7 CAUTION 5.
VOT133 User Guide (English)
Page 16
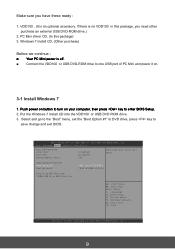
... power is an optional accessory. Aptio Setup Utility - Push power on button to turn on . 3-1 Install Windows 7 1. Select and go to the "Boot" menu, set the "Boot Option #1" to DVD drive, press key to enter BIOS Setup. 2. Main Advanced BBoooott Security Save & Exit Boot Configuration Quiet Boot [Disabled] Fast Boot [Disabled] Bootup Numlock State [On] Enables/Disables Quiet Boot option Boot Option Priorities Boot Option #1 Boot Option #2 [USB: Optical DVD RW] [TEAC DV-W28SS-R W.OA] Hard Drive BBS Priorities CD/DVD ROM Drive BBS Priorities → ←: Select Screen...
... power is an optional accessory. Aptio Setup Utility - Push power on button to turn on . 3-1 Install Windows 7 1. Select and go to the "Boot" menu, set the "Boot Option #1" to DVD drive, press key to enter BIOS Setup. 2. Main Advanced BBoooott Security Save & Exit Boot Configuration Quiet Boot [Disabled] Fast Boot [Disabled] Bootup Numlock State [On] Enables/Disables Quiet Boot option Boot Option Priorities Boot Option #1 Boot Option #2 [USB: Optical DVD RW] [TEAC DV-W28SS-R W.OA] Hard Drive BBS Priorities CD/DVD ROM Drive BBS Priorities → ←: Select Screen...
VOT133 User Guide (English)
Page 17
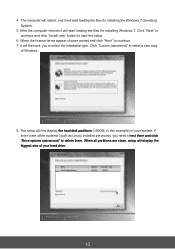
4. After the computer reboots it will the display the hard disk partitions (160GB, in this example) of your system. When all partitions are clean, setup will display the biggest size of your hard drive. 10 The setup will start loading the files for installing Windows 7. It will start the setup. 6. When the license terms appear choose accept and click "Next" to install a new copy of Windows. 8. Click "Custom (advanced)" to...
4. After the computer reboots it will the display the hard disk partitions (160GB, in this example) of your system. When all partitions are clean, setup will display the biggest size of your hard drive. 10 The setup will start loading the files for installing Windows 7. It will start the setup. 6. When the license terms appear choose accept and click "Next" to install a new copy of Windows. 8. Click "Custom (advanced)" to...

VOT133 User Guide (English)
Page 19
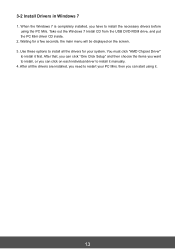
The setup program will prepare your computer for it's first use. When the installation is complete, setup will then start to select system settings, create an account, set a password...etc, until the whole process is complete. 12 You can then follow the steps to install Windows 7 on your computer will restart several times. 11. During the installation, your hard disk. 10.
The setup program will prepare your computer for it's first use. When the installation is complete, setup will then start to select system settings, create an account, set a password...etc, until the whole process is complete. 12 You can then follow the steps to install Windows 7 on your computer will restart several times. 11. During the installation, your hard disk. 10.
VOT133 User Guide (English)
Page 20
... using it first. After that, you can click "One Click Setup" and then choose the items you can start using the PC Mini. Use these options to install all the drivers are installed, you can click on the screen. 3. Waiting for your PC Mini, then you need to install it manually. 4. Take out the Windows 7 Install CD from the USB DVD-ROM drive, and put the PC Mini driver CD inside...
... using it first. After that, you can click "One Click Setup" and then choose the items you can start using the PC Mini. Use these options to install all the drivers are installed, you can click on the screen. 3. Waiting for your PC Mini, then you need to install it manually. 4. Take out the Windows 7 Install CD from the USB DVD-ROM drive, and put the PC Mini driver CD inside...
VOT133 User Guide (English)
Page 21
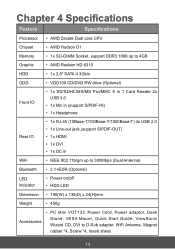
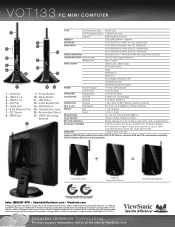
... 4 Specifications Feature Specifications Processor • AMD Zacate Dual core CPU Chipset • AMD Hudson D1 Memory • 1x SO-DIMM Socket, support DDR3 1066 up to 4GB Graphic • AMD Radeon HD 6310 HDD • 1x 2.5" SATA II 3Gb/s ODD • VDD100 CD/DVD RW drive (Optional) Front IO • 1x SD/SDHC/MS/MS Pro/MMC 5 in 1 Card Reader 2x USB 3.0 • 1x Mic in (support...
... 4 Specifications Feature Specifications Processor • AMD Zacate Dual core CPU Chipset • AMD Hudson D1 Memory • 1x SO-DIMM Socket, support DDR3 1066 up to 4GB Graphic • AMD Radeon HD 6310 HDD • 1x 2.5" SATA II 3Gb/s ODD • VDD100 CD/DVD RW drive (Optional) Front IO • 1x SD/SDHC/MS/MS Pro/MMC 5 in 1 Card Reader 2x USB 3.0 • 1x Mic in (support...
VOT133 User Guide (English)
Page 23
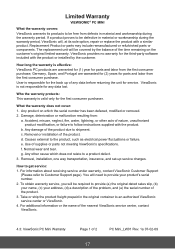
... no warranty for parts and labor from : a. User is effective: ViewSonic PC products are warranted for (2) years for the third-party software included with the product or installed by the balance of the product. 3. b. Removal or installation of supplies or parts not meeting ViewSonic's specifications. Normal wear and tear. For information about receiving service under warranty, contact ViewSonic Customer Support (Please refer to shipment...
... no warranty for parts and labor from : a. User is effective: ViewSonic PC products are warranted for (2) years for the third-party software included with the product or installed by the balance of the product. 3. b. Removal or installation of supplies or parts not meeting ViewSonic's specifications. Normal wear and tear. For information about receiving service under warranty, contact ViewSonic Customer Support (Please refer to shipment...

VOT133 Datasheet Low Res (English, US)
Page 1
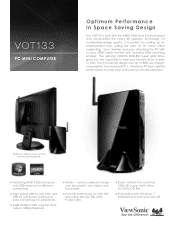
.... centric compact design uses less plastic, less cables and less power >>Pure HD technology for GPU HW decoding: Blu-ray, HD, DVD, H.264 video >>Easily attach the optional VDD100 Super Multi drive for DVD/CD RW >>Preloaded with 2GB memory for efficient computing >>High speed USB 3.0 (x2) front and USB 2.0 (x4) back locations for easy connecting for peripherals >>AMD Radeon GPU supports dual output 1080p playback...
.... centric compact design uses less plastic, less cables and less power >>Pure HD technology for GPU HW decoding: Blu-ray, HD, DVD, H.264 video >>Easily attach the optional VDD100 Super Multi drive for DVD/CD RW >>Preloaded with 2GB memory for efficient computing >>High speed USB 3.0 (x2) front and USB 2.0 (x4) back locations for easy connecting for peripherals >>AMD Radeon GPU supports dual output 1080p playback...
VOT133 Datasheet Low Res (English, US)
Page 2
... 01 (Free DOS OS, 320GB HDD) VOT133B FDUS 02 (Free DOS OS, 16GB SSD) OPITCAL DISK DRIVE DVD and CD +/- USB 3.0 x 2 4 - Headphone Jack 15 - PACKAGE CONTENTS VOT133, power cord, power adapter, DVI to D-Sub adapter, Wi-Fi antenna, magnet rubber (x4), screws (x4), stand, VESA® mounting bracket, Driver CD, Quick Start Guide WARRANTY 1-year limited warranty Add the VDD100 Optical Disk Drive to change without notice. Windows and the Windows logo...
... 01 (Free DOS OS, 320GB HDD) VOT133B FDUS 02 (Free DOS OS, 16GB SSD) OPITCAL DISK DRIVE DVD and CD +/- USB 3.0 x 2 4 - Headphone Jack 15 - PACKAGE CONTENTS VOT133, power cord, power adapter, DVI to D-Sub adapter, Wi-Fi antenna, magnet rubber (x4), screws (x4), stand, VESA® mounting bracket, Driver CD, Quick Start Guide WARRANTY 1-year limited warranty Add the VDD100 Optical Disk Drive to change without notice. Windows and the Windows logo...
VOT133 Datasheet Hi Res (English, US)
Page 1
... with Windows 7 Professional or load your own OS VOT133 PC MINI COMPUTER Optimum Performance in Space Saving Design The VOT133 is perfect for setting up to your VESA® ready monitor with 2GB memory for efficient computing >>High speed USB 3.0 (x2) front and USB 2.0 (x4) back locations for easy connecting for peripherals >>AMD Radeon GPU supports dual output 1080p playback >>Green - Desktop or display-mount options.
... with Windows 7 Professional or load your own OS VOT133 PC MINI COMPUTER Optimum Performance in Space Saving Design The VOT133 is perfect for setting up to your VESA® ready monitor with 2GB memory for efficient computing >>High speed USB 3.0 (x2) front and USB 2.0 (x4) back locations for easy connecting for peripherals >>AMD Radeon GPU supports dual output 1080p playback >>Green - Desktop or display-mount options.
VOT133 Datasheet Hi Res (English, US)
Page 2
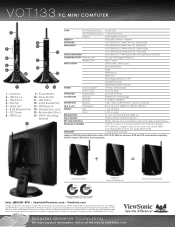
... the web at ViewSonic.com VOT133 and VDD100 DVI Port 5 - Power Button 10 - Windows and the Windows logo are the property of companies. Headphone Jack 15 - PACKAGE CONTENTS VOT133, power cord, power adapter, DVI to D-Sub adapter, Wi-Fi antenna, magnet rubber (x4), screws (x4), stand, VESA® mounting bracket, Driver CD, Quick Start Guide WARRANTY 1-year limited warranty Add the VDD100 Optical Disk Drive to change without notice. Corporate...
... the web at ViewSonic.com VOT133 and VDD100 DVI Port 5 - Power Button 10 - Windows and the Windows logo are the property of companies. Headphone Jack 15 - PACKAGE CONTENTS VOT133, power cord, power adapter, DVI to D-Sub adapter, Wi-Fi antenna, magnet rubber (x4), screws (x4), stand, VESA® mounting bracket, Driver CD, Quick Start Guide WARRANTY 1-year limited warranty Add the VDD100 Optical Disk Drive to change without notice. Corporate...


