

English Owners Manual
Page 2
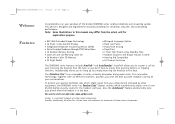
... the Uniden EXAI2980 series cordless telephone and answering system. Features • 900 MHz Extended Range Technology • 16 Digit, 3-line Backlit Display • Integrated Telephone Answering Device (ITAD) • Voice Prompted Guidance through ITAD Setup Menu • 10 Number Memory Dialing • Caller ID and Call Waiting Caller ID • 30 Number Caller ID Memory • 32 Digit Redial • Flash and Pause • Pulse/Tone Dialing • Page/Find • 7 Hour Talk Time/14 Day Standby Time • Handset Earpiece and Ringer Volume Control...
... the Uniden EXAI2980 series cordless telephone and answering system. Features • 900 MHz Extended Range Technology • 16 Digit, 3-line Backlit Display • Integrated Telephone Answering Device (ITAD) • Voice Prompted Guidance through ITAD Setup Menu • 10 Number Memory Dialing • Caller ID and Call Waiting Caller ID • 30 Number Caller ID Memory • 32 Digit Redial • Flash and Pause • Pulse/Tone Dialing • Page/Find • 7 Hour Talk Time/14 Day Standby Time • Handset Earpiece and Ringer Volume Control...

English Owners Manual
Page 3
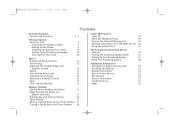
... Phone Mounting the Base Unit on a Wall Setting Caller ID Options Entering Your Area Code Basics Making and Receiving Calls Terminology Adjusting the Handset Ringer and Earpiece Volume Redial Tone Dialing Switch-over Traveling Out-of-Range Selecting a Different Channel Page Flash and Call Waiting Memory Dialing Storing Phone Numbers and Names Steps for Entering Names and Special Characters Making Calls with Memory Dialing Chain Dialing Contents Editing a Stored Name and/or Phone Number 25 2, 3 Erasing a Stored Name and Phone Number 27 Caller ID Features 4 Caller...
... Phone Mounting the Base Unit on a Wall Setting Caller ID Options Entering Your Area Code Basics Making and Receiving Calls Terminology Adjusting the Handset Ringer and Earpiece Volume Redial Tone Dialing Switch-over Traveling Out-of-Range Selecting a Different Channel Page Flash and Call Waiting Memory Dialing Storing Phone Numbers and Names Steps for Entering Names and Special Characters Making Calls with Memory Dialing Chain Dialing Contents Editing a Stored Name and/or Phone Number 25 2, 3 Erasing a Stored Name and Phone Number 27 Caller ID Features 4 Caller...
English Owners Manual
Page 6
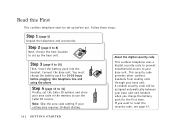
... charge the battery pack for 15-20 hours before use the Caller ID service. About the digital security code This cordless telephone uses a digital security code to prevent unauthorized access to use . Note: Skip the area code setting if your base unit. Step 3 (page 9 to reset the security code, see page 47. [ 4 ] GETTING STARTED This security code prevents other cordless handsets from making calls through your base unit and handset when you want to 10) Then, insert the battery pack into telephone line and using the phone...
... charge the battery pack for 15-20 hours before use the Caller ID service. About the digital security code This cordless telephone uses a digital security code to prevent unauthorized access to use . Note: Skip the area code setting if your base unit. Step 3 (page 9 to reset the security code, see page 47. [ 4 ] GETTING STARTED This security code prevents other cordless handsets from making calls through your base unit and handset when you want to 10) Then, insert the battery pack into telephone line and using the phone...

English Owners Manual
Page 12
... telephone company for pulse dialing, press # . The default setting is , otherwise set the dial mode for certain situations during a call . Or to Dial Mode. 2) To set for tone dialing. However some phone systems still use tone dialing which sends DTMF tones through the phone line. • Af ter installing the batter y pack in rural areas. Once the handset battery pack is fully charged, connect the telephone line cord to the base and telephone wall outlet. 5) Connect the telephone line cord to "Tone Dialing Switch-over" on your dialing system, set...
... telephone company for pulse dialing, press # . The default setting is , otherwise set the dial mode for certain situations during a call . Or to Dial Mode. 2) To set for tone dialing. However some phone systems still use tone dialing which sends DTMF tones through the phone line. • Af ter installing the batter y pack in rural areas. Once the handset battery pack is fully charged, connect the telephone line cord to the base and telephone wall outlet. 5) Connect the telephone line cord to "Tone Dialing Switch-over" on your dialing system, set...

English Owners Manual
Page 16
... mode, press and hold call id. A confirmation tone sounds. To complete the setting, press call id to enter the new area code. The handset returns to the base unit. [ 14 ] G E T T I N G S T A R T E D Or return the handset to the base unit to enter the 3-digit area code. 5)Press select. Do not program this option. Then press select. When reviewing Caller ID messages, you will see a full 10-digit number. 1)When the phone is entered. 6)Press call...
... mode, press and hold call id. A confirmation tone sounds. To complete the setting, press call id to enter the new area code. The handset returns to the base unit. [ 14 ] G E T T I N G S T A R T E D Or return the handset to the base unit to enter the 3-digit area code. 5)Press select. Do not program this option. Then press select. When reviewing Caller ID messages, you will see a full 10-digit number. 1)When the phone is entered. 6)Press call...

English Owners Manual
Page 35
...; Time and Day Announcement • Remote Message Retrieval • Toll Saver • Conversation Recording • Voice Memo Digital Tapeless Recording allows you to quickly review, save, or delete the messages you choose. The Integrated Answering System is easy and convenient to worry about a tape wearing out, jamming, or resetting improperly. THE INTEGRATED ANSWERING DEVICE The Integrated Answering Device The EXAI2980 series has a built-in answering system that answers and records incoming calls. Features...
...; Time and Day Announcement • Remote Message Retrieval • Toll Saver • Conversation Recording • Voice Memo Digital Tapeless Recording allows you to quickly review, save, or delete the messages you choose. The Integrated Answering System is easy and convenient to worry about a tape wearing out, jamming, or resetting improperly. THE INTEGRATED ANSWERING DEVICE The Integrated Answering Device The EXAI2980 series has a built-in answering system that answers and records incoming calls. Features...

English Owners Manual
Page 36
If the display flashes, then there are new messages waiting for 20 seconds, a tone sounds and the system returns to standby. • You can use volume v /w to standby. The message counter displays the number of f" the message counter display goes out. menu "Greeting Message" menu "Time" menu "Security Code" menu "Ringer Volume" menu "Ring Time" menu "Record Time" menu Return to set the following occurs during menu setup, the handset returns to adjust the announcement volume level during a voice prompt...
If the display flashes, then there are new messages waiting for 20 seconds, a tone sounds and the system returns to standby. • You can use volume v /w to standby. The message counter displays the number of f" the message counter display goes out. menu "Greeting Message" menu "Time" menu "Security Code" menu "Ringer Volume" menu "Ring Time" menu "Record Time" menu Return to set the following occurs during menu setup, the handset returns to adjust the announcement volume level during a voice prompt...

English Owners Manual
Page 46
... memory. You hear "To play /stop recording, press play incoming messages, press pound two. Recording a conversation You can record up to record a new greeting message. 1) Call your telephone number. 2)During the greeting message playbacks, press # and enter your convenience a remote operation cards are provided for recorded messages, to play or delete messages, even to 10 minutes of this function to check for you to accept the waiting call waiting tone while recording a conversation, press flash to use while away from home...
... memory. You hear "To play /stop recording, press play incoming messages, press pound two. Recording a conversation You can record up to record a new greeting message. 1) Call your telephone number. 2)During the greeting message playbacks, press # and enter your convenience a remote operation cards are provided for recorded messages, to play or delete messages, even to 10 minutes of this function to check for you to accept the waiting call waiting tone while recording a conversation, press flash to use while away from home...

English Owners Manual
Page 53
... base unit. • Place the base unit away from appliances or metal objects. • Reset the digital security code (See page 47). • Keep the handset away from microwave ovens, computers, remote control toys, wireless microphones, alarm systems, intercoms, room monitors, fluorescent lights, and electrical appliances. • Move to another location or turn off the source of the saved messages. • Record your personal outgoing message again. Af ter a power...
... base unit. • Place the base unit away from appliances or metal objects. • Reset the digital security code (See page 47). • Keep the handset away from microwave ovens, computers, remote control toys, wireless microphones, alarm systems, intercoms, room monitors, fluorescent lights, and electrical appliances. • Move to another location or turn off the source of the saved messages. • Record your personal outgoing message again. Af ter a power...

English Owners Manual
Page 58
... or message 42 Turning on/of f 34 B Base location 6 Battery pack Information 53 Installing 7 Preparing and charging 8 Replacement and handling 49 Beltclip installation 48 C Caller ID Caller ID service 28 Call Waiting 18 Deleting 30 Setting Caller ID options 13 Using 31 Viewing 29 Call waiting 18 Chain dialing 24 Channel 18 Charging the battery pack 7 Cleaning Battery Contacts 8 Clock 36 Connect the base unit 9 Controls and Functions 2,3 D Dial mode 10 Digital security code 4,47 E, F, G, H, I, J, K, L Earpiece volume 16 Flash 18 General information (Specification...
... or message 42 Turning on/of f 34 B Base location 6 Battery pack Information 53 Installing 7 Preparing and charging 8 Replacement and handling 49 Beltclip installation 48 C Caller ID Caller ID service 28 Call Waiting 18 Deleting 30 Setting Caller ID options 13 Using 31 Viewing 29 Call waiting 18 Chain dialing 24 Channel 18 Charging the battery pack 7 Cleaning Battery Contacts 8 Clock 36 Connect the base unit 9 Controls and Functions 2,3 D Dial mode 10 Digital security code 4,47 E, F, G, H, I, J, K, L Earpiece volume 16 Flash 18 General information (Specification...
English Owners Manual
Page 2
... MHz Extended Range Technology • 16 Digit, 3-line Backlit Display • Integrated Telephone Answering Device (ITAD) • Voice Prompted Guidance through ITAD Setup Menu • 10 Number Memory Dialing • Caller ID and Call Waiting Caller ID • 30 Number Caller ID Memory • 32 Digit Redial • Bilingual Language Option • Flash and Pause • Pulse/Tone Dialing • Page/Find • 7 Hour Talk Time/14 Day Standby Time • Handset Earpiece and Ringer Volume Control • Hearing Aid Compatible...
... MHz Extended Range Technology • 16 Digit, 3-line Backlit Display • Integrated Telephone Answering Device (ITAD) • Voice Prompted Guidance through ITAD Setup Menu • 10 Number Memory Dialing • Caller ID and Call Waiting Caller ID • 30 Number Caller ID Memory • 32 Digit Redial • Bilingual Language Option • Flash and Pause • Pulse/Tone Dialing • Page/Find • 7 Hour Talk Time/14 Day Standby Time • Handset Earpiece and Ringer Volume Control • Hearing Aid Compatible...
English Owners Manual
Page 3
... the Phone 5 Mounting the Base Unit on a Wall 9 Setting Caller ID Options/Language 10 Entering Your Area Code 10 Basics Making and Receiving Calls 11 Terminology 12 Adjusting the Handset Ringer and Earpiece Volume 12 Redial 12 Tone Dialing Switch-over 12 Traveling Out-of-Range 13 Selecting a Different Channel 13 Page 13 Flash and Call Waiting 13 Memory Dialing Storing Phone Numbers and Names 14 Steps for Entering Names and Special Characters 15 Making Calls with Memory Dialing...
... the Phone 5 Mounting the Base Unit on a Wall 9 Setting Caller ID Options/Language 10 Entering Your Area Code 10 Basics Making and Receiving Calls 11 Terminology 12 Adjusting the Handset Ringer and Earpiece Volume 12 Redial 12 Tone Dialing Switch-over 12 Traveling Out-of-Range 13 Selecting a Different Channel 13 Page 13 Flash and Call Waiting 13 Memory Dialing Storing Phone Numbers and Names 14 Steps for Entering Names and Special Characters 15 Making Calls with Memory Dialing...

English Owners Manual
Page 6
... area code setting if your area code in the package. Connect the base unit. Step 4 (page 10) Finally, set the Caller ID options and store your calling area requires 10-digit dialing. [ 4 ] GETTING STARTED • Base unit • Handset • AC adapter • Rechargeable battery • Belt clip • Telephone cord • Wall Mount Adapter Also included: • This Owner's Manual • Quick Reference Guide • Precautions and Important Safety Instructions /Warranty Information • Other printed Material Uniden Parts...
... area code setting if your area code in the package. Connect the base unit. Step 4 (page 10) Finally, set the Caller ID options and store your calling area requires 10-digit dialing. [ 4 ] GETTING STARTED • Base unit • Handset • AC adapter • Rechargeable battery • Belt clip • Telephone cord • Wall Mount Adapter Also included: • This Owner's Manual • Quick Reference Guide • Precautions and Important Safety Instructions /Warranty Information • Other printed Material Uniden Parts...

English Owners Manual
Page 10
... Page 8 5) Connect the telephone line cord to the TEL LINE jack and a telephone outlet once the handset is tone dialing. Choose the dial mode Most phone systems use pulse dialing such as in rural areas. D. The default setting is fully charged. A confirmation tone sounds to set the dial mode for tone dialing. If your telephone outlet isn't modular, contact your battery pack is , otherwise set for pulse dialing, press # . If the call connects, leave the setting as follows: 1)Press and hold flash until you...
... Page 8 5) Connect the telephone line cord to the TEL LINE jack and a telephone outlet once the handset is tone dialing. Choose the dial mode Most phone systems use pulse dialing such as in rural areas. D. The default setting is fully charged. A confirmation tone sounds to set the dial mode for tone dialing. If your telephone outlet isn't modular, contact your battery pack is , otherwise set for pulse dialing, press # . If the call connects, leave the setting as follows: 1)Press and hold flash until you...

English Owners Manual
Page 12
.... For calls received from the base and the phone automatically answers the call. The following screen appears. 2)Use v and w or a number key (1-4) to move the pointer to "Language". The Caller ID setting screen appears. 2)Press 3 to select "Area Code" or press w twice. 3)Press select. 4)Use the number keys (0 to 9 ) to answer the call id. A tone sounds and the displayed area code is in the standby mode, press and hold call . To change . Do not program this...
.... For calls received from the base and the phone automatically answers the call. The following screen appears. 2)Use v and w or a number key (1-4) to move the pointer to "Language". The Caller ID setting screen appears. 2)Press 3 to select "Area Code" or press w twice. 3)Press select. 4)Use the number keys (0 to 9 ) to answer the call id. A tone sounds and the displayed area code is in the standby mode, press and hold call . To change . Do not program this...
English Owners Manual
Page 21
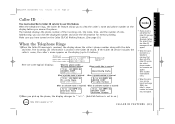
... the Caller ID/Call Waiting feature. (See page 10.) When the Telephone Rings 1)When the Caller ID message is stored in the Caller ID record. The incoming call is received (Example: before you have turned on .) • If you can dial the displayed number and store the information for memor y dialing. C A L L E R I D F E A T U R E S [ 19 ] The handset displays the phone number of calls. Make sure you answer the phone. The date and time received Caller's name Caller's phone number 5/11 12:30PM 01 UNIDEN...
... the Caller ID/Call Waiting feature. (See page 10.) When the Telephone Rings 1)When the Caller ID message is stored in the Caller ID record. The incoming call is received (Example: before you have turned on .) • If you can dial the displayed number and store the information for memor y dialing. C A L L E R I D F E A T U R E S [ 19 ] The handset displays the phone number of calls. Make sure you answer the phone. The date and time received Caller's name Caller's phone number 5/11 12:30PM 01 UNIDEN...

English Owners Manual
Page 25
... and convenient to use the phone, or to announce a special message to callers when you will never have to quickly review, save, or delete the messages you . 2) To turn the answering system on, press ans on /off . If the display flashes, then there are new messages waiting for Guidance • Time and Day Announcement • Remote Message Retrieval • Toll Saver • Conversation Recording • Voice Memo Digital Tapeless Recording allows you to...
... and convenient to use the phone, or to announce a special message to callers when you will never have to quickly review, save, or delete the messages you . 2) To turn the answering system on, press ans on /off . If the display flashes, then there are new messages waiting for Guidance • Time and Day Announcement • Remote Message Retrieval • Toll Saver • Conversation Recording • Voice Memo Digital Tapeless Recording allows you to...

English Owners Manual
Page 28
... can set the ring time to check your messages from the handset. This way, if you make a long distance call to answer af ter two, four, or six rings. Setting the base ringer volume You have set to off . The system announces new ringer volume. Adjusting the speaker volume level Adjust the volume of the base speaker by pressing the volume keys on the base. 2) Press set the base ringer to change the PIN code. Setting the ring time The ring time setting allows you purchase the EXAI2980 series. Setting (Toll...
... can set the ring time to check your messages from the handset. This way, if you make a long distance call to answer af ter two, four, or six rings. Setting the base ringer volume You have set to off . The system announces new ringer volume. Adjusting the speaker volume level Adjust the volume of the base speaker by pressing the volume keys on the base. 2) Press set the base ringer to change the PIN code. Setting the ring time The ring time setting allows you purchase the EXAI2980 series. Setting (Toll...

English Owners Manual
Page 32
... the Recording function. Recording a conversation You can operate your answering system from the handset, press and hold . 2) To stop recording, press play incoming messages, press pound two. Remote access away from home You can record up to record a new greeting message. 1) Call your telephone number. 2)During the greeting message playbacks, press # and enter your phone. 1) During a conversation from a remote location using your PIN code. (See "Setting a Personal Security Code", page 26). 3) The answering system announces the number of conversation while you are disabled...
... the Recording function. Recording a conversation You can operate your answering system from the handset, press and hold . 2) To stop recording, press play incoming messages, press pound two. Remote access away from home You can record up to record a new greeting message. 1) Call your telephone number. 2)During the greeting message playbacks, press # and enter your phone. 1) During a conversation from a remote location using your PIN code. (See "Setting a Personal Security Code", page 26). 3) The answering system announces the number of conversation while you are disabled...

English Owners Manual
Page 38
... a message 28 Skipping a message 29 Turning on/off 23 B Base location 5 Battery pack Information 33 Installing 6 Preparing and charging 6 Replacement and handling 33 Beltclip installation 32 C Caller ID Caller ID service 19 Deleting 20 Setting Caller ID options 10 Using 21 Viewing 20 Call waiting 13 Chain dialing 17 Channel 13 Charging the battery pack 6 Cleaning Battery Contacts 7 Clock 25 Connect the base unit 7 Controls and Functions 2, 3 D Dial mode 8 Digital security code 5, 32 E, F, G, H, I, J, K, L Earpiece volume 12 Flash 13 General information (Specification...
... a message 28 Skipping a message 29 Turning on/off 23 B Base location 5 Battery pack Information 33 Installing 6 Preparing and charging 6 Replacement and handling 33 Beltclip installation 32 C Caller ID Caller ID service 19 Deleting 20 Setting Caller ID options 10 Using 21 Viewing 20 Call waiting 13 Chain dialing 17 Channel 13 Charging the battery pack 6 Cleaning Battery Contacts 7 Clock 25 Connect the base unit 7 Controls and Functions 2, 3 D Dial mode 8 Digital security code 5, 32 E, F, G, H, I, J, K, L Earpiece volume 12 Flash 13 General information (Specification...


