User Guide
Page 5
... telephone number In order to do this change. or an authorized representative of this , it is necessary. Connection to party line service is a REN of 0.3). Also, you will notify you in advance that you believe it may occasionally be necessary for repair or limited warranty information, please contact Toshiba Corporation, Toshiba America Information Systems, Inc. If trouble is experienced...
... telephone number In order to do this change. or an authorized representative of this , it is necessary. Connection to party line service is a REN of 0.3). Also, you will notify you in advance that you believe it may occasionally be necessary for repair or limited warranty information, please contact Toshiba Corporation, Toshiba America Information Systems, Inc. If trouble is experienced...
User Guide
Page 27
... Opening the display panel 53 Your computer's features and specifications ....54 Turning on the power 55 Adding memory (optional 56 Installing a memory module 56 Removing a memory module 62 Hard Drive Recovery Utilities 64 Creating Recovery CDs/DVDs 65 Hard Disk Drive Recovery using the recovery partition 67 Hard Disk Drive Recovery using the Recovery media 72 Deleting the Hard Disk Recovery Utility 75 Installing drivers and applications 76 Using the TouchPad 76 Scrolling with the TouchPad 77 Control buttons 77 Disabling or enabling the TouchPad 78 Using external display devices...
... Opening the display panel 53 Your computer's features and specifications ....54 Turning on the power 55 Adding memory (optional 56 Installing a memory module 56 Removing a memory module 62 Hard Drive Recovery Utilities 64 Creating Recovery CDs/DVDs 65 Hard Disk Drive Recovery using the recovery partition 67 Hard Disk Drive Recovery using the Recovery media 72 Deleting the Hard Disk Recovery Utility 75 Installing drivers and applications 76 Using the TouchPad 76 Scrolling with the TouchPad 77 Control buttons 77 Disabling or enabling the TouchPad 78 Using external display devices...

User Guide
Page 57
... the computer is on the system) The Turn off the computer. 3 Unplug and remove any cables connected to locate the memory module slot cover. The computer has one memory module. If the computer is on, begin at step 1; Getting Started Adding memory (optional) 57 To avoid damaging the computer's screws, use a standard Phillips No. 1 screwdriver that is in Standby or Hibernation mode, data will be lost.
... the computer is on the system) The Turn off the computer. 3 Unplug and remove any cables connected to locate the memory module slot cover. The computer has one memory module. If the computer is on, begin at step 1; Getting Started Adding memory (optional) 57 To avoid damaging the computer's screws, use a standard Phillips No. 1 screwdriver that is in Standby or Hibernation mode, data will be lost.
User Guide
Page 61
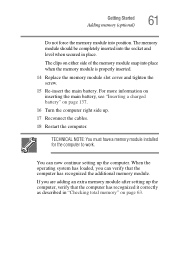
... has recognized the additional memory module. For more information on inserting the main battery, see "Inserting a charged battery" on either side of the memory module snap into position. TECHNICAL NOTE: You must have a memory module installed for the computer to work. Getting Started Adding memory (optional) 61 Do not force the memory module into place when the memory module is properly inserted. 14 Replace the memory module slot cover and tighten the screw...
... has recognized the additional memory module. For more information on inserting the main battery, see "Inserting a charged battery" on either side of the memory module snap into position. TECHNICAL NOTE: You must have a memory module installed for the computer to work. Getting Started Adding memory (optional) 61 Do not force the memory module into place when the memory module is properly inserted. 14 Replace the memory module slot cover and tighten the screw...

User Guide
Page 63
... computer has recognized the change. Getting Started Adding memory (optional) 63 Sample removing the memory module 4 Replace the memory module slot cover and tighten the screw. 5 Re-insert the main battery. For more information on inserting the main battery, see "Inserting a charged battery" on page 137. 6 Turn the computer right side up. 7 Reconnect the cables. 8 Restart the computer. To do this: 1 Click Start, Control Panel, Performance and Maintenance, and then System. 2 The...
... computer has recognized the change. Getting Started Adding memory (optional) 63 Sample removing the memory module 4 Replace the memory module slot cover and tighten the screw. 5 Re-insert the main battery. For more information on inserting the main battery, see "Inserting a charged battery" on page 137. 6 Turn the computer right side up. 7 Reconnect the cables. 8 Restart the computer. To do this: 1 Click Start, Control Panel, Performance and Maintenance, and then System. 2 The...
User Guide
Page 64
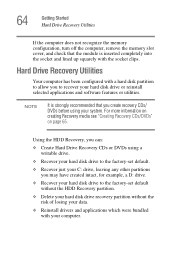
64 Getting Started Hard Drive Recovery Utilities If the computer does not recognize the memory configuration, turn off the computer, remove the memory slot cover, and check that you to allow you create recovery CDs/ DVDs before using your computer. For more information on creating Recovery media see "Creating Recovery CDs/DVDs" on page 65. Using the HDD Recovery, you can: ❖ Create Hard Drive Recovery CDs or DVDs using a writable drive. ❖ Recover your hard disk drive to the factory-set default. ❖ Recover just your C: drive, leaving any other partitions you...
64 Getting Started Hard Drive Recovery Utilities If the computer does not recognize the memory configuration, turn off the computer, remove the memory slot cover, and check that you to allow you create recovery CDs/ DVDs before using your computer. For more information on creating Recovery media see "Creating Recovery CDs/DVDs" on page 65. Using the HDD Recovery, you can: ❖ Create Hard Drive Recovery CDs or DVDs using a writable drive. ❖ Recover your hard disk drive to the factory-set default. ❖ Recover just your C: drive, leaving any other partitions you...
User Guide
Page 72
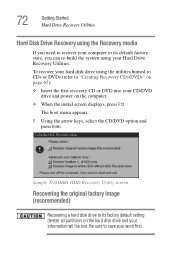
Sample TOSHIBA HDD Recovery Utility screen Recovering the original factory image (recommended) Recovering a hard disk drive to its default factory state, you need to recover your computer to its factory default setting deletes all partitions on the hard disk drive and your work first. Be sure to save your information will be lost. The boot menu appears. 5 Using the arrow keys, select the CD/DVD option and press Enter. 72 Getting Started Hard Drive Recovery Utilities Hard Disk Drive Recovery using the Recovery media If you can re-build the system using the utilities burned...
Sample TOSHIBA HDD Recovery Utility screen Recovering the original factory image (recommended) Recovering a hard disk drive to its default factory state, you need to recover your computer to its factory default setting deletes all partitions on the hard disk drive and your work first. Be sure to save your information will be lost. The boot menu appears. 5 Using the arrow keys, select the CD/DVD option and press Enter. 72 Getting Started Hard Drive Recovery Utilities Hard Disk Drive Recovery using the Recovery media If you can re-build the system using the utilities burned...
User Guide
Page 79
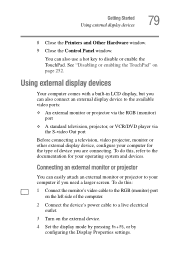
.../DVD player via the S-video Out port Before connecting a television, video projector, monitor or other external display device, configure your computer for your computer if you are connecting. Connecting an external monitor or projector You can also use a hot key to your operating system and devices. See "Disabling or enabling the TouchPad" on the external device. 4 Set the display mode by pressing Fn + F5, or by configuring the Display Properties settings. Getting Started Using external display devices 79 8 Close the Printers and Other Hardware window. 9 Close the Control Panel...
.../DVD player via the S-video Out port Before connecting a television, video projector, monitor or other external display device, configure your computer for your computer if you are connecting. Connecting an external monitor or projector You can also use a hot key to your operating system and devices. See "Disabling or enabling the TouchPad" on the external device. 4 Set the display mode by pressing Fn + F5, or by configuring the Display Properties settings. Getting Started Using external display devices 79 8 Close the Printers and Other Hardware window. 9 Close the Control Panel...
User Guide
Page 102
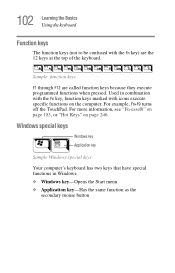
... execute specific functions on page 246. Used in Windows: ❖ Windows key-Opens the Start menu ❖ Application key-Has the same function as the secondary mouse button Windows special keys Windows key Application key Sample Windows special keys Your computer's keyboard has two keys that have special functions in combination with the Fn key, function keys marked with the Fn key) are called function keys because they execute programmed functions when pressed. For example, Fn+F9 turns off the TouchPad. For...
... execute specific functions on page 246. Used in Windows: ❖ Windows key-Opens the Start menu ❖ Application key-Has the same function as the secondary mouse button Windows special keys Windows key Application key Sample Windows special keys Your computer's keyboard has two keys that have special functions in combination with the Fn key, function keys marked with the Fn key) are called function keys because they execute programmed functions when pressed. For example, Fn+F9 turns off the TouchPad. For...
User Guide
Page 188
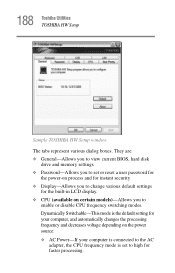
... current BIOS, hard disk drive and memory settings ❖ Password-Allows you to set or reset a user password for the power-on process and for instant security ❖ Display-Allows you to change various default settings for the built-in LCD display. ❖ CPU (available on the power source: ❖ AC Power-If your computer is connected to the AC adapter, the CPU frequency mode is the default setting for faster processing. 188 Toshiba Utilities TOSHIBA HW Setup Sample TOSHIBA HW Setup window The...
... current BIOS, hard disk drive and memory settings ❖ Password-Allows you to set or reset a user password for the power-on process and for instant security ❖ Display-Allows you to change various default settings for the built-in LCD display. ❖ CPU (available on the power source: ❖ AC Power-If your computer is connected to the AC adapter, the CPU frequency mode is the default setting for faster processing. 188 Toshiba Utilities TOSHIBA HW Setup Sample TOSHIBA HW Setup window The...
User Guide
Page 206
...; The screen does not look right. If you change the system in Standby mode for several hours. To charge the battery, leave the computer plugged into a live wall outlet for long periods of these problems, use the options in the optional external diskette drive. The Windows® operating system is not working Once you are running on battery power, it and press any key does not work routine...
...; The screen does not look right. If you change the system in Standby mode for several hours. To charge the battery, leave the computer plugged into a live wall outlet for long periods of these problems, use the options in the optional external diskette drive. The Windows® operating system is not working Once you are running on battery power, it and press any key does not work routine...
User Guide
Page 217
Display problems Here are some typical display problems and their solutions: The screen is not set for an external monitor. You may have gone into a working . If you are using the TouchPad on the external keyboard. HINT: Holding the Fn key and pressing the F5 key several times will restart and recognize the device. Click Start, Shut Down or Turn off computer, and Restart the computer using the built-in...
Display problems Here are some typical display problems and their solutions: The screen is not set for an external monitor. You may have gone into a working . If you are using the TouchPad on the external keyboard. HINT: Holding the Fn key and pressing the F5 key several times will restart and recognize the device. Click Start, Shut Down or Turn off computer, and Restart the computer using the built-in...
User Guide
Page 232
... be disabling the Windows XP wireless management facility, in the drive tray. 3 Ensure that vendor's support group for further advice. It should be set to determine if this is the case, contact that the Display properties are using an external Wi-Fi adapter (a PC Card, USB adapter, or other variety), check if the adapter comes with its own management utility. 232 If Something Goes Wrong DVD operating problems The Windows XP wireless management...
... be disabling the Windows XP wireless management facility, in the drive tray. 3 Ensure that vendor's support group for further advice. It should be set to determine if this is the case, contact that the Display properties are using an external Wi-Fi adapter (a PC Card, USB adapter, or other variety), check if the adapter comes with its own management utility. 232 If Something Goes Wrong DVD operating problems The Windows XP wireless management...
User Guide
Page 255
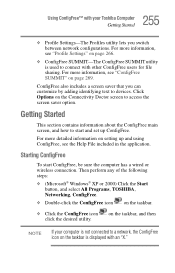
... Connectivity Doctor screen to access the screen saver option. Then perform any of the following steps: ❖ (Microsoft® Windows® XP or 2000) Click the Start button, and select All Programs, TOSHIBA, Networking, ConfigFree. ❖ Double-click the ConfigFree icon on page 266. ❖ ConfigFree SUMMIT-The ConfigFree SUMMIT utility is used to connect with other ConfigFree users for file sharing. Click Options on setting...
... Connectivity Doctor screen to access the screen saver option. Then perform any of the following steps: ❖ (Microsoft® Windows® XP or 2000) Click the Start button, and select All Programs, TOSHIBA, Networking, ConfigFree. ❖ Double-click the ConfigFree icon on page 266. ❖ ConfigFree SUMMIT-The ConfigFree SUMMIT utility is used to connect with other ConfigFree users for file sharing. Click Options on setting...
User Guide
Page 266
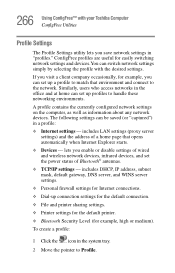
... configured network settings on the computer, as well as information about any network devices. lets you enable or disable settings of Bluetooth® antennas. ❖ TCP/IP settings - Similarly, users who access networks in the office and at home can be saved (or "captured") in "profiles." ConfigFree profiles are useful for example, you can switch network settings simply by selecting the profile with your Toshiba Computer ConfigFree Utilities Profile Settings...
... configured network settings on the computer, as well as information about any network devices. lets you enable or disable settings of Bluetooth® antennas. ❖ TCP/IP settings - Similarly, users who access networks in the office and at home can be saved (or "captured") in "profiles." ConfigFree profiles are useful for example, you can switch network settings simply by selecting the profile with your Toshiba Computer ConfigFree Utilities Profile Settings...

User Guide
Page 294
... keys 101 assign keys Fn-esse 185 audio .wav files 153 audio features 153 Auto-Run 117 B backing up files 99 battery changing 135 charge indicator light 51, 128 charge not lasting 215 charging 48, 52 conserving power 132 disposal 140 low charge 131 monitoring power 51, 128 not charging 214 power usage hot key 134 power usage mode 249 real-time clock (RTC) 124 removing 135 BIOS see Toshiba Hardware Setup Bridge Media slot 159 button power 55, 65 start...
... keys 101 assign keys Fn-esse 185 audio .wav files 153 audio features 153 Auto-Run 117 B backing up files 99 battery changing 135 charge indicator light 51, 128 charge not lasting 215 charging 48, 52 conserving power 132 disposal 140 low charge 131 monitoring power 51, 128 not charging 214 power usage hot key 134 power usage mode 249 real-time clock (RTC) 124 removing 135 BIOS see Toshiba Hardware Setup Bridge Media slot 159 button power 55, 65 start...
User Guide
Page 295
... disk or disk error message 206 not accessing disk drives 205 running on battery power 122 setting up 44, 57 turning off 86 warning resume failure message 205 computing tips 98 connecting to a power source 48 connection set up 148 control buttons 77 critical applications 3 Ctrl keys 101 D desktop creating new icon 143 major features 143 desktop exploration 142 desktop icons 143 Device Manager 211 checking properties 212 disabling a device 212 devices keyboard 81 mouse 82 Disk...
... disk or disk error message 206 not accessing disk drives 205 running on battery power 122 setting up 44, 57 turning off 86 warning resume failure message 205 computing tips 98 connecting to a power source 48 connection set up 148 control buttons 77 critical applications 3 Ctrl keys 101 D desktop creating new icon 143 major features 143 desktop exploration 142 desktop icons 143 Device Manager 211 checking properties 212 disabling a device 212 devices keyboard 81 mouse 82 Disk...
User Guide
Page 296
... problems 232 DVD/multi-function drive problems 222 E environment computer-friendly 40 error messages device driver conflict 209 general hardware problem 209 non-system disk or disk error 206, 221 problem with display settings/ current settings not working with hardware 218 program has performed an illegal operation 203 warning resume failure 205 Error-checking 220 Ethernet LAN port 148 expansion capability 162 expansion memory slot 58 exploring the desktop 142 external monitor not working 219 mouse 82 external diskette drive connecting 84 external display, adjusting...
... problems 232 DVD/multi-function drive problems 222 E environment computer-friendly 40 error messages device driver conflict 209 general hardware problem 209 non-system disk or disk error 206, 221 problem with display settings/ current settings not working with hardware 218 program has performed an illegal operation 203 warning resume failure 205 Error-checking 220 Ethernet LAN port 148 expansion capability 162 expansion memory slot 58 exploring the desktop 142 external monitor not working 219 mouse 82 external diskette drive connecting 84 external display, adjusting...
User Guide
Page 297
... J jack RJ-11 162 K key assign 185 changing 187 direct assign 186 popup 186 removing 187 key assignment viewing existing 187 key assignments changing or removing existing 187 keyboard character keys 100 function keys 102 hot keys 253 not working 205 overlay keys 103 troubleshooting 216 Windows special keys 103 keyboard, external 81 keyboard, full-size 101 keyboard, PS/2-compatible 81 M main battery removing 135 memory adding 56 expansion slots 57 problem solving 213 removing expansion slot cover 58 memory module inserting 60 installation...
... J jack RJ-11 162 K key assign 185 changing 187 direct assign 186 popup 186 removing 187 key assignment viewing existing 187 key assignments changing or removing existing 187 keyboard character keys 100 function keys 102 hot keys 253 not working 205 overlay keys 103 troubleshooting 216 Windows special keys 103 keyboard, external 81 keyboard, full-size 101 keyboard, PS/2-compatible 81 M main battery removing 135 memory adding 56 expansion slots 57 problem solving 213 removing expansion slot cover 58 memory module inserting 60 installation...
User Guide
Page 299
... Device Manager 211 disabling a device 212 disk drive is slow 220 display is blank 217 external display not working 219 external monitor 217 faulty memory 213 hardware conflict 209, 210 high-pitched noise 223 illegal operation 203 Internet bookmarked site not found 208 Internet connection is slow 208 keyboard not responding 205 missing files/trouble accessing a disk 219 modem not receiving or transmitting 228 no sound 223 non-system disk or disk error 206, 221 PC Card...
... Device Manager 211 disabling a device 212 disk drive is slow 220 display is blank 217 external display not working 219 external monitor 217 faulty memory 213 hardware conflict 209, 210 high-pitched noise 223 illegal operation 203 Internet bookmarked site not found 208 Internet connection is slow 208 keyboard not responding 205 missing files/trouble accessing a disk 219 modem not receiving or transmitting 228 no sound 223 non-system disk or disk error 206, 221 PC Card...


