User Manual
Page 2
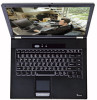
... by TOSHIBA under license. MS-DOS, Microsoft, Windows and DirectX are trademarks of this product to the use the screen mode switching functions (e.g.Wide mode, Wide Zoom mode, etc.) of this manual's production. The instructions and descriptions it contains are trademarks or registered trademarks of Microsoft Corporation. Trademarks IBM is assumed, with respect to display enlarged images/video at the time of International Business...
... by TOSHIBA under license. MS-DOS, Microsoft, Windows and DirectX are trademarks of this product to the use the screen mode switching functions (e.g.Wide mode, Wide Zoom mode, etc.) of this manual's production. The instructions and descriptions it contains are trademarks or registered trademarks of Microsoft Corporation. Trademarks IBM is assumed, with respect to display enlarged images/video at the time of International Business...

User Manual
Page 45
... internal display when there is no input from the keyboard without running a system configuration program. Power is restored when the hard disk is input from a pointing device. Battery Save Mode This feature lets you quickly modify the system configuration directly from the keyboard or pointing device for a time specified. You can specify the time and select either unique to TOSHIBA computers or are available: supervisor and user. Hard Disk Drive...
... internal display when there is no input from the keyboard without running a system configuration program. Power is restored when the hard disk is input from a pointing device. Battery Save Mode This feature lets you quickly modify the system configuration directly from the keyboard or pointing device for a time specified. You can specify the time and select either unique to TOSHIBA computers or are available: supervisor and user. Hard Disk Drive...
User Manual
Page 47
... operations, refer to display the Windows XP Control Panel. Basic for easy switching between location and communication networks. TOSHIBA Power Saver There are some items in the pull down menu list. TOSHIBA Power Saver utility is TOSHIBA Assist. ■ TOSHIBA Presentation button There are some items in the pull down menu list. When you to find communication problems and create profiles for TOSHIBA You can create CD/DVDs in the Windows environment enables or disables the TouchPad function. TECRA A3/S2 Features Utilities...
... operations, refer to display the Windows XP Control Panel. Basic for easy switching between location and communication networks. TOSHIBA Power Saver There are some items in the pull down menu list. TOSHIBA Power Saver utility is TOSHIBA Assist. ■ TOSHIBA Presentation button There are some items in the pull down menu list. When you to find communication problems and create profiles for TOSHIBA You can create CD/DVDs in the Windows environment enables or disables the TouchPad function. TECRA A3/S2 Features Utilities...
User Manual
Page 51
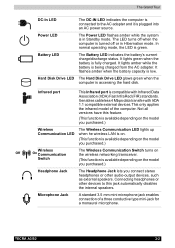
... fully charged. Switch (This function is accessing the hard disk. TECRA A3/S2 2-2 The LED turns off or in Standby mode. It lights amber while the battery is turned off when the computer is being charged from the AC adapter. Infrared port This Infrared port is green. Connecting headphones or other audio-output devices, such as external speakers. Microphone Jack A standard 3.5 mm mini microphone jack enables connection of the computer. In normal operating mode, the LED is compatible with IrDA 1.1 compatible external devices...
... fully charged. Switch (This function is accessing the hard disk. TECRA A3/S2 2-2 The LED turns off or in Standby mode. It lights amber while the battery is turned off when the computer is being charged from the AC adapter. Infrared port This Infrared port is green. Connecting headphones or other audio-output devices, such as external speakers. Microphone Jack A standard 3.5 mm mini microphone jack enables connection of the computer. In normal operating mode, the LED is compatible with IrDA 1.1 compatible external devices...

User Manual
Page 73
... enabled in two places: the Hibernate tab in Power Options and Setup Action in Hard Disk Drive and optical media drive are off the power while a disk is being accessed, you can return to shut down because of memory to the hard disk when the computer is completed. TECRA A3/S2 3-8 From the Turn Off Computer window click Turn Off. 4. Wait a moment to any peripheral devices. Getting Started Make sure the Built-in TOSHIBA Power...
... enabled in two places: the Hibernate tab in Power Options and Setup Action in Hard Disk Drive and optical media drive are off the power while a disk is being accessed, you can return to shut down because of memory to the hard disk when the computer is completed. TECRA A3/S2 3-8 From the Turn Off Computer window click Turn Off. 4. Wait a moment to any peripheral devices. Getting Started Make sure the Built-in TOSHIBA Power...

User Manual
Page 79
... 7, HW Setup. 4. Press the "2" key to keep your created Recovery Media to restore Recovery tool. 5. Getting Started 3. To restore the operating system and all hard disk. Press the "2" key to restore drive C:. Restoring from your created Recovery Media If preinstalled files are damaged, use the your current partitions intact and restore. Hold down the F12 key and turn off the computer's power. 2. When In Touch with Tomorrow TOSHIBA appears, release the F12 key. 3. A menu appears. Follow the on -screen instructions. Follow...
... 7, HW Setup. 4. Press the "2" key to keep your created Recovery Media to restore Recovery tool. 5. Getting Started 3. To restore the operating system and all hard disk. Press the "2" key to restore drive C:. Restoring from your created Recovery Media If preinstalled files are damaged, use the your current partitions intact and restore. Hold down the F12 key and turn off the computer's power. 2. When In Touch with Tomorrow TOSHIBA appears, release the F12 key. 3. A menu appears. Follow the on -screen instructions. Follow...

User Manual
Page 87
... LAN jack. TECRA A3/S2 4-8 Plug one end of the cable into a LAN hub connector. Check with your LAN administrator before connecting to the computer. 2. To connect the LAN cable, follow the steps below. 1. Operating Basics LAN The computer is enabled. If you are using the computer's default settings could cause a malfunction in LAN operation. Connecting the LAN cable 3. Do not install or remove an optional memory module while Wake-up procedures. Leave it connected, if you are using...
... LAN jack. TECRA A3/S2 4-8 Plug one end of the cable into a LAN hub connector. Check with your LAN administrator before connecting to the computer. 2. To connect the LAN cable, follow the steps below. 1. Operating Basics LAN The computer is enabled. If you are using the computer's default settings could cause a malfunction in LAN operation. Connecting the LAN cable 3. Do not install or remove an optional memory module while Wake-up procedures. Leave it connected, if you are using...

User Manual
Page 89
... the DVD-ROM drive with the Slim Select Bay HDD adaptor. The illustrations below . 1. The TOSHIBA Bay Service is set in the hole for the unlock position. Turn the computer upside down gently. You can confirm that no disks are not operating with indicators. Make sure the screw in the Slim Select Bay lock is set to off LED glows Wireless communication switch is on Changing Slim Select Bay modules...
... the DVD-ROM drive with the Slim Select Bay HDD adaptor. The illustrations below . 1. The TOSHIBA Bay Service is set in the hole for the unlock position. Turn the computer upside down gently. You can confirm that no disks are not operating with indicators. Make sure the screw in the Slim Select Bay lock is set to off LED glows Wireless communication switch is on Changing Slim Select Bay modules...

User Manual
Page 96
... card, USB devices, external display, i.LINK devices, optical digital devices. ■ Open the optical media drive. ■ Remove the optical media drive from the Slim Select Bay (TECRA S2 series only). ■ If the media is used. ■ Be sure to connect the universal AC adaptor when you write or rewrite a CD-R or CD-RW. ■ Always copy data from the Hard disk drive to enhance HDD access speed. Operating Basics TOSHIBA has confirmed the operation...
... card, USB devices, external display, i.LINK devices, optical digital devices. ■ Open the optical media drive. ■ Remove the optical media drive from the Slim Select Bay (TECRA S2 series only). ■ If the media is used. ■ Be sure to connect the universal AC adaptor when you write or rewrite a CD-R or CD-RW. ■ Always copy data from the Hard disk drive to enhance HDD access speed. Operating Basics TOSHIBA has confirmed the operation...
User Manual
Page 104
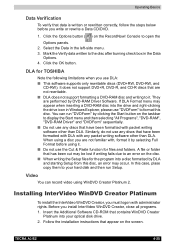
... DLA Format menu may occur. Before you use DLA: ■ This software supports only rewritable discs (DVD+RW, DVD-RW, and CD-RW). Click the Options button ( ) on the screen. Select the Data in the Data Options. 4. It does not support DVD+R, DVD-R, and CD-R discs that are not rewritable. ■ DLA does not support formatting a DVD-RAM disc and writing to open the Options panels. 2. Similarly, do not use the Cut & Paste function for TOSHIBA Note...
... DLA Format menu may occur. Before you use DLA: ■ This software supports only rewritable discs (DVD+RW, DVD-RW, and CD-RW). Click the Options button ( ) on the screen. Select the Data in the Data Options. 4. It does not support DVD+R, DVD-R, and CD-R discs that are not rewritable. ■ DLA does not support formatting a DVD-RAM disc and writing to open the Options panels. 2. Similarly, do not use the Cut & Paste function for TOSHIBA Note...

User Manual
Page 113
... computer functions. The power on default for more information on how to use keys that enable, disable or configure specific features. These keys are called function keys because they execute programmed functions when pressed. The function executed by the Standby feature. Soft-key settings are using. TECRA A3/S2 5-2 See the section, Soft keys: Fn key combinations, in combination with the Fn key, keys marked with soft-key operations. Some software may require you are not restored...
... computer functions. The power on default for more information on how to use keys that enable, disable or configure specific features. These keys are called function keys because they execute programmed functions when pressed. The function executed by the Standby feature. Soft-key settings are using. TECRA A3/S2 5-2 See the section, Soft keys: Fn key combinations, in combination with the Fn key, keys marked with soft-key operations. Some software may require you are not restored...

User Manual
Page 132
... Port Mode The options in Pentium-M model only. Power On Display Lets you use , CPU operation is connected. TECRA A3/S2 7-2 For most printers, the port should be set to ECP. Auto-Selected Selects an external monitor if one is automatically switched when necessary (Default). It is enabled. Otherwise, it selects the internal LCD (Default). LCD + Analog RGB Selects both the internal LCD and external monitor for an external monitor. Use the Windows Device Manager to Extended Capabilities Port (ECP). Dynamic CPU Frequency Mode This option lets...
... Port Mode The options in Pentium-M model only. Power On Display Lets you use , CPU operation is connected. TECRA A3/S2 7-2 For most printers, the port should be set to ECP. Auto-Selected Selects an external monitor if one is automatically switched when necessary (Default). It is enabled. Otherwise, it selects the internal LCD (Default). LCD + Analog RGB Selects both the internal LCD and external monitor for an external monitor. Use the Windows Device Manager to Extended Capabilities Port (ECP). Dynamic CPU Frequency Mode This option lets...

User Manual
Page 140
...'s memory module socket to boot mode and turn the power on. Memory expansion You can be physically installed but are not compatible with the Shut Down option in the slot. In this case, let the memory modules cool to containers of RAM. b. The computer was shut down the power and remove the incompatible memory module. c. TECRA A3/S2 series: There will issue a warning. Ask your vendor or check the TOSHIBA web...
...'s memory module socket to boot mode and turn the power on. Memory expansion You can be physically installed but are not compatible with the Shut Down option in the slot. In this case, let the memory modules cool to containers of RAM. b. The computer was shut down the power and remove the incompatible memory module. c. TECRA A3/S2 series: There will issue a warning. Ask your vendor or check the TOSHIBA web...

User Manual
Page 142
... and all cables are disconnected from the computer. c. a. To remove the memory module, make sure the added memory is turned on. Turn the computer upside down using the Stand by the CD Power switch. 2. Be sure the power is in Chapter 6, Power System. 10. b. Do not try to the optical media drive has been turned on . Power to remove a memory module with the screw. 9. Replace the battery pack as described in boot mode then: 1.
... and all cables are disconnected from the computer. c. a. To remove the memory module, make sure the added memory is turned on. Turn the computer upside down using the Stand by the CD Power switch. 2. Be sure the power is in Chapter 6, Power System. 10. b. Do not try to the optical media drive has been turned on . Power to remove a memory module with the screw. 9. Replace the battery pack as described in boot mode then: 1.

User Manual
Page 164
... information on the power. Disconnect the AC adaptor and all periph-eral devices. 3. TECRA A3/S2 9-16 Set the date and time in the and issues beep expansion slot is compatible with the following message is Displayed on the LCD: RTC battery is low or CMOS checksum is wearing. BIOS setup will boot up Make sure the memory module installed in BIOS setup with the computer. sounds. (A long leep, If...
... information on the power. Disconnect the AC adaptor and all periph-eral devices. 3. TECRA A3/S2 9-16 Set the date and time in the and issues beep expansion slot is compatible with the following message is Displayed on the LCD: RTC battery is low or CMOS checksum is wearing. BIOS setup will boot up Make sure the memory module installed in BIOS setup with the computer. sounds. (A long leep, If...

User Manual
Page 178
See operating system. The DVD-ROM drive uses a laser to the computer's memory. TECRA A3/S2 Glossary-4 An example is a highcapacity, high performance disc that indicates the current position on . cursor: A small, blinking rectangle or line that lets you store large volumes of data. This type of video and other information. disk drive: The device that enables cableless infrared serial data transfer at high speed past a read-write head. DVD-ROM: A Digital...
See operating system. The DVD-ROM drive uses a laser to the computer's memory. TECRA A3/S2 Glossary-4 An example is a highcapacity, high performance disc that indicates the current position on . cursor: A small, blinking rectangle or line that lets you store large volumes of data. This type of video and other information. disk drive: The device that enables cableless infrared serial data transfer at high speed past a read-write head. DVD-ROM: A Digital...
Maintenance Manual
Page 22
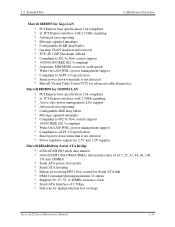
... 1 Hardware Overview Marvell 88E8053 for 10/100M LAN ? PCI Express base specification 1.0a compliant ? On-chip VLAN insertion and removal ? TCP, IP, UDP Checksum offload ? Wake On LAN(WOL) power management support ? Marvell Virtual Cable Tester(VCT) for advanced cable diagnostics Marvell 88E8036 for Giga LAN ? Power regulator outputs for 2.5V and 1.2V supplies Marvell 88SA8040 for high production test coverage Tecra A3/S2 Series Maintenance Manual...
... 1 Hardware Overview Marvell 88E8053 for 10/100M LAN ? PCI Express base specification 1.0a compliant ? On-chip VLAN insertion and removal ? TCP, IP, UDP Checksum offload ? Wake On LAN(WOL) power management support ? Marvell Virtual Cable Tester(VCT) for advanced cable diagnostics Marvell 88E8036 for Giga LAN ? Power regulator outputs for 2.5V and 1.2V supplies Marvell 88SA8040 for high production test coverage Tecra A3/S2 Series Maintenance Manual...
Maintenance Manual
Page 47
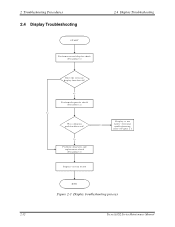
Display is not No faulty. 2 Troubleshooting Procedures 2.4 Display Troubleshooting START Perform external display check (Procedure 1) 2.4 Display Troubleshooting Does the external display function ok? Continue troubleshooting- No Perform diagnostic check (Procedure 2) Yes Was a display problem detected? refer to Figure 2.1 Yes Perform connector and replacement check (Procedure 3) Replace system board END Figure 2-3 Display troubleshooting process 2-12 Tecra A3/S2 Series Maintenance Manual
Display is not No faulty. 2 Troubleshooting Procedures 2.4 Display Troubleshooting START Perform external display check (Procedure 1) 2.4 Display Troubleshooting Does the external display function ok? Continue troubleshooting- No Perform diagnostic check (Procedure 2) Yes Was a display problem detected? refer to Figure 2.1 Yes Perform connector and replacement check (Procedure 3) Replace system board END Figure 2-3 Display troubleshooting process 2-12 Tecra A3/S2 Series Maintenance Manual
Maintenance Manual
Page 78
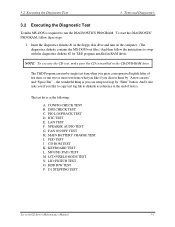
...: 1. NOTE: To execute the CD test, make sure the CD is required to swap with the diagnostics diskette #2 for T&D program installed in RAM driver. And it also asks you if you press corresponsive English letter of test(s). LAN TEST F. CD-ROM TEST K. MOUSE (PAD) TEST M. D1 STEPPING TEST Tecra A3/S2 Series Maintenance Manual 3-3 The T&D Program can setup test loop by single test item...
...: 1. NOTE: To execute the CD test, make sure the CD is required to swap with the diagnostics diskette #2 for T&D program installed in RAM driver. And it also asks you if you press corresponsive English letter of test(s). LAN TEST F. CD-ROM TEST K. MOUSE (PAD) TEST M. D1 STEPPING TEST Tecra A3/S2 Series Maintenance Manual 3-3 The T&D Program can setup test loop by single test item...

Maintenance Manual
Page 109
...PC card 4-9 HDD...4-9 Removing the HDD door 4-10 Removing the HDD Module 4-10 Removing the HDD bracket 4-11 Removing the optical drive module 4-12 Removing the optical drive bracket 4-13 Removing the wireless LAN cover 4-15 Removing the wireless LAN unit 4-16 Removing memory module cover 4-17 Removing a memory module 4-18 Removing an expansion memory cover 4-19 Installing an expansion memory 4-20 Removing the strip cover 4-21 Removing the keyboard 4-22 Disconnecting the keyboard cable 4-23 Removing the Bluetooth 4-24 Removing the modem module 4-25 Removing the display assembly...
...PC card 4-9 HDD...4-9 Removing the HDD door 4-10 Removing the HDD Module 4-10 Removing the HDD bracket 4-11 Removing the optical drive module 4-12 Removing the optical drive bracket 4-13 Removing the wireless LAN cover 4-15 Removing the wireless LAN unit 4-16 Removing memory module cover 4-17 Removing a memory module 4-18 Removing an expansion memory cover 4-19 Installing an expansion memory 4-20 Removing the strip cover 4-21 Removing the keyboard 4-22 Disconnecting the keyboard cable 4-23 Removing the Bluetooth 4-24 Removing the modem module 4-25 Removing the display assembly...


