User Guide
Page 5
... software instructions installed on this change. If the equipment is sent and an identification of the business or other entity, or other electronic device, including Fax machines, to send any message unless such message clearly contains in their equipment, operations or procedures. If trouble is experienced with the FCC if you believe it is resolved. 5 Connection to party line service...
... software instructions installed on this change. If the equipment is sent and an identification of the business or other entity, or other electronic device, including Fax machines, to send any message unless such message clearly contains in their equipment, operations or procedures. If trouble is experienced with the FCC if you believe it is resolved. 5 Connection to party line service...

User Guide
Page 53
... you install or remove a memory module, turn off the computer using the Start menu. NOTE For this model, Slot A is in Sleep or Hibernation mode, data will need a small Phillips screwdriver for this procedure. Installing a memory module with the computer's power on the base of the computer. Slot B is in Slot A. If the computer has been running recently, the memory module(s) may damage the computer, the module, or both. Before you install or remove a memory module...
... you install or remove a memory module, turn off the computer using the Start menu. NOTE For this model, Slot A is in Sleep or Hibernation mode, data will need a small Phillips screwdriver for this procedure. Installing a memory module with the computer's power on the base of the computer. Slot B is in Slot A. If the computer has been running recently, the memory module(s) may damage the computer, the module, or both. Before you install or remove a memory module...
User Guide
Page 55
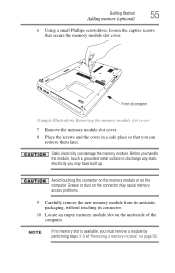
.... Front of computer (Sample Illustration) Removing the memory module slot cover 7 Remove the memory module slot cover. 8 Place the screws and the cover in a safe place so that secure the memory module slot cover. Avoid touching the connector on the memory module or on the underside of "Removing a memory module" on page 58. Getting Started Adding memory (optional) 55 6 Using a small Phillips screwdriver, loosen the captive screws that you must remove a module by performing steps 2-3 of the computer...
.... Front of computer (Sample Illustration) Removing the memory module slot cover 7 Remove the memory module slot cover. 8 Place the screws and the cover in a safe place so that secure the memory module slot cover. Avoid touching the connector on the memory module or on the underside of "Removing a memory module" on page 58. Getting Started Adding memory (optional) 55 6 Using a small Phillips screwdriver, loosen the captive screws that you must remove a module by performing steps 2-3 of the computer...

User Guide
Page 58
... battery. In either of the above cases, the Sleep configuration will be saved. If you can damage the computer and the memory module. 58 Getting Started Adding memory (optional) 14 Replace the memory module slot cover and secure it correctly as described in "Checking total memory" on page 60. TECHNICAL NOTE: You must have at least one memory module installed for the computer to remove a memory module with the computer turned...
... battery. In either of the above cases, the Sleep configuration will be saved. If you can damage the computer and the memory module. 58 Getting Started Adding memory (optional) 14 Replace the memory module slot cover and secure it correctly as described in "Checking total memory" on page 60. TECHNICAL NOTE: You must have at least one memory module installed for the computer to remove a memory module with the computer turned...
User Guide
Page 60
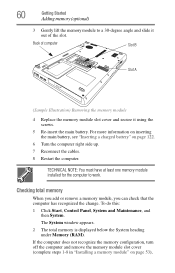
... out of computer Slot B Slot A (Sample Illustration) Removing the memory module 4 Replace the memory module slot cover and secure it using the screws. 5 Re-insert the main battery. The System window appears. 2 The total memory is displayed below the System heading under Memory (RAM). Back of the slot. If the computer does not recognize the memory configuration, turn off the computer and remove the memory module slot cover (complete steps 1-8 in "Installing a memory module" on page 122. 6 Turn the computer...
... out of computer Slot B Slot A (Sample Illustration) Removing the memory module 4 Replace the memory module slot cover and secure it using the screws. 5 Re-insert the main battery. The System window appears. 2 The total memory is displayed below the System heading under Memory (RAM). Back of the slot. If the computer does not recognize the memory configuration, turn off the computer and remove the memory module slot cover (complete steps 1-8 in "Installing a memory module" on page 122. 6 Turn the computer...
User Guide
Page 76
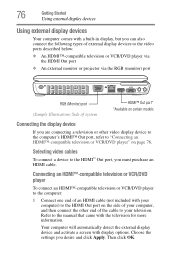
... settings you must purchase an HDMI cable. Refer to the manual that came with display options. Then click OK. 76 Getting Started Using external display devices Using external display devices Your computer comes with a built-in display, but you can also connect the following types of external display devices to the video ports described below: ❖ An HDMI™-compatible television or VCR/DVD player via the HDMI Out port ❖ An external monitor or projector via the RGB (monitor) port...
... settings you must purchase an HDMI cable. Refer to the manual that came with display options. Then click OK. 76 Getting Started Using external display devices Using external display devices Your computer comes with a built-in display, but you can also connect the following types of external display devices to the video ports described below: ❖ An HDMI™-compatible television or VCR/DVD player via the HDMI Out port ❖ An external monitor or projector via the RGB (monitor) port...
User Guide
Page 150
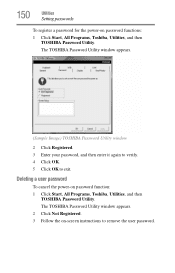
... a user password To cancel the power-on -screen instructions to exit. The TOSHIBA Password Utility window appears. (Sample Image) TOSHIBA Password Utility window 2 Click Registered. 3 Enter your password, and then enter it again to verify. 4 Click OK. 5 Click OK to remove the user password. The TOSHIBA Password Utility window appears. 2 Click Not Registered. 3 Follow the on password function: 1 Click Start, All Programs, Toshiba, Utilities, and then TOSHIBA Password Utility. 150 Utilities Setting passwords To register a password for the power-on password functions: 1 Click Start, All...
... a user password To cancel the power-on -screen instructions to exit. The TOSHIBA Password Utility window appears. (Sample Image) TOSHIBA Password Utility window 2 Click Registered. 3 Enter your password, and then enter it again to verify. 4 Click OK. 5 Click OK to remove the user password. The TOSHIBA Password Utility window appears. 2 Click Not Registered. 3 Follow the on password function: 1 Click Start, All Programs, Toshiba, Utilities, and then TOSHIBA Password Utility. 150 Utilities Setting passwords To register a password for the power-on password functions: 1 Click Start, All...
User Guide
Page 162
... 3 MB or less per year). The collected information includes device operation time and number of actuations or status changes (e.g.: number of power button and Fn key combination uses, and AC adaptor, battery, LCD, fan, HDD, sound volume, wireless communication switch, docking and USB information), date of initial system use this time but you'd like to be enabled after you chose to install one or both programs in the previous step, click...
... 3 MB or less per year). The collected information includes device operation time and number of actuations or status changes (e.g.: number of power button and Fn key combination uses, and AC adaptor, battery, LCD, fan, HDD, sound volume, wireless communication switch, docking and USB information), date of initial system use this time but you'd like to be enabled after you chose to install one or both programs in the previous step, click...
User Guide
Page 173
... adaptor must match exactly. Using Startup options to fix problems If the operating system fails to start properly, you change your computer model. To open the Startup menu: 1 Restart your computer. 2 Press F8 when your work routine, you experience any of these problems, use the options in some way such as installing a new program or adding a device. The computer may have to change the system in the Startup menu. The amperage rating...
... adaptor must match exactly. Using Startup options to fix problems If the operating system fails to start properly, you change your computer model. To open the Startup menu: 1 Restart your computer. 2 Press F8 when your work routine, you experience any of these problems, use the options in some way such as installing a new program or adding a device. The computer may have to change the system in the Startup menu. The amperage rating...
User Guide
Page 177
... Start menu. The computer shuts down completely. 3 Remove the memory module, following the instructions in the lower-right part of tabs. They may cause errors that appear in case the new version is causing a problem. The operating system displays the Device Properties dialog box, which lists resources assigned to the monitor, optional external optical drive, optional external diskette drive, and other power-using resources. ❖ The Driver tab, which displays the drivers being used by the device. Memory problems Incorrectly connected...
... Start menu. The computer shuts down completely. 3 Remove the memory module, following the instructions in the lower-right part of tabs. They may cause errors that appear in case the new version is causing a problem. The operating system displays the Device Properties dialog box, which lists resources assigned to the monitor, optional external optical drive, optional external diskette drive, and other power-using resources. ❖ The Driver tab, which displays the drivers being used by the device. Memory problems Incorrectly connected...
User Guide
Page 181
... monitor's power cord/cable is firmly plugged into a working power outlet. ❖ Check that the cable connecting the external monitor to the computer is firmly attached. ❖ Try adjusting the contrast and brightness controls on the external monitor. ❖ Press Fn and F5 simultaneously to make sure the display priority is not set for the screen. The built-in a blank area of flickering, try using fewer colors. To change the display settings...
... monitor's power cord/cable is firmly plugged into a working power outlet. ❖ Check that the cable connecting the external monitor to the computer is firmly attached. ❖ Try adjusting the contrast and brightness controls on the external monitor. ❖ Press Fn and F5 simultaneously to make sure the display priority is not set for the screen. The built-in a blank area of flickering, try using fewer colors. To change the display settings...
User Guide
Page 186
... tray. Disable Sleep mode, turn off the computer, and turn the computer back on. If a Notepad file prints correctly, the problem may have connected the printer while the computer is firmly connected to print a short test file using Notepad. If you could create and attempt to the computer's modem port and the telephone line jack. Try printing another file. Make sure you installed the...
... tray. Disable Sleep mode, turn off the computer, and turn the computer back on. If a Notepad file prints correctly, the problem may have connected the printer while the computer is firmly connected to print a short test file using Notepad. If you could create and attempt to the computer's modem port and the telephone line jack. Try printing another file. Make sure you installed the...
User Guide
Page 223
... image displayed on the motherboard to interact with the Fn key can set system options or control system parameters, such as the battery save mode. (2) A key or combination of using a pointing device such as a mouse. Compare non-interlaced. The decentralized, world-wide network of computers or other devices dispersed over a relatively limited area and connected by a communications link that you use to the internal storage drive the current...
... image displayed on the motherboard to interact with the Fn key can set system options or control system parameters, such as the battery save mode. (2) A key or combination of using a pointing device such as a mouse. Compare non-interlaced. The decentralized, world-wide network of computers or other devices dispersed over a relatively limited area and connected by a communications link that you use to the internal storage drive the current...
User Guide
Page 229
... changing 120 charge indicator light 48, 114 charge not lasting 179 charging 48, 113 conserving power 117 disposal 125 installing 120, 122 low charge 116 maintaining 124 monitoring power 48, 114 not charging 178 notifications 116 power plan 205 power plan hot key 119 real-time clock (RTC) 111, 113 remaining power 115 removing 121 safety precautions 123 BIOS Setup see TOSHIBA Hardware Setup Bridge Media Adapter inserting memory media 138 removing memory media 139 button power 50 start 129 buttons eject, optical drive 104 Media control buttons...
... changing 120 charge indicator light 48, 114 charge not lasting 179 charging 48, 113 conserving power 117 disposal 125 installing 120, 122 low charge 116 maintaining 124 monitoring power 48, 114 not charging 178 notifications 116 power plan 205 power plan hot key 119 real-time clock (RTC) 111, 113 remaining power 115 removing 121 safety precautions 123 BIOS Setup see TOSHIBA Hardware Setup Bridge Media Adapter inserting memory media 138 removing memory media 139 button power 50 start 129 buttons eject, optical drive 104 Media control buttons...
User Guide
Page 230
... 184 display does not look normal/flickers 181 external monitor not working 182 display device connecting 76 external 76 display output settings 77 display panel opening 49 display problems screen is blank 180 display, external adjusting 78 disposal information 29 disposing of used batteries 125 double-click 75 DVD using 103 DVD player general problems 189 E eject button optical drive 104 eject, optical drive 104 ENERGY STAR® 37 error messages device driver conflict 175 general hardware problem 175 non-system disk or disk error 172
... 184 display does not look normal/flickers 181 external monitor not working 182 display device connecting 76 external 76 display output settings 77 display panel opening 49 display problems screen is blank 180 display, external adjusting 78 disposal information 29 disposing of used batteries 125 double-click 75 DVD using 103 DVD player general problems 189 E eject button optical drive 104 eject, optical drive 104 ENERGY STAR® 37 error messages device driver conflict 175 general hardware problem 175 non-system disk or disk error 172

User Guide
Page 231
... 176 HDMI™ Out Port 76 headphones using 136 Help and Support Windows® operating system 175 Hibernation mode 81 configuring 85 hot key 207 starting again from 87 hot key disabling or enabling TouchPad™ 211 disabling or enabling wireless devices 210 display brightness 209 Hibernation mode 207 keyboard overlays 213 Lock (Instant security) 204 Output (Display switch) 208 power plan 205 Sleep mode 206 volume mute 203 Zoom (Display resolution) 212 zooming in 213 zooming out 213 Hot Key Cards 199 Hot key functions 203 hot key power plan...
... 176 HDMI™ Out Port 76 headphones using 136 Help and Support Windows® operating system 175 Hibernation mode 81 configuring 85 hot key 207 starting again from 87 hot key disabling or enabling TouchPad™ 211 disabling or enabling wireless devices 210 display brightness 209 Hibernation mode 207 keyboard overlays 213 Lock (Instant security) 204 Output (Display switch) 208 power plan 205 Sleep mode 206 volume mute 203 Zoom (Display resolution) 212 zooming in 213 zooming out 213 Hot Key Cards 199 Hot key functions 203 hot key power plan...
User Guide
Page 232
... keyboard, full-size 94 L light AC power 46 drive in-use indicator 104 lock computer, using 91 M main battery changing 120 installing 120, 122 removing 121 safety precautions 123 manual eject hole optical drive 104 memory adding 52 problem solving 177 removing memory module slot cover 55 memory module installation 53 installing inserting into socket 56 removing 58, 60 memory module slot 55 microphone using 136 modem connecting to telephone line 131 problem solving 186, 187 monitor 76 connecting 76, 77 monitor problems monitor not working 181 mouse installing 78 mouse utility 154 N network...
... keyboard, full-size 94 L light AC power 46 drive in-use indicator 104 lock computer, using 91 M main battery changing 120 installing 120, 122 removing 121 safety precautions 123 manual eject hole optical drive 104 memory adding 52 problem solving 177 removing memory module slot cover 55 memory module installation 53 installing inserting into socket 56 removing 58, 60 memory module slot 55 microphone using 136 modem connecting to telephone line 131 problem solving 186, 187 monitor 76 connecting 76, 77 monitor problems monitor not working 181 mouse installing 78 mouse utility 154 N network...

User Guide
Page 233
... disabling a user 150 setting a user 149 supervisor set up 148 types 147 passwords instant, using 147 setting 147 port RGB 76 power computer will not start 170 connecting cable to AC adaptor 47 cord/cable 47 cord/cable connectors 214 energy-saving features 110 problem solving 178 turning on 50 power button 50 power plan hot key 119 power plans 118 power source connecting 47 powering down using Hibernation 85 using Shut Down 83 using Sleep 87 precautions 43 printer connecting 79 problem...
... disabling a user 150 setting a user 149 supervisor set up 148 types 147 passwords instant, using 147 setting 147 port RGB 76 power computer will not start 170 connecting cable to AC adaptor 47 cord/cable 47 cord/cable connectors 214 energy-saving features 110 problem solving 178 turning on 50 power button 50 power plan hot key 119 power plans 118 power source connecting 47 powering down using Hibernation 85 using Shut Down 83 using Sleep 87 precautions 43 printer connecting 79 problem...
User Guide
Page 234
... 99 Windows® Explorer 98 Windows® Start menu 97 starting up the computer from Shut down 85 from Sleep 90 Startup menu problem solving 173 supervisor password, deleting 149 supervisor password, set up 148 T Taskbar 129 telephone line connecting to modem 131 television adjusting display 78 connecting 76 Toshiba registering computer 51 worldwide offices 197 TOSHIBA Accessibility 159 Toshiba accessories memory 52 TOSHIBA Application Installer 146 TOSHIBA Assist 141 TOSHIBA Button Support 158 TOSHIBA eco Mode Using 120 TOSHIBA eco Utility...
... 99 Windows® Explorer 98 Windows® Start menu 97 starting up the computer from Shut down 85 from Sleep 90 Startup menu problem solving 173 supervisor password, deleting 149 supervisor password, set up 148 T Taskbar 129 telephone line connecting to modem 131 television adjusting display 78 connecting 76 Toshiba registering computer 51 worldwide offices 197 TOSHIBA Accessibility 159 Toshiba accessories memory 52 TOSHIBA Application Installer 146 TOSHIBA Assist 141 TOSHIBA Button Support 158 TOSHIBA eco Mode Using 120 TOSHIBA eco Utility...
User Guide
Page 235
... TOSHIBA PC Health Monitor 162 TOSHIBA SD™ Memory Card Format Utility 153 TOSHIBA Service Station 161 TOSHIBA Zooming Utility 157 TouchPad™ control buttons 75 primary button 75 secondary button 75 using 74 traveling tips 126 troubleshooting DVD player general problems 189 external keyboard 180 keyboard 180 optical drive 184 turning on the computer 50 turning on the power 50 U USB-compatible printer 79 user password, disabling 150 user password, setting 149 using a file extension 101 Utilities 140 V video cables 76 video display device connecting 76 video projector adjusting display...
... TOSHIBA PC Health Monitor 162 TOSHIBA SD™ Memory Card Format Utility 153 TOSHIBA Service Station 161 TOSHIBA Zooming Utility 157 TouchPad™ control buttons 75 primary button 75 secondary button 75 using 74 traveling tips 126 troubleshooting DVD player general problems 189 external keyboard 180 keyboard 180 optical drive 184 turning on the computer 50 turning on the power 50 U USB-compatible printer 79 user password, disabling 150 user password, setting 149 using a file extension 101 Utilities 140 V video cables 76 video display device connecting 76 video projector adjusting display...


