
User Guide
Page 3
... ANY BUSINESS, PROFITS, PROGRAMS, DATA, NETWORK SYSTEMS OR REMOVABLE STORAGE MEDIA ARISING OUT OF OR RESULTING FROM THE USE OF THE PRODUCT, EVEN IF ADVISED OF THE POSSIBILITY THEREOF. Protection of Stored Data For your important data, please make periodic back-up and usage instructions in the applicable user guides and/or manuals enclosed or provided electronically. WHEN COPYING...
... ANY BUSINESS, PROFITS, PROGRAMS, DATA, NETWORK SYSTEMS OR REMOVABLE STORAGE MEDIA ARISING OUT OF OR RESULTING FROM THE USE OF THE PRODUCT, EVEN IF ADVISED OF THE POSSIBILITY THEREOF. Protection of Stored Data For your important data, please make periodic back-up and usage instructions in the applicable user guides and/or manuals enclosed or provided electronically. WHEN COPYING...
User Guide
Page 9
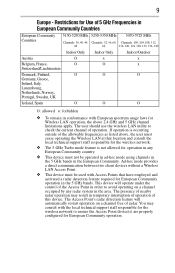
.... The user should use the wireless LAN utility to avoid operating on a channel free of operation. 9 Europe - The Access Point's radar detection feature will operate under the control of the Access Point in the European Community. Ad-hoc mode provides a direct communication between two client devices without a Wireless LAN Access Point. ❖ This device must not be operated in ad-hoc mode using channels in the 5 GHz bands in order to check...
.... The user should use the wireless LAN utility to avoid operating on a channel free of operation. 9 Europe - The Access Point's radar detection feature will operate under the control of the Access Point in the European Community. Ad-hoc mode provides a direct communication between two client devices without a Wireless LAN Access Point. ❖ This device must not be operated in ad-hoc mode using channels in the 5 GHz bands in order to check...
User Guide
Page 14
... (up to : ❖ Bluetooth Specification as defined and approved by The Bluetooth Special Interest Group. Please contact Toshiba computer product support on Web site http://www.toshiba-europe.com/computers/tnt/bluetooth.htm in Europe or pcsupport.toshiba.com in order to 2.4 GHz Wireless LAN devices, Bluetooth transmissions might slow down or cause errors. Bluetooth® Wireless Technology Interoperability Bluetooth® Cards from TOSHIBA close to enable wireless networks over two or...
... (up to : ❖ Bluetooth Specification as defined and approved by The Bluetooth Special Interest Group. Please contact Toshiba computer product support on Web site http://www.toshiba-europe.com/computers/tnt/bluetooth.htm in Europe or pcsupport.toshiba.com in order to 2.4 GHz Wireless LAN devices, Bluetooth transmissions might slow down or cause errors. Bluetooth® Wireless Technology Interoperability Bluetooth® Cards from TOSHIBA close to enable wireless networks over two or...
User Guide
Page 21
... is used. You can wake the computer from its maximum energy efficiency. household and businesses replaced old computers with the power management options preset to a configuration that you purchased is compliant, it is set to enter the low-power Sleep mode which shuts down the system and display within 15 minutes of those from 25 million vehicles. commercial building space each year. Toshiba...
... is used. You can wake the computer from its maximum energy efficiency. household and businesses replaced old computers with the power management options preset to a configuration that you purchased is compliant, it is set to enter the low-power Sleep mode which shuts down the system and display within 15 minutes of those from 25 million vehicles. commercial building space each year. Toshiba...
User Guide
Page 28
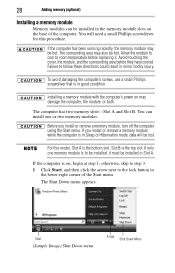
... lock button in Sleep or Hibernation mode, data will need a small Phillips screwdriver for this model, Slot A is the bottom slot. The Shut Down menu appears. Slot B is the top slot. Avoid touching the cover, the module, and the surrounding area before replacing it must be installed in the memory module slots on , begin at step 1; If the computer is on the base of the Start menu. Start (Sample Image) Shut Down menu...
... lock button in Sleep or Hibernation mode, data will need a small Phillips screwdriver for this model, Slot A is the bottom slot. The Shut Down menu appears. Slot B is the top slot. Avoid touching the cover, the module, and the surrounding area before replacing it must be installed in the memory module slots on , begin at step 1; If the computer is on the base of the Start menu. Start (Sample Image) Shut Down menu...
User Guide
Page 29
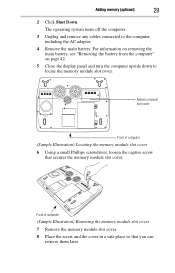
.... 4 Remove the main battery. Front of computer (Sample Illustration) Locating the memory module slot cover 6 Using a small Phillips screwdriver, loosen the captive screw that you can retrieve them later. Adding memory (optional) 29 2 Click Shut Down. The operating system turns off the computer. 3 Unplug and remove any cables connected to locate the memory module slot cover. Memory module slot cover Front of computer (Sample Illustration) Removing the memory module slot cover 7 Remove the memory module slot cover. 8 Place the screw and the cover in a safe place...
.... 4 Remove the main battery. Front of computer (Sample Illustration) Locating the memory module slot cover 6 Using a small Phillips screwdriver, loosen the captive screw that you can retrieve them later. Adding memory (optional) 29 2 Click Shut Down. The operating system turns off the computer. 3 Unplug and remove any cables connected to locate the memory module slot cover. Memory module slot cover Front of computer (Sample Illustration) Removing the memory module slot cover 7 Remove the memory module slot cover. 8 Place the screw and the cover in a safe place...
User Guide
Page 30
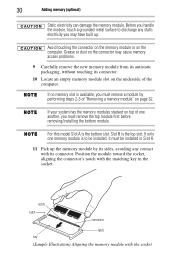
... "Removing a memory module" on page 32. Avoid touching the connector on the memory module or on the underside of the computer. For this model Slot A is the top slot. notch latch connector latch key (Sample Illustration) Aligning the memory module with its sides, avoiding any static electricity you may cause memory access problems. 9 Carefully remove the new memory module from its antistatic packaging, without touching its connector. 10 Locate an empty memory module slot...
... "Removing a memory module" on page 32. Avoid touching the connector on the memory module or on the underside of the computer. For this model Slot A is the top slot. notch latch connector latch key (Sample Illustration) Aligning the memory module with its sides, avoiding any static electricity you may cause memory access problems. 9 Carefully remove the new memory module from its antistatic packaging, without touching its connector. 10 Locate an empty memory module slot...
User Guide
Page 32
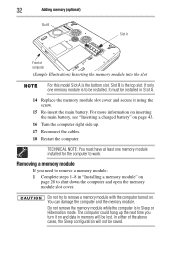
32 Adding memory (optional) Slot B Slot A Front of the above cases, the Sleep configuration will be lost. The computer could hang up . 17 Reconnect the cables. 18 Restart the computer. For more information on inserting the main battery, see "Inserting a charged battery" on page 43. 16 Turn the computer right side up the next time you need to be installed in Slot A. 14 Replace the memory module slot cover and...
32 Adding memory (optional) Slot B Slot A Front of the above cases, the Sleep configuration will be lost. The computer could hang up . 17 Reconnect the cables. 18 Restart the computer. For more information on inserting the main battery, see "Inserting a charged battery" on page 43. 16 Turn the computer right side up the next time you need to be installed in Slot A. 14 Replace the memory module slot cover and...
User Guide
Page 33
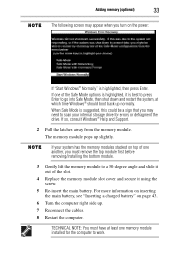
... the memory modules stacked on top of one of the slot. 4 Replace the memory module slot cover and secure it is highlighted, it using the screw. 5 Re-insert the main battery. Adding memory (optional) 33 The following screen may need to a 30-degree angle and slide it out of the Safe Mode options is best to press Enter to work. If one another, you may appear when you turn on...
... the memory modules stacked on top of one of the slot. 4 Replace the memory module slot cover and secure it is highlighted, it using the screw. 5 Re-insert the main battery. Adding memory (optional) 33 The following screen may need to a 30-degree angle and slide it out of the Safe Mode options is best to press Enter to work. If one another, you may appear when you turn on...
User Guide
Page 35
... a safe place. ❖ Scan all work frequently. This feature saves your desktop setup, during its shutdown procedure. The Windows® operating system records information, such as new icon positions may be activated. Learning the basics 35 Learning the basics Computing tips ❖ Save your software documentation for viruses. ❖ Do not turn off the computer if a drive indicator light indicates a drive is sensitive to touch...
... a safe place. ❖ Scan all work frequently. This feature saves your desktop setup, during its shutdown procedure. The Windows® operating system records information, such as new icon positions may be activated. Learning the basics 35 Learning the basics Computing tips ❖ Save your software documentation for viruses. ❖ Do not turn off the computer if a drive indicator light indicates a drive is sensitive to touch...
User Guide
Page 36
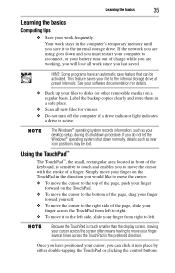
... mouse button. To scroll vertically, run your program's documentation to play DVDs from that last region. The primary button usually corresponds to region 1 is , the drive will be disabled or changed in rapid succession. 36 Using the optical drive Scrolling with the TouchPad™ There are two active regions on the TouchPad™ that allow you to the right mouse button ("right-clicking"). Control buttons When a step instructs you...
... mouse button. To scroll vertically, run your program's documentation to play DVDs from that last region. The primary button usually corresponds to region 1 is , the drive will be disabled or changed in rapid succession. 36 Using the optical drive Scrolling with the TouchPad™ There are two active regions on the TouchPad™ that allow you to the right mouse button ("right-clicking"). Control buttons When a step instructs you...
User Guide
Page 37
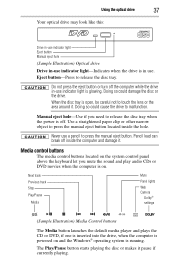
... turn off . Never use a pencil to release the disc tray when the power is off the computer while the drive in use indicator light is powered on the system control panel above the keyboard let you need to press the manual eject button. Next track Previous track Stop Play/Pause Media Mute Panel lights Web Camera Dolby® settings (Sample Illustration) Media Control buttons The Media button launches the default media player and plays the CD or DVD...
... turn off . Never use a pencil to release the disc tray when the power is off the computer while the drive in use indicator light is powered on the system control panel above the keyboard let you need to press the manual eject button. Next track Previous track Stop Play/Pause Media Mute Panel lights Web Camera Dolby® settings (Sample Illustration) Media Control buttons The Media button launches the default media player and plays the CD or DVD...

User Guide
Page 38
... the disc in -use indicator light is off . The Web Camera button launches the Web Camera. The Dolby® settings button launches the Dolby® controls. Inserting an optical disc Before putting on and off . 3 Press the drive's eject button. The Panel lights button turns all of the computer panel lights on headphones to loud sound can harm your hearing. 38 Using the optical drive The Stop button stops a disc that it is free of...
... the disc in -use indicator light is off . The Web Camera button launches the Web Camera. The Dolby® settings button launches the Dolby® controls. Inserting an optical disc Before putting on and off . 3 Press the drive's eject button. The Panel lights button turns all of the computer panel lights on headphones to loud sound can harm your hearing. 38 Using the optical drive The Stop button stops a disc that it is free of...
User Guide
Page 40
... product model, configuration, applications, power management settings and features utilized, as well as the natural performance variations produced by Toshiba at maximum capacity and will need to retain a charge. To purchase a new battery pack, see "Maintaining your system configuration settings and the current time and date information. The computer also has an internal real-time-clock (RTC) battery. Use only batteries designed to fully discharge the battery periodically...
... product model, configuration, applications, power management settings and features utilized, as well as the natural performance variations produced by Toshiba at maximum capacity and will need to retain a charge. To purchase a new battery pack, see "Maintaining your system configuration settings and the current time and date information. The computer also has an internal real-time-clock (RTC) battery. Use only batteries designed to fully discharge the battery periodically...
User Guide
Page 41
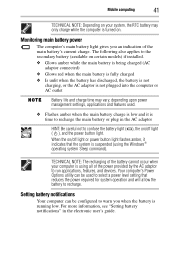
... to confuse the battery light ( ), the on /off light ( ), and the power button light. Your computer's Power Options utility can be used . ❖ Flashes amber when the main battery charge is low and it indicates that reduces the power required for system operation and will allow the battery to the secondary battery (available on certain models) if installed. ❖ Glows amber while the main battery is being charged (AC adaptor connected) ❖ Glows...
... to confuse the battery light ( ), the on /off light ( ), and the power button light. Your computer's Power Options utility can be used . ❖ Flashes amber when the main battery charge is low and it indicates that reduces the power required for system operation and will allow the battery to the secondary battery (available on certain models) if installed. ❖ Glows amber while the main battery is being charged (AC adaptor connected) ❖ Glows...

User Guide
Page 47
... AC adaptor and power cord/cable properly or installed a charged battery. If you are using an AC adaptor, verify that the wall outlet is receiving power from the external power source by plugging in the lower-right part of the Start menu. If the indicator is glowing, the computer is connected to the Lock button in another device, such as a lamp. Try clicking your mouse on /off your...
... AC adaptor and power cord/cable properly or installed a charged battery. If you are using an AC adaptor, verify that the wall outlet is receiving power from the external power source by plugging in the lower-right part of the Start menu. If the indicator is glowing, the computer is connected to the Lock button in another device, such as a lamp. Try clicking your mouse on /off your...
User Guide
Page 48
... with the conflicting device and "Resolving a hardware conflict" in your program stops responding (see "Problems that are using the built-in screen, make sure the display priority is firmly attached. ❖ Try adjusting the contrast and brightness controls on page 46). Clearing the condition may have gone into a working . If you to its previous setting. Press any key, type the password and press Enter. You may be...
... with the conflicting device and "Resolving a hardware conflict" in your program stops responding (see "Problems that are using the built-in screen, make sure the display priority is firmly attached. ❖ Try adjusting the contrast and brightness controls on page 46). Clearing the condition may have gone into a working . If you to its previous setting. Press any key, type the password and press Enter. You may be...
User Guide
Page 49
... that used to insert ExpressCards. ❖ Make sure all cables are an intrinsic characteristic of the screen technology. Your display contains an extremely large number of the screen will dim and you turn on battery power. Check the ExpressCard® status: 1 Click Start, Control Panel, System and Maintenance, and then Device Manager. 2 Double-click the appropriate ExpressCard, which contains information about how to work no longer work. Small bright...
... that used to insert ExpressCards. ❖ Make sure all cables are an intrinsic characteristic of the screen technology. Your display contains an extremely large number of the screen will dim and you turn on battery power. Check the ExpressCard® status: 1 Click Start, Control Panel, System and Maintenance, and then Device Manager. 2 Double-click the appropriate ExpressCard, which contains information about how to work no longer work. Small bright...
User Guide
Page 52
... power cord/cable 26 printer 27 control buttons TouchPad 36 D DC-IN 26 display problems screen is blank 48 E eject button optical drive 37 ExpressCard® inserting 34 removing 34 ExpressCard® problems 49 computer stops working 50 slot appears dead 49 F files backing up 35 saving 35 I inserting CD/DVD 38 installing main battery 42, 43 memory module 27 K keyboard problems not working 48 L lights AC power 25 M main battery changing 42 installing 42, 43 removing 42 memory module installing...
... power cord/cable 26 printer 27 control buttons TouchPad 36 D DC-IN 26 display problems screen is blank 48 E eject button optical drive 37 ExpressCard® inserting 34 removing 34 ExpressCard® problems 49 computer stops working 50 slot appears dead 49 F files backing up 35 saving 35 I inserting CD/DVD 38 installing main battery 42, 43 memory module 27 K keyboard problems not working 48 L lights AC power 25 M main battery changing 42 installing 42, 43 removing 42 memory module installing...
User Guide
Page 53
... low battery 41 O optical drive eject button 37 inserting a disc 38 removing disc 39 using 36 P power cable connectors 51 cord/cable 26 power problems computer will not start 47 precautions 23 primary button TouchPad 36 printer connecting 27 problem solving computer hangs when ExpressCard® inserted 50 computer will not start 47 contacting Toshiba 50 display is blank 48 ExpressCard® checklist 49 ExpressCard® slot appears dead 49 external monitor 48 keyboard...
... low battery 41 O optical drive eject button 37 inserting a disc 38 removing disc 39 using 36 P power cable connectors 51 cord/cable 26 power problems computer will not start 47 precautions 23 primary button TouchPad 36 printer connecting 27 problem solving computer hangs when ExpressCard® inserted 50 computer will not start 47 contacting Toshiba 50 display is blank 48 ExpressCard® checklist 49 ExpressCard® slot appears dead 49 external monitor 48 keyboard...


