User Manual
Page 1
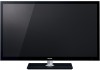
...169; 2010 TOSHIBA CORPORATION All Rights Reserved Owner's Record The model number and serial number are on the back and side of steps for setting up your new TV, see page 11. Refer to these numbers in the spaces below. Integrated High Definition LCD Television 46VX700U 55VX700U For an... overview of your Toshiba dealer about this TV. Note: To display a High Definition picture, the TV must be receiving a High Definition signal (such as an over-the-air High...
...169; 2010 TOSHIBA CORPORATION All Rights Reserved Owner's Record The model number and serial number are on the back and side of steps for setting up your new TV, see page 11. Refer to these numbers in the spaces below. Integrated High Definition LCD Television 46VX700U 55VX700U For an... overview of your Toshiba dealer about this TV. Note: To display a High Definition picture, the TV must be receiving a High Definition signal (such as an over-the-air High...
User Manual
Page 2
... USER-SERVICEABLE PARTS INSIDE. The lightning flash with steel studs or old cinder block construction. WARNING To prevent injury, this Toshiba LCD TV. NEC, which provides guidelines for purchasing this apparatus must be securely attached to Article 820-40 of the U.S. WARNING: ...does NOT fit all enclosed instructions for installation. See item 25 on p. 4 and instructions on your flat panel display. TOSHIBA Cares! • The consumer electronics industry is committed to walls with arrowhead symbol, within an equilateral triangle, is intended to alert ...
... USER-SERVICEABLE PARTS INSIDE. The lightning flash with steel studs or old cinder block construction. WARNING To prevent injury, this Toshiba LCD TV. NEC, which provides guidelines for purchasing this apparatus must be securely attached to Article 820-40 of the U.S. WARNING: ...does NOT fit all enclosed instructions for installation. See item 25 on p. 4 and instructions on your flat panel display. TOSHIBA Cares! • The consumer electronics industry is committed to walls with arrowhead symbol, within an equilateral triangle, is intended to alert ...
User Manual
Page 3
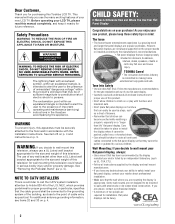
... or other . Important Safety Instructions 1) Read these instructions. 2) Keep these recommendations and precautions and heed all warnings when installing your TV: 19) WARNING: NEVER expose batteries to excessive heat such as power-supply cord or plug is located in such a manner that it... for your doctor. • ALWAYS contact a service technician to excessive dust or vibration. 3 Additional Safety Precautions 14a) CAUTION: If the TV is used, use attachments/accessories specified by the manufacturer. 12) Use only with the cart, stand, tripod, bracket, or table specified by...
... or other . Important Safety Instructions 1) Read these instructions. 2) Keep these recommendations and precautions and heed all warnings when installing your TV: 19) WARNING: NEVER expose batteries to excessive heat such as power-supply cord or plug is located in such a manner that it... for your doctor. • ALWAYS contact a service technician to excessive dust or vibration. 3 Additional Safety Precautions 14a) CAUTION: If the TV is used, use attachments/accessories specified by the manufacturer. 12) Use only with the cart, stand, tripod, bracket, or table specified by...
User Manual
Page 4
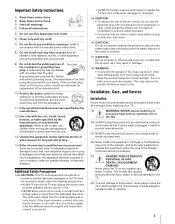
...TV cabinet back, bottom, and sides. Never place the TV...TV surface. Make sure the strap is not a sign of the TV pedestal to rest on or roll over , secure the TV... TV. 36) ...TV falling over the power cord, and never place the TV...TV. 28) Always place the back of time. 40) ALWAYS unplug the TV...TV from overheating and to completely disconnect from the surface. Care For better performance and safer operation of your TV... TV screen... the TV cabinet ... TV surface...TV is turned off using the on/off switch, it is not completely disconnected from the TV... the TV on the...TV surface. When cleaning your TV...
...TV cabinet back, bottom, and sides. Never place the TV...TV surface. Make sure the strap is not a sign of the TV pedestal to rest on or roll over , secure the TV... TV. 36) ...TV falling over the power cord, and never place the TV...TV. 28) Always place the back of time. 40) ALWAYS unplug the TV...TV from overheating and to completely disconnect from the surface. Care For better performance and safer operation of your TV... TV screen... the TV cabinet ... TV surface...TV is turned off using the on/off switch, it is not completely disconnected from the TV... the TV on the...TV surface. When cleaning your TV...

User Manual
Page 5
... not specified in this manual to a Toshiba Authorized Service Center. 45) If you have removed all five screws holding the pedestal stand in place, remove the pedestal stand from the TV by ultraviolet radiation from the rear of the TV. 2) Carefully lay the front of the...or place anything on or off. Remove the four screws. (Do not use these sounds become frequent or continuous, unplug the power cord and contact a Toshiba Authorized Service Center. 42) WARNING: RISK OF SERIOUS PERSONAL INJURY OR EQUIPMENT DAMAGE! If these for attaching a wall bracket.) 2. p. 2) : CAUTION:...
... not specified in this manual to a Toshiba Authorized Service Center. 45) If you have removed all five screws holding the pedestal stand in place, remove the pedestal stand from the TV by ultraviolet radiation from the rear of the TV. 2) Carefully lay the front of the...or place anything on or off. Remove the four screws. (Do not use these sounds become frequent or continuous, unplug the power cord and contact a Toshiba Authorized Service Center. 42) WARNING: RISK OF SERIOUS PERSONAL INJURY OR EQUIPMENT DAMAGE! If these for attaching a wall bracket.) 2. p. 2) : CAUTION:...
User Manual
Page 6
... for a Class B digital device, pursuant to operate this device is connected. • Consult the dealer or an experienced radio/TV technician for help. Important: Any changes or modifications not expressly approved by one of information to be co-located or operating in ... the equipment off and on a circuit different from that this equipment. Federal Communications Commission Statement FCC Compliance Statement This Toshiba television models 46VX700U and 55VX700U comply with minimum distance 20cm between the equipment and receiver. • Connect the equipment into an outlet on , ...
... for a Class B digital device, pursuant to operate this device is connected. • Consult the dealer or an experienced radio/TV technician for help. Important: Any changes or modifications not expressly approved by one of information to be co-located or operating in ... the equipment off and on a circuit different from that this equipment. Federal Communications Commission Statement FCC Compliance Statement This Toshiba television models 46VX700U and 55VX700U comply with minimum distance 20cm between the equipment and receiver. • Connect the equipment into an outlet on , ...
User Manual
Page 7
...and functionality (e.g. ENERGY STAR® qualified TV. therefore, Toshiba is not responsible for perceived issues resulting from these symptoms. 1) An afterimage (ghost) may be used in the TV tuning process to certain intellectual property rights of this TV. Dolby and the double-D symbol are... under your television is not a sign of malfunction; marks. S. Adobe and Flash are trademarks of Silicon Image, Inc. in this TV is a trademark of VUDU, Inc . • YouTube and the YouTube Logo are trademarks of Adobe Systems Incorporated. • This product...
...and functionality (e.g. ENERGY STAR® qualified TV. therefore, Toshiba is not responsible for perceived issues resulting from these symptoms. 1) An afterimage (ghost) may be used in the TV tuning process to certain intellectual property rights of this TV. Dolby and the double-D symbol are... under your television is not a sign of malfunction; marks. S. Adobe and Flash are trademarks of Silicon Image, Inc. in this TV is a trademark of VUDU, Inc . • YouTube and the YouTube Logo are trademarks of Adobe Systems Incorporated. • This product...
User Manual
Page 9
... . . . . . 38 REGZA-LINK® input source selection 39 Adjusting the amplifier's audio 39 Other REGZA-LINK® functions 39 Connecting a Toshiba PC compatible to REGZA-LINK 40 Using the HDMI® settings feature 40 Setting the HDMI® audio mode 41 Viewing the HDMI® signal...timer 42 Setting Automatic Power Down 43 Setting No Signal Power Down 43 Setting Blue Screen 43 Adjusting POWER LED's Dimmer 43 Displaying TV status information 44 Viewing support information 44 Resetting to Factory Defaults 44 Power failure 44 Chapter 7: Picture and sound controls 45 Selecting...
... . . . . . 38 REGZA-LINK® input source selection 39 Adjusting the amplifier's audio 39 Other REGZA-LINK® functions 39 Connecting a Toshiba PC compatible to REGZA-LINK 40 Using the HDMI® settings feature 40 Setting the HDMI® audio mode 41 Viewing the HDMI® signal...timer 42 Setting Automatic Power Down 43 Setting No Signal Power Down 43 Setting Blue Screen 43 Adjusting POWER LED's Dimmer 43 Displaying TV status information 44 Viewing support information 44 Resetting to Factory Defaults 44 Power failure 44 Chapter 7: Picture and sound controls 45 Selecting...
User Manual
Page 10
RGB Filter 51 White Balance 51 Resetting to the factory default 52 Viewing the TV's brightness 52 Locking the picture settings 52 Adjusting the audio 53 Muting the sound 53 Selecting stereo/SAP broadcasts 53 Adjusting the audio balance 53 ... combination buttons 87 Remote control codes 88 Limited United States Warranty for LCD Televisions 94 Limited Canadian Warranty for Toshiba Brand Flat Panel Televisions 95 Index 98 10 TV Widgets 65 Setting up the Network 56 Wireless Setup 56 Advanced Network Setup 58 Network Connection Test 59 Using the software keyboard 60...
RGB Filter 51 White Balance 51 Resetting to the factory default 52 Viewing the TV's brightness 52 Locking the picture settings 52 Adjusting the audio 53 Muting the sound 53 Selecting stereo/SAP broadcasts 53 Adjusting the audio balance 53 ... combination buttons 87 Remote control codes 88 Limited United States Warranty for LCD Televisions 94 Limited Canadian Warranty for Toshiba Brand Flat Panel Televisions 95 Index 98 10 TV Widgets 65 Setting up the Network 56 Wireless Setup 56 Advanced Network Setup 58 Network Connection Test 59 Using the software keyboard 60...
User Manual
Page 11
... via HDMI connection (- p. 53). •PC IN (Analog RGB) computer terminal (- p. 65). •ColorMaster™ lets you turn on the TV, the Initial Setup menu appears. 7 See "Chapter 4: Initial Setup and Menu" for a quick overview of installation, setup, and use Follow these steps...until AFTER you have connected all cables and devices, plug in a proper location (- p. 48). •Dolby® Volume eliminates inconsistent TV volume when changing channels or viewing commercials (p. 54). •Media Player lets you automatically adjust picture settings based on ambient light conditions ...
... via HDMI connection (- p. 53). •PC IN (Analog RGB) computer terminal (- p. 65). •ColorMaster™ lets you turn on the TV, the Initial Setup menu appears. 7 See "Chapter 4: Initial Setup and Menu" for a quick overview of installation, setup, and use Follow these steps...until AFTER you have connected all cables and devices, plug in a proper location (- p. 48). •Dolby® Volume eliminates inconsistent TV volume when changing channels or viewing commercials (p. 54). •Media Player lets you automatically adjust picture settings based on ambient light conditions ...

User Manual
Page 12
... menu navigation buttons. • MENU - DIGITAL AUDIO OUT See "Connecting a digital audio system" (- p. 19). 12 To turn the TV on the TV's control panel functions as up . - To adjust the volume level. Power cord ANT/CABLE IR IN/OUT To configure for use these inputs...the menu. Back panel connections For an explanation of cable types and connections, see "Rear Shared Audio" (- p. 30). p. 30). p. 78). HDMI 4 IN TV back HDMI IN VIDEO 1 IN** To configure the use , see "Shared PC Input" (- Second touch: these keys function as the OK button. p. 30). When...
... menu navigation buttons. • MENU - DIGITAL AUDIO OUT See "Connecting a digital audio system" (- p. 19). 12 To turn the TV on the TV's control panel functions as up . - To adjust the volume level. Power cord ANT/CABLE IR IN/OUT To configure for use these inputs...the menu. Back panel connections For an explanation of cable types and connections, see "Rear Shared Audio" (- p. 30). p. 30). p. 78). HDMI 4 IN TV back HDMI IN VIDEO 1 IN** To configure the use , see "Shared PC Input" (- Second touch: these keys function as the OK button. p. 30). When...
User Manual
Page 14
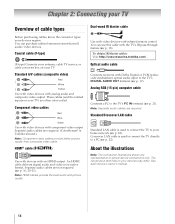
..., or cable converter box on your devices may differ. To obtain IR blaster cables: Visit http://ceaccessories.toshiba.com/ . p. 19). The input/output terminals on your TV. You can purchase cables from most stores that sell audio/video devices. p. 22). p. 22). Separate audio cables are... network (- Crossover LAN cable is Toshiba's brand.) Note: Component video cables provide better picture quality than composite video cable. Analog RGB (15-pin) computer cable Connects a PC to a PC (- These cables (and the related inputs on your TV) are not required (- Optical audio...
..., or cable converter box on your devices may differ. To obtain IR blaster cables: Visit http://ceaccessories.toshiba.com/ . p. 19). The input/output terminals on your TV. You can purchase cables from most stores that sell audio/video devices. p. 22). p. 22). Separate audio cables are... network (- Crossover LAN cable is Toshiba's brand.) Note: Component video cables provide better picture quality than composite video cable. Analog RGB (15-pin) computer cable Connects a PC to a PC (- These cables (and the related inputs on your TV) are not required (- Optical audio...
User Manual
Page 15
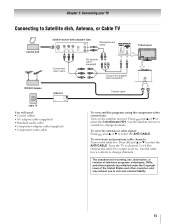
..., DVDs, and other materials is set to select the ColorStream HD1. Use the satellite receiver's controls to change channels. Chapter 2: Connecting your TV Connecting to select the ANT/CABLE. To view basic and premium cable channels: Turn on the satellite receiver. Press + and B or b ...to Satellite dish, Antenna, or Cable TV Satellite dish Satellite receiver with component video Y PB PR AUDIO OUT L Satellite COMPONENT VIDEO VIDEO R IN OUT Standard audio cable Component video ...
..., DVDs, and other materials is set to select the ColorStream HD1. Use the satellite receiver's controls to change channels. Chapter 2: Connecting your TV Connecting to select the ANT/CABLE. To view basic and premium cable channels: Turn on the satellite receiver. Press + and B or b ...to Satellite dish, Antenna, or Cable TV Satellite dish Satellite receiver with component video Y PB PR AUDIO OUT L Satellite COMPONENT VIDEO VIDEO R IN OUT Standard audio cable Component video ...

User Manual
Page 16
...• To connect a PC to the HDMI input, see p. 21. • Some legacy HDMI sources may not work properly with your TV receives digital audio and uncompressed digital video from an HDMI source device, or uncompressed digital video from EIA/CEA-861-D compliant[1] consumer electronic devices (... this is an evolving technology, it is being standardized for HDMI is needed. For signal specifications, see p. 85. p. 40). Note: To program the TV remote control to operate other devices, see p. 81. For proper operation, the length of an HDMI-to select the HDMI 1, HDMI 2, HDMI 3 or...
...• To connect a PC to the HDMI input, see p. 21. • Some legacy HDMI sources may not work properly with your TV receives digital audio and uncompressed digital video from an HDMI source device, or uncompressed digital video from EIA/CEA-861-D compliant[1] consumer electronic devices (... this is an evolving technology, it is being standardized for HDMI is needed. For signal specifications, see p. 85. p. 40). Note: To program the TV remote control to operate other devices, see p. 81. For proper operation, the length of an HDMI-to select the HDMI 1, HDMI 2, HDMI 3 or...
User Manual
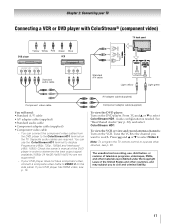
Page 17
... United States and other countries, and may subject you want to operate other materials is needed. Note: To program the TV remote control to watch. If your DVD player has HDMI video, see p. 85. p. 30), and select ColorStream HD1. If your...audio cable •Component adapter cable (supplied) •Component video cable - See "Rear Shared Audio" (- Press + and B or b to VIDEO 2 on the TV. Chapter 2: Connecting your DVD player does not have component video, connect a composite video cable to select Video 2. G Component adapter cable (supplied) To view the DVD...
... United States and other countries, and may subject you want to operate other materials is needed. Note: To program the TV remote control to watch. If your DVD player has HDMI video, see p. 85. p. 30), and select ColorStream HD1. If your...audio cable •Component adapter cable (supplied) •Component video cable - See "Rear Shared Audio" (- Press + and B or b to VIDEO 2 on the TV. Chapter 2: Connecting your DVD player does not have component video, connect a composite video cable to select Video 2. G Component adapter cable (supplied) To view the DVD...

User Manual
Page 18
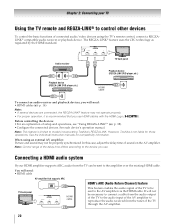
...'s lower-left corner, place the end of the device's remote control (with a rubber band and leave it behind the TV. 3 Plug the IR blaster cable's plug into the TV's IR OUT terminal. IR blaster cable wand (approx.1 inch from the remote control through feature does not support all IRcontrolled ...infrared remote-controlled devices enclosed in a similar manner. Chapter 2: Connecting your device. Front of IR-controlled DVD player (for example) Front of the TV and press the button for example) Infrared sensor To control the device(s): Point either the device's remote control or the...
...'s lower-left corner, place the end of the device's remote control (with a rubber band and leave it behind the TV. 3 Plug the IR blaster cable's plug into the TV's IR OUT terminal. IR blaster cable wand (approx.1 inch from the remote control through feature does not support all IRcontrolled ...infrared remote-controlled devices enclosed in a similar manner. Chapter 2: Connecting your device. Front of IR-controlled DVD player (for example) Front of the TV and press the button for example) Infrared sensor To control the device(s): Point either the device's remote control or the...
User Manual
Page 19
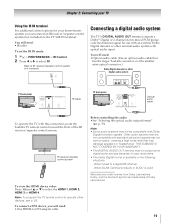
... control system (not included) to operate other digital audio system LINE IN LR Optical Audio IN TV back panel IR cable TV back panel Optical audio cable To operate the TV with this connection, point the Toshiba TV remote control toward the front of Dolby Laboratories. 19 Older audio systems that may not be compatible...
... control system (not included) to operate other digital audio system LINE IN LR Optical Audio IN TV back panel IR cable TV back panel Optical audio cable To operate the TV with this connection, point the Toshiba TV remote control toward the front of Dolby Laboratories. 19 Older audio systems that may not be compatible...
User Manual
Page 20
...existing HDMI cable. p. 38). •Configure the connected devices. Connecting a HDMI audio system If your TV Using the TV remote and REGZA-LINK® to models incorporating Toshiba's REGZA-LINK. Before controlling the devices: •For an explanation of sound on the AV amplifier. ... For proper operation, it is limited to control other devices To control the basic functions of connected audio/video devices using the TV's remote control, connect a REGZALINK® compatible audio receiver or playback device. See the individual instruction manuals for those operations. ...
...existing HDMI cable. p. 38). •Configure the connected devices. Connecting a HDMI audio system If your TV Using the TV remote and REGZA-LINK® to models incorporating Toshiba's REGZA-LINK. Before controlling the devices: •For an explanation of sound on the AV amplifier. ... For proper operation, it is limited to control other devices To control the basic functions of connected audio/video devices using the TV's remote control, connect a REGZALINK® compatible audio receiver or playback device. See the individual instruction manuals for those operations. ...
User Manual
Page 21
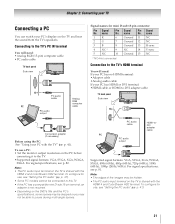
...NC 7 Ground 12 NC 8 Ground 13 H-sync 9 NC 14 V-sync 10 Ground 15 NC * NC=Not connected Connection to the TV's HDMI terminal You will need : If your PC has no HDMI terminal: •Adapter cable •Analog audio cable If your PC ...has HDMI or DVI terminal: •HDMI cable or HDMI-to the TV. •Supported signal formats: VGA, SVGA, XGA, WXGA, SXGA. Note: • The edges of... the images may not be connected to this TV. • If the PC has a compatible mini D-sub15-pin terminal, an adapter is shared with the...
...NC 7 Ground 12 NC 8 Ground 13 H-sync 9 NC 14 V-sync 10 Ground 15 NC * NC=Not connected Connection to the TV's HDMI terminal You will need : If your PC has no HDMI terminal: •Adapter cable •Analog audio cable If your PC ...has HDMI or DVI terminal: •HDMI cable or HDMI-to the TV. •Supported signal formats: VGA, SVGA, XGA, WXGA, SXGA. Note: • The edges of... the images may not be connected to this TV. • If the PC has a compatible mini D-sub15-pin terminal, an adapter is shared with the...

User Manual
Page 22
... wireless LAN and the distance over which wireless LAN can use this home network to your home network. Chapter 2: Connecting your TV Connecting to a home network The LAN port allows your Toshiba TV to connect to access photo, movie and music files that are stored on a DLNA CERTIFIED™ Server and play them...
... wireless LAN and the distance over which wireless LAN can use this home network to your home network. Chapter 2: Connecting your TV Connecting to a home network The LAN port allows your Toshiba TV to connect to access photo, movie and music files that are stored on a DLNA CERTIFIED™ Server and play them...


