User Manual
Page 2
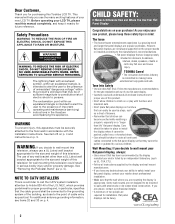
... lightning flash with steel studs or old cinder block construction. Before operating your purchase! Dear Customer, Thank you decide to wall mount this television, always use a UL Listed wall bracket appropriate for the size and weight of this television. CHILD SAFETY: It Makes A Difference How and Where You Use Your Flat Panel Display Congratulations on your LCD TV, please read and understand all enclosed instructions for proper use of...
... lightning flash with steel studs or old cinder block construction. Before operating your purchase! Dear Customer, Thank you decide to wall mount this television, always use a UL Listed wall bracket appropriate for the size and weight of this television. CHILD SAFETY: It Makes A Difference How and Where You Use Your Flat Panel Display Congratulations on your LCD TV, please read and understand all enclosed instructions for proper use of...
User Manual
Page 4
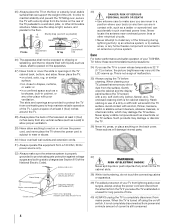
.... 39) For added protection of your TV, please first remove any vertical surface (such as a ladder or screwdriver) can support the weight of the TV pedestal to a wall stud, pillar, or other electrical circuits. • Never attempt to install any home theater component connected to rest on the rear of the unit. Leave a space of at least 4 (four...
.... 39) For added protection of your TV, please first remove any vertical surface (such as a ladder or screwdriver) can support the weight of the TV pedestal to a wall stud, pillar, or other electrical circuits. • Never attempt to install any home theater component connected to rest on the rear of the unit. Leave a space of at least 4 (four...

User Manual
Page 5
... blanket. Remove the four screws. (Do not use , the TV may be used when attaching the pedestal stand to avoid damage to wall mount your wall bracket. Service 44) WARNING: RISK OF ELECTRIC SHOCK! Choosing a location for the size and weight of the unit face down on the LCD screen. Place the four spacers (supplied). Be sure to service the TV yourself. 41) During normal use these sounds become...
... blanket. Remove the four screws. (Do not use , the TV may be used when attaching the pedestal stand to avoid damage to wall mount your wall bracket. Service 44) WARNING: RISK OF ELECTRIC SHOCK! Choosing a location for the size and weight of the unit face down on the LCD screen. Place the four spacers (supplied). Be sure to service the TV yourself. 41) During normal use these sounds become...
User Manual
Page 9
... Using SurfLock 33 Selecting the video input to view 33 Using closed captions 34 Analog CC mode 34 Digital CC settings 34 Setting the PIN code 35 Entering a new PIN code 35 Changing or deleting your PIN code 35 Forgotten PIN code 35 Using parental controls 35 Blocking TV programs and movies by rating (V-Chip 35 Downloading an additional rating system 36 Displaying ratings 37 Unlocking programs 37 Locking specific channels 37 Locking video input 37 Setting a time limit for games 38 Locking the control panel 38 Using...
... Using SurfLock 33 Selecting the video input to view 33 Using closed captions 34 Analog CC mode 34 Digital CC settings 34 Setting the PIN code 35 Entering a new PIN code 35 Changing or deleting your PIN code 35 Forgotten PIN code 35 Using parental controls 35 Blocking TV programs and movies by rating (V-Chip 35 Downloading an additional rating system 36 Displaying ratings 37 Unlocking programs 37 Locking specific channels 37 Locking video input 37 Setting a time limit for games 38 Locking the control panel 38 Using...
User Manual
Page 10
... 80 PC IN signal formats 80 HDMI signal formats 81 Remote control functional key chart 82 Operating other devices 85 Programming the remote to operate other devices . . . 85 Device code setup 85 Searching for a device code 86 Locking the volume keys 86 Clearing the remote's programming 86 Resetting to the factory default 86 Operating TV with combination buttons 87 Remote control codes 88 Limited United States Warranty for LCD Televisions 94 Limited Canadian Warranty for Toshiba Brand Flat Panel Televisions 95 Index 98 10...
... 80 PC IN signal formats 80 HDMI signal formats 81 Remote control functional key chart 82 Operating other devices 85 Programming the remote to operate other devices . . . 85 Device code setup 85 Searching for a device code 86 Locking the volume keys 86 Clearing the remote's programming 86 Resetting to the factory default 86 Operating TV with combination buttons 87 Remote control codes 88 Limited United States Warranty for LCD Televisions 94 Limited Canadian Warranty for Toshiba Brand Flat Panel Televisions 95 Index 98 10...
User Manual
Page 11
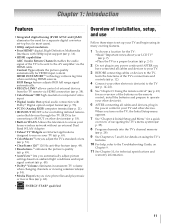
... you automatically adjust picture settings based on ambient light conditions and input signal content (- RGB Range feature adjusts RGB full range signal automatically. •REGZA-LINK® allows control of external devices from the TV remote via the HDMI cable. p. 12). 4 Connect your TV (- Content Type adjusts the picture quality automatically for technical specifications and warranty information. 11 p. 18). •Built-in any power cords until AFTER you view photo files and play music...
... you automatically adjust picture settings based on ambient light conditions and input signal content (- RGB Range feature adjusts RGB full range signal automatically. •REGZA-LINK® allows control of external devices from the TV remote via the HDMI cable. p. 12). 4 Connect your TV (- Content Type adjusts the picture quality automatically for technical specifications and warranty information. 11 p. 18). •Built-in any power cords until AFTER you view photo files and play music...
User Manual
Page 14
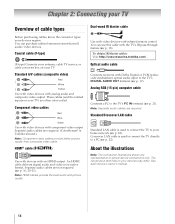
... input/output terminals on your TV. To obtain IR blaster cables: Visit http://ceaccessories.toshiba.com/ . Note: Separate audio cables are not required (- p. 21). VIDEO PR PB Y Component video cables Red Blue Green Use with video devices with infrared remote control. p. 22). See each device's owner's manual. 14 Chapter 2: Connecting your TV Overview of typical device connections only. Crossover LAN cable is Toshiba's brand.) Note: Component video cables provide better picture quality than composite video cable. p. 22). Coaxial cable (F-type) (F-type...
... input/output terminals on your TV. To obtain IR blaster cables: Visit http://ceaccessories.toshiba.com/ . Note: Separate audio cables are not required (- p. 21). VIDEO PR PB Y Component video cables Red Blue Green Use with video devices with infrared remote control. p. 22). See each device's owner's manual. 14 Chapter 2: Connecting your TV Overview of typical device connections only. Crossover LAN cable is Toshiba's brand.) Note: Component video cables provide better picture quality than composite video cable. p. 22). Coaxial cable (F-type) (F-type...
User Manual
Page 15
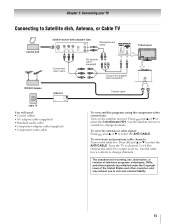
...back panel VHF/UHF Antenna Cable TV Cable box CH 3 CH 4 IN OUT You will need: •Coaxial cables •AV adapter cable (supplied) •Standard audio cable •Component adapter cable (supplied) •Component video cable Coaxial cable To view satellite programs using the component video connections: Turn on the cable box. Chapter 2: Connecting your TV Connecting to select the ANT/CABLE. To view the antenna or cable signal: Press + and B or b to select the ColorStream HD1. Use the satellite receiver's controls to change channels. Use the cable box's controls to...
...back panel VHF/UHF Antenna Cable TV Cable box CH 3 CH 4 IN OUT You will need: •Coaxial cables •AV adapter cable (supplied) •Standard audio cable •Component adapter cable (supplied) •Component video cable Coaxial cable To view satellite programs using the component video connections: Turn on the cable box. Chapter 2: Connecting your TV Connecting to select the ANT/CABLE. To view the antenna or cable signal: Press + and B or b to select the ColorStream HD1. Use the satellite receiver's controls to change channels. Use the cable box's controls to...
User Manual
Page 20
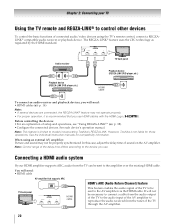
... panel Playback device (REGZA-LINK DVD player,etc.) HDMI cable HDMI OUT To connect an audio receiver and playback devices, you will need : •HDMI cables (- Connecting a HDMI audio system If your TV Using the TV remote and REGZA-LINK® to control other devices To control the basic functions of setup and operations, see "Using REGZA-LINK®" (- However, Toshiba is recommended that supports ARC HDMI's ARC (Audio Return Channel) feature TV back panel HDMI cable This feature enables the audio signal of sound...
... panel Playback device (REGZA-LINK DVD player,etc.) HDMI cable HDMI OUT To connect an audio receiver and playback devices, you will need : •HDMI cables (- Connecting a HDMI audio system If your TV Using the TV remote and REGZA-LINK® to control other devices To control the basic functions of setup and operations, see "Using REGZA-LINK®" (- However, Toshiba is recommended that supports ARC HDMI's ARC (Audio Return Channel) feature TV back panel HDMI cable This feature enables the audio signal of sound...

User Manual
Page 27
... On Timer 42 Sleep Timer 42 PREFERENCES REGZA-LINK Setup 40 Network Setup 56 Netflix Setup 62 VUDU Deactivation 62 Media Renderer Setup Photo Frame Setup Channel Browser Setup PIN Setting Parental Control and Locks Display Settings AV Connection Auto Input 66 74 31 35 35 41, 47 29, 30, 40, 41, 53 30 IR Control 18 Energy Saving Settings 43 Blue Screen 43 Icon SETUP Item HDMI Information Display POWER LED Dimmer Menu Language ANT/CABLE In Auto Tuning Manual Tuning TV Settings Quick Setup Location Software Upgrade Software...
... On Timer 42 Sleep Timer 42 PREFERENCES REGZA-LINK Setup 40 Network Setup 56 Netflix Setup 62 VUDU Deactivation 62 Media Renderer Setup Photo Frame Setup Channel Browser Setup PIN Setting Parental Control and Locks Display Settings AV Connection Auto Input 66 74 31 35 35 41, 47 29, 30, 40, 41, 53 30 IR Control 18 Energy Saving Settings 43 Blue Screen 43 Icon SETUP Item HDMI Information Display POWER LED Dimmer Menu Language ANT/CABLE In Auto Tuning Manual Tuning TV Settings Quick Setup Location Software Upgrade Software...

User Manual
Page 42
... number buttons. 3 Select Done. To cancel the timer: 1 Y > APPLICATIONS > On Timer > . Input Video input source. Using the remote control: 1 Press [ 2 Set the time until Power On Amount of time from now when you do not operate the TV for 1 hour after a specific amount of time (maximum = 12 hours). Note: If the Enable On Timer is set to 0 minutes. 42 You can set the on timer to turn on the TV to a preset channel or input...
... number buttons. 3 Select Done. To cancel the timer: 1 Y > APPLICATIONS > On Timer > . Input Video input source. Using the remote control: 1 Press [ 2 Set the time until Power On Amount of time from now when you do not operate the TV for 1 hour after a specific amount of time (maximum = 12 hours). Note: If the Enable On Timer is set to 0 minutes. 42 You can set the on timer to turn on the TV to a preset channel or input...
User Manual
Page 44
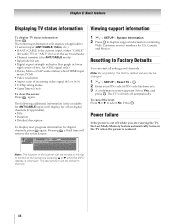
... to display support information containing Web/Customer service numbers for digital channels, press again. Select Yes, and press OK . Note: The location of the banner can reset all settings and channels. Pressing a third time will be changed. 1 Y > SETUP > Reset TV > . Resetting to select No. Chapter 6: Basic features Displaying TV status information Viewing support information To display TV status information: Press . The following additional information (only available for ANT/CABLE input) will turn...
... to display support information containing Web/Customer service numbers for digital channels, press again. Select Yes, and press OK . Note: The location of the banner can reset all settings and channels. Pressing a third time will be changed. 1 Y > SETUP > Reset TV > . Resetting to select No. Chapter 6: Basic features Displaying TV status information Viewing support information To display TV status information: Press . The following additional information (only available for ANT/CABLE input) will turn...
User Manual
Page 53
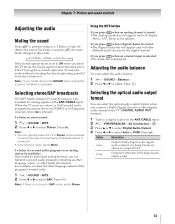
... The MTS (multi-channel TV sound) feature is closed-captioned. For example, you select MUTE mode, the closed caption feature becomes active if the TV program is only available for the digital channel. Press O. Chapter 7: Picture and sound controls Adjusting the audio Muting the sound Press to the digital audio output socket. 53 To listen on the ANT/CABLE input. Press O. Each time you press , the mute mode changes in Stereo mode because it is...
... The MTS (multi-channel TV sound) feature is closed-captioned. For example, you select MUTE mode, the closed caption feature becomes active if the TV program is only available for the digital channel. Press O. Chapter 7: Picture and sound controls Adjusting the audio Muting the sound Press to the digital audio output socket. 53 To listen on the ANT/CABLE input. Press O. Each time you press , the mute mode changes in Stereo mode because it is...
User Manual
Page 76
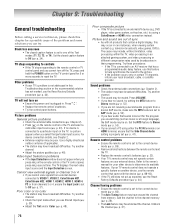
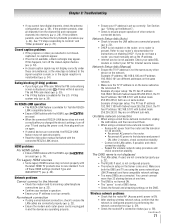
... the remote control or TV control panel and you cannot view signals from external devices connected to VIDEO 1, VIDEO 2, ColorStream HD1, ColorStream HD2, HDMI 1, HDMI 2, HDMI 3, HDMI 4, PC or from channels 3 or 4, ensure the Input Lock is connected to an A/V receiver that contain a digital display, this may be poor. The TV displays the next video input source and the Input Selection screen. p. 33). Try another channel. • Check the Input mode when you connect a PC using a ColorStream or HDMI video connection instead. p. 44). Poor composite picture...
... the remote control or TV control panel and you cannot view signals from external devices connected to VIDEO 1, VIDEO 2, ColorStream HD1, ColorStream HD2, HDMI 1, HDMI 2, HDMI 3, HDMI 4, PC or from channels 3 or 4, ensure the Input Lock is connected to an A/V receiver that contain a digital display, this may be poor. The TV displays the next video input source and the Input Selection screen. p. 33). Try another channel. • Check the Input mode when you connect a PC using a ColorStream or HDMI video connection instead. p. 44). Poor composite picture...
User Manual
Page 77
... legacy HDMI sources may appear. Turn off the closed -caption signal may not operate properly. • Read the instruction manual furnished with Subnet mask 255.255.253.0; p. 40). Network problems Cannot connect to controls" and "Other problems" (- p. 22). • Confirm your modem's operation. • Ensure your PIN code: While the PIN code entering screen is incorrect. No network connection • If using a wireless home-network connection: - p. 22). • Ensure the modem and router power cords are plugged...
... legacy HDMI sources may appear. Turn off the closed -caption signal may not operate properly. • Read the instruction manual furnished with Subnet mask 255.255.253.0; p. 40). Network problems Cannot connect to controls" and "Other problems" (- p. 22). • Confirm your modem's operation. • Ensure your PIN code: While the PIN code entering screen is incorrect. No network connection • If using a wireless home-network connection: - p. 22). • Ensure the modem and router power cords are plugged...
User Manual
Page 79
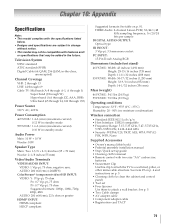
... HDMI® INPUT: HDMI compliant HDCP compliant Suggested formats: See table on p. 5. • Cleaning cloth (to clean the cabinet and control panel) • Tool set up guide • Cleaning cloth's manual • Remote control with features and/ or specifications that may be compatible with two size "AA" carbon zinc batteries • Securement Clip Use this book) • Pedestal assembly installation manual • Stop/Quick set • Four Spacers Use these to attach a wall bracket...
... HDMI® INPUT: HDMI compliant HDCP compliant Suggested formats: See table on p. 5. • Cleaning cloth (to clean the cabinet and control panel) • Tool set up guide • Cleaning cloth's manual • Remote control with features and/ or specifications that may be compatible with two size "AA" carbon zinc batteries • Securement Clip Use this book) • Pedestal assembly installation manual • Stop/Quick set • Four Spacers Use these to attach a wall bracket...
User Manual
Page 94
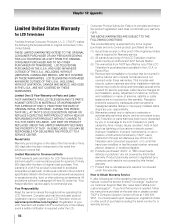
... first. This includes wall mounts, custom cabinets and other proof of purchase including the serial number for in warranty service. Labor service charges for set installation, setup, adjustment of customer controls, and installation or repair of antenna, satellite or cable systems are not covered by an Authorized TACP Service Station. (3) The warranties from TACP are your warranty rights. You must be performed by this LCD Television. THESE LIMITED WARRANTIES EXTEND TO THE...
... first. This includes wall mounts, custom cabinets and other proof of purchase including the serial number for in warranty service. Labor service charges for set installation, setup, adjustment of customer controls, and installation or repair of antenna, satellite or cable systems are not covered by an Authorized TACP Service Station. (3) The warranties from TACP are your warranty rights. You must be performed by this LCD Television. THESE LIMITED WARRANTIES EXTEND TO THE...
User Manual
Page 96
... INSTRUCTIONS IN THE APPLICABLE USER GUIDES AND/ OR MANUALS. IF THE TELEVISION FAILS TO WORK AS WARRANTED ABOVE, YOUR SOLE AND EXCLUSIVE REMEDY SHALL BE REPAIR OR REPLACEMENT OF THE DEFECTIVE PART. Arbitration and Dispute Resolution To the extent not precluded by law, any claim, dispute, controversy or disagreement (whether for set installation, setup, adjustment of customer controls, and installation or repair of antenna systems are your responsibility. (5) Warranties...
... INSTRUCTIONS IN THE APPLICABLE USER GUIDES AND/ OR MANUALS. IF THE TELEVISION FAILS TO WORK AS WARRANTED ABOVE, YOUR SOLE AND EXCLUSIVE REMEDY SHALL BE REPAIR OR REPLACEMENT OF THE DEFECTIVE PART. Arbitration and Dispute Resolution To the extent not precluded by law, any claim, dispute, controversy or disagreement (whether for set installation, setup, adjustment of customer controls, and installation or repair of antenna systems are your responsibility. (5) Warranties...
User Manual
Page 98
... Network Setup 56 O On Timer 42 P Panel Lock 38 PC audio 41 PC connection 21 PC settings 41 Picture mode 48 Picture Position 47 Picture quality 48 Picture size 45 PIN code 35 R REGZA-LINK 38 Remote control Battery installation 23 Buttons 24 Device code table 88 Functional key chart 82 Programming 85 Reset TV 44 Resolution 49 RGB Filter 51 RGB Range 40 Room Lighting 50 S SAP 53 Shared inputs 30 Sleep Timer 42 Smart Sensor 50 Smart Sound...
... Network Setup 56 O On Timer 42 P Panel Lock 38 PC audio 41 PC connection 21 PC settings 41 Picture mode 48 Picture Position 47 Picture quality 48 Picture size 45 PIN code 35 R REGZA-LINK 38 Remote control Battery installation 23 Buttons 24 Device code table 88 Functional key chart 82 Programming 85 Reset TV 44 Resolution 49 RGB Filter 51 RGB Range 40 Room Lighting 50 S SAP 53 Shared inputs 30 Sleep Timer 42 Smart Sensor 50 Smart Sound...
Brochure
Page 2
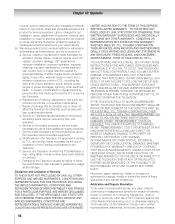
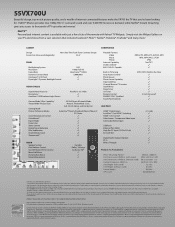
...; LCD Panel DynaLightTM Dynamic Backlight Control LED 1080p Full HD ClearFrameTM 120Hz 5,000,000:1 3 3 VIDEO CHASSIS Digital Video Processor Resolution+® AutoViewTM RGB Ambient Light Sensor PixelPure® 5G 14 Bit 3 3 Cinema Mode 24fps Capability3 TheaterWide® Picture Sizes Gaming Mode Picture Preference Modes Color Temperature Control ColorMasterTM Expert Mode Deep Color Static Gamma Digital Noise Reduction Film Stabilization Channel/Input Lock TheaterLockTM 5:5 Pull-Down & Smooth Mode Natural, TheaterWide 1/2/3, Full, 4:3 HD, Native and Dot by Toshiba, may change...
...; LCD Panel DynaLightTM Dynamic Backlight Control LED 1080p Full HD ClearFrameTM 120Hz 5,000,000:1 3 3 VIDEO CHASSIS Digital Video Processor Resolution+® AutoViewTM RGB Ambient Light Sensor PixelPure® 5G 14 Bit 3 3 Cinema Mode 24fps Capability3 TheaterWide® Picture Sizes Gaming Mode Picture Preference Modes Color Temperature Control ColorMasterTM Expert Mode Deep Color Static Gamma Digital Noise Reduction Film Stabilization Channel/Input Lock TheaterLockTM 5:5 Pull-Down & Smooth Mode Natural, TheaterWide 1/2/3, Full, 4:3 HD, Native and Dot by Toshiba, may change...


