
User Guide
Page 17
... Lesson 8: Closing programs 147 Lesson 9: Creating shortcuts 148 Creating a shortcut to the Calculator 148 Creating a shortcut to the Character Map ...... 149 Lesson 10: Changing the screen saver 151 Lesson 11: Setting the date and time 153 Lesson 12: Removing objects from the desktop .. 154 Lesson 13: Using System Restore 156
... Lesson 8: Closing programs 147 Lesson 9: Creating shortcuts 148 Creating a shortcut to the Calculator 148 Creating a shortcut to the Character Map ...... 149 Lesson 10: Changing the screen saver 151 Lesson 11: Setting the date and time 153 Lesson 12: Removing objects from the desktop .. 154 Lesson 13: Using System Restore 156
User Guide
Page 30
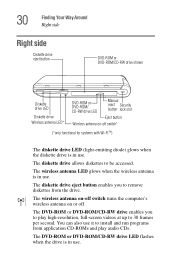
... in use . The DVD-ROM or DVD-ROM/CD-RW drive enables you to remove diskettes from application CD-ROMs and play high-resolution, full-screen videos at up to install and run programs from the drive. You can also use . The wireless antenna LED glows when the wireless antenna is...
... in use . The DVD-ROM or DVD-ROM/CD-RW drive enables you to remove diskettes from application CD-ROMs and play high-resolution, full-screen videos at up to install and run programs from the drive. You can also use . The wireless antenna LED glows when the wireless antenna is...
User Guide
Page 32
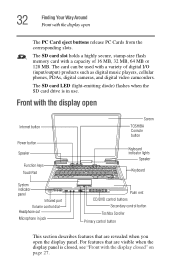
... cameras, and digital video camcorders. For features that are visible when the display panel is in jack Screen TOSHIBA Console button Keyboard indicator lights Speaker Keyboard Palm rest CD/DVD control buttons Secondary control button Toshiba Scroller Primary control button This section describes features that are revealed when you open The PC Card...
... cameras, and digital video camcorders. For features that are visible when the display panel is in jack Screen TOSHIBA Console button Keyboard indicator lights Speaker Keyboard Palm rest CD/DVD control buttons Secondary control button Toshiba Scroller Primary control button This section describes features that are revealed when you open The PC Card...
User Guide
Page 34
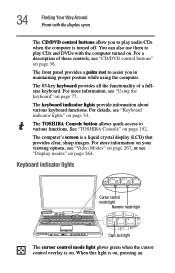
...information on your viewing options, see "Video Modes" on page 267, or see "CD/DVD control buttons" on page 264. The TOSHIBA Console button allows quick access to assist you to play audio CDs when the computer is a liquid crystal display (LCD) that provides clear..., sharp images. The computer's screen is turned off. The keyboard indicator lights provide information about various keyboard functions. See "TOSHIBA Console" on page 34. Keyboard indicator lights Cursor control mode light Numeric mode light Caps lock...
...information on your viewing options, see "Video Modes" on page 267, or see "CD/DVD control buttons" on page 264. The TOSHIBA Console button allows quick access to assist you to play audio CDs when the computer is a liquid crystal display (LCD) that provides clear..., sharp images. The computer's screen is turned off. The keyboard indicator lights provide information about various keyboard functions. See "TOSHIBA Console" on page 34. Keyboard indicator lights Cursor control mode light Numeric mode light Caps lock...
User Guide
Page 40
... hints on ergonomics, repetitive-strain injury, and repetitive-stress syndrome. CAUTION: If you spill liquid into the computer, turn it on a flat surface at the screen without twisting your torso or neck, and look at a comfortable height and distance. For more common as air conditioner vents or heaters. ❖ Extreme heat... the equipment, you turn it off, unplug it from the AC power source, and let it dry out completely before turning it back on, contact a Toshiba authorized service provider.
... hints on ergonomics, repetitive-strain injury, and repetitive-stress syndrome. CAUTION: If you spill liquid into the computer, turn it on a flat surface at the screen without twisting your torso or neck, and look at a comfortable height and distance. For more common as air conditioner vents or heaters. ❖ Extreme heat... the equipment, you turn it off, unplug it from the AC power source, and let it dry out completely before turning it back on, contact a Toshiba authorized service provider.

User Guide
Page 41
... slightly below the level of the computer Whichever type you choose, use a paper holder, set it at about the same height and distance as the screen. You should be slightly higher than your forearms parallel to the floor. If you are using your computer, maintain good posture with your shoulders relaxed...
... slightly below the level of the computer Whichever type you choose, use a paper holder, set it at about the same height and distance as the screen. You should be slightly higher than your forearms parallel to the floor. If you are using your computer, maintain good posture with your shoulders relaxed...

User Guide
Page 42
... Getting Started Selecting a place to work ❖ Adjust the back of your chair so that sunlight or bright indoor lighting does not reflect off the screen. If necessary, use soft, indirect lighting in front of a bright light that your knees, hips, and elbows form approximately 90-degree angles when you while...
... Getting Started Selecting a place to work ❖ Adjust the back of your chair so that sunlight or bright indoor lighting does not reflect off the screen. If necessary, use soft, indirect lighting in front of a bright light that your knees, hips, and elbows form approximately 90-degree angles when you while...

User Guide
Page 43
... feel too hot to the touch, if you maintain physical contact with the computer for a long time (if you rest the computer on your computer screen for example), your activities. Precautions Your notebook computer is to vary your skin might suffer low-heat injury. ❖ Never apply heavy pressure to the...
... feel too hot to the touch, if you maintain physical contact with the computer for a long time (if you rest the computer on your computer screen for example), your activities. Precautions Your notebook computer is to vary your skin might suffer low-heat injury. ❖ Never apply heavy pressure to the...

User Guide
Page 45
...page 60. NOTE: To register online, your computer 45 To use external power or to charge the battery, you may register with Toshiba by clicking the Register with Toshiba and Microsoft. 5 Click Yes to register, or No to exit the process. A window will pause for a moment while checking for..., you must be chosen." 4 Click Skip to exit the process or Next to continue. Getting Started Setting up your software. 1 From the welcome screen, click Next to enter the Setup Wizard. 2 Confirm acceptance of Microsoft's End User License Agreement and click Next. 3 Enter the computer name and ...
...page 60. NOTE: To register online, your computer 45 To use external power or to charge the battery, you may register with Toshiba by clicking the Register with Toshiba and Microsoft. 5 Click Yes to register, or No to exit the process. A window will pause for a moment while checking for..., you must be chosen." 4 Click Skip to exit the process or Next to continue. Getting Started Setting up your software. 1 From the welcome screen, click Next to enter the Setup Wizard. 2 Confirm acceptance of Microsoft's End User License Agreement and click Next. 3 Enter the computer name and ...

User Guide
Page 54
... choose to use the internal display only, the external device only, or both simultaneously. Once you've connected an external display device, you need a larger screen. For details of connecting other external video devices and setting display options, see "Viewing presentations or DVD movies on page 176. For information on attaching...
... choose to use the internal display only, the external device only, or both simultaneously. Once you've connected an external display device, you need a larger screen. For details of connecting other external video devices and setting display options, see "Viewing presentations or DVD movies on page 176. For information on attaching...
User Guide
Page 58
.... ❖ If the external video device, such as an SVGA monitor, is capable of displaying at a maximum resolution of the desktop will appear on the screen.
.... ❖ If the external video device, such as an SVGA monitor, is capable of displaying at a maximum resolution of the desktop will appear on the screen.
User Guide
Page 65
... the next time you to The TOSHIBA Console window appears. Using the TouchPad The TouchPad, the small, smooth square cutout located in the future. If the password is required. After the third incorrect password submission, the system automatically shuts down. To activate the power-on -screen instructions. Getting Started Using the computer...
... the next time you to The TOSHIBA Console window appears. Using the TouchPad The TouchPad, the small, smooth square cutout located in the future. If the password is required. After the third incorrect password submission, the system automatically shuts down. To activate the power-on -screen instructions. Getting Started Using the computer...

User Guide
Page 66
... is the button on page 135. The secondary control button is much smaller than the display screen, moving your cursor across the TouchPad in rapid succession. Simply move your finger several times across the screen often means having to the left . Once you've positioned your cursor, you 'd like ...computer for the first time move the cursor with the stroke of the page, slide your program's You can select an object on the display screen by double-tapping the TouchPad or clicking the control buttons. Check your finger forward on the right and corresponds to the top of a finger...
... is the button on page 135. The secondary control button is much smaller than the display screen, moving your cursor across the TouchPad in rapid succession. Simply move your finger several times across the screen often means having to the left . Once you've positioned your cursor, you 'd like ...computer for the first time move the cursor with the stroke of the page, slide your program's You can select an object on the display screen by double-tapping the TouchPad or clicking the control buttons. Check your finger forward on the right and corresponds to the top of a finger...

User Guide
Page 72
...Setting up the fax function To set up faxing option. 3 Follow the on -screen instructions. The fax function default setting is descriptive enough to receive. But, under the device name, right-click Toshiba Soft Modem AMR, select Receive and then select Disable. 72 Getting Started Setting up ...the fax function 5 Follow the on -screen instructions. If it is disabled, enable the fax function by doing the following...
...Setting up the fax function To set up faxing option. 3 Follow the on -screen instructions. The fax function default setting is descriptive enough to receive. But, under the device name, right-click Toshiba Soft Modem AMR, select Receive and then select Disable. 72 Getting Started Setting up ...the fax function 5 Follow the on -screen instructions. If it is disabled, enable the fax function by doing the following...
User Guide
Page 87
... can also back up to a diskette by clicking the file (or files) you can read both DVDROM and CD-ROM discs. These features include wide-screen movies, multiple language tracks, digital surround sound, multiple camera angles, and interactive menus. A special feature allows you to play high-resolution video at up a file...
... can also back up to a diskette by clicking the file (or files) you can read both DVDROM and CD-ROM discs. These features include wide-screen movies, multiple language tracks, digital surround sound, multiple camera angles, and interactive menus. A special feature allows you to play high-resolution video at up a file...

User Guide
Page 94
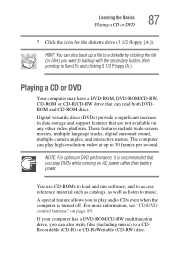
... disk. 94 Learning the Basics Playing a CD or DVD Rewind Fast forward Play Volume Stop control Previous track Next track Mute Sample Windows MediaTM Player screen Playing a DVD This guide has an entire chapter devoted to play back a DVD, see "WinDVD™ 2000" on page 201. For information about how to...
... disk. 94 Learning the Basics Playing a CD or DVD Rewind Fast forward Play Volume Stop control Previous track Next track Mute Sample Windows MediaTM Player screen Playing a DVD This guide has an entire chapter devoted to play back a DVD, see "WinDVD™ 2000" on page 201. For information about how to...

User Guide
Page 98
... the Network Setup Wizard: 1 Click Start and point to All Programs. 2 Point to Accessories, then to Communications, and click Network Setup Wizard. 3 Follow the on-screen instructions. The computer connects with the network. To set up connection.
... the Network Setup Wizard: 1 Click Start and point to All Programs. 2 Point to Accessories, then to Communications, and click Network Setup Wizard. 3 Follow the on-screen instructions. The computer connects with the network. To set up connection.

User Guide
Page 111
... to apply whether you are using . Starting again from Hibernation mode, press and release the power button until the on/off light changes to the screen you were using battery power or outlet power. 9 Click OK to close the Full Power Properties window. 10 Click OK to close the...
... to apply whether you are using . Starting again from Hibernation mode, press and release the power button until the on/off light changes to the screen you were using battery power or outlet power. 9 Click OK to close the Full Power Properties window. 10 Click OK to close the...

User Guide
Page 116
.... Starting again from Standby mode, press and release the power button until the on/off light changes to green. The computer returns to close the TOSHIBA Power Saver Properties window, then close the Control Panel. If you put the computer in Standby mode by closing the display panel, you were using... battery power or outlet power. 9 Click OK to close the Full Power Properties window. 10 Click OK to the screen you can start the computer from Standby To start the computer again by opening the display panel. Sample Set the range window with settings here...
.... Starting again from Standby mode, press and release the power button until the on/off light changes to green. The computer returns to close the TOSHIBA Power Saver Properties window, then close the Control Panel. If you put the computer in Standby mode by closing the display panel, you were using... battery power or outlet power. 9 Click OK to close the Full Power Properties window. 10 Click OK to the screen you can start the computer from Standby To start the computer again by opening the display panel. Sample Set the range window with settings here...

User Guide
Page 132
... Sample Desktop System tray However, the differences are not significant and do not indicate any change in this guide may appear slightly different from the screens displayed by your way around the desktop Your computer's desktop includes several standard features: icons, Start button, taskbar, System tray, and background pattern. Finding your...
... Sample Desktop System tray However, the differences are not significant and do not indicate any change in this guide may appear slightly different from the screens displayed by your way around the desktop Your computer's desktop includes several standard features: icons, Start button, taskbar, System tray, and background pattern. Finding your...


