User's Guide
Page 5
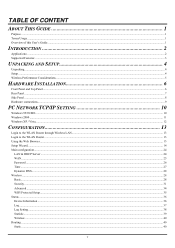
... LAN...13 Login to the WLAN Router ...13 Using the Web Browser ...13 Setup Wizard...14 Main configuration...24 LAN & DHCP Server ...24 WAN ...25 Password ...26 Time ...27 Dynamic DNS ...28 Wireless ...28 Basic...28 Security ...31 Advanced ...34 WIFI Protected Setup...35 Status...36 Device Information ...36 Log ...37...
... LAN...13 Login to the WLAN Router ...13 Using the Web Browser ...13 Setup Wizard...14 Main configuration...24 LAN & DHCP Server ...24 WAN ...25 Password ...26 Time ...27 Dynamic DNS ...28 Wireless ...28 Basic...28 Security ...31 Advanced ...34 WIFI Protected Setup...35 Status...36 Device Information ...36 Log ...37...

User's Guide
Page 13
... with USB Port. WAN: One 10/100/1000Mbps WAN port that connects to default settings. 7 It will be a useful tool when the manager forgot the password to login, and needs to restore the device back to the xDSL/Cable modem for Internet connectivity. LAN (1-4): Four 10/100/1000Mbps Auto-MDIX LAN...
... with USB Port. WAN: One 10/100/1000Mbps WAN port that connects to default settings. 7 It will be a useful tool when the manager forgot the password to login, and needs to restore the device back to the xDSL/Cable modem for Internet connectivity. LAN (1-4): Four 10/100/1000Mbps Auto-MDIX LAN...
User's Guide
Page 19
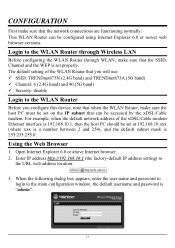
...Web Browser 1. Enter IP address http://192.168.10.1 (the factory-default IP address setting) to the main configuration window, the default username and password is set on the IP subnet that the SSID, Channel and the WEP is "admin". 13 For example, when the default network address of ... that when the WLAN Router, make sure the host PC must be set properly. When the following dialog box appears, enter the user name and password to login to the URL web address location. 3. Open Internet Explorer 6.0 or above Internet browser. 2. CONFIGURATION First make sure that can be configured ...
...Web Browser 1. Enter IP address http://192.168.10.1 (the factory-default IP address setting) to the main configuration window, the default username and password is set on the IP subnet that the SSID, Channel and the WEP is "admin". 13 For example, when the default network address of ... that when the WLAN Router, make sure the host PC must be set properly. When the following dialog box appears, enter the user name and password to login to the URL web address location. 3. Open Internet Explorer 6.0 or above Internet browser. 2. CONFIGURATION First make sure that can be configured ...

User's Guide
Page 20
Step 2: Choose time zone Select the time zone from the drop down list. Step 1: Set your new password Set a new admin password of the web configuration utility. The following screen will appear. Please click "Next" to continue. Please click "Next" to continue. 14 Please click "Next" to run in 6 easy steps by clicking on` the "Wizard" button on the function menu. Users can simply follow the step-by-step process to get the wireless Router configuration ready to continue. Setup Wizard Setup wizard is provided as part of the WLAN Router.
Step 2: Choose time zone Select the time zone from the drop down list. Step 1: Set your new password Set a new admin password of the web configuration utility. The following screen will appear. Please click "Next" to continue. Please click "Next" to continue. 14 Please click "Next" to run in 6 easy steps by clicking on` the "Wizard" button on the function menu. Users can simply follow the step-by-step process to get the wireless Router configuration ready to continue. Setup Wizard Setup wizard is provided as part of the WLAN Router.
User's Guide
Page 23
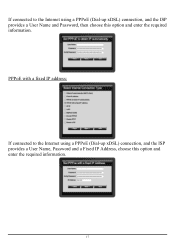
If connected to the Internet using a PPPoE (Dial-up xDSL) connection, and the ISP provides a User Name, Password and a Fixed IP Address, choose this option and enter the required information. PPPoE with a fixed IP address: If connected to the Internet using a PPPoE (Dial-up xDSL) connection, and the ISP provides a User Name and Password, then choose this option and enter the required information. 17
If connected to the Internet using a PPPoE (Dial-up xDSL) connection, and the ISP provides a User Name, Password and a Fixed IP Address, choose this option and enter the required information. PPPoE with a fixed IP address: If connected to the Internet using a PPPoE (Dial-up xDSL) connection, and the ISP provides a User Name and Password, then choose this option and enter the required information. 17

User's Guide
Page 24
PPTP: If connected to the Internet using a PPTP xDSL connection, enter your IP, Subnet Mask, Gateway, Server IP, PPTP Account and PPTP Password. 18
PPTP: If connected to the Internet using a PPTP xDSL connection, enter your IP, Subnet Mask, Gateway, Server IP, PPTP Account and PPTP Password. 18

User's Guide
Page 25
L2TP: If connected to the Internet using a L2TP (Dial-up xDSL) connection and the ISP provides a Server IP, Account and Password information, choose this option and enter the required information. 19
L2TP: If connected to the Internet using a L2TP (Dial-up xDSL) connection and the ISP provides a Server IP, Account and Password information, choose this option and enter the required information. 19
User's Guide
Page 26
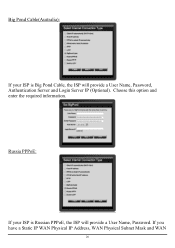
Big Pond Cable(Australia): If your ISP is Big Pond Cable, the ISP will provide a User Name, Password. If you have a Static IP WAN Physical IP Address, WAN Physical Subnet Mask and WAN 20 Russia PPPoE: If your ISP is Russian PPPoE, the ISP will provide a User Name, Password, Authentication Server and Login Server IP (Optional). Choose this option and enter the required information.
Big Pond Cable(Australia): If your ISP is Big Pond Cable, the ISP will provide a User Name, Password. If you have a Static IP WAN Physical IP Address, WAN Physical Subnet Mask and WAN 20 Russia PPPoE: If your ISP is Russian PPPoE, the ISP will provide a User Name, Password, Authentication Server and Login Server IP (Optional). Choose this option and enter the required information.
User's Guide
Page 27
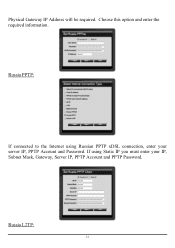
If using Russian PPTP xDSL connection, enter your IP, Subnet Mask, Gateway, Server IP, PPTP Account and PPTP Password. Russia PPTP: If connected to the Internet using Static IP you must enter your server IP, PPTP Account and Password. Choose this option and enter the required information. Russia L2TP: 21 Physical Gateway IP Address will be required.
If using Russian PPTP xDSL connection, enter your IP, Subnet Mask, Gateway, Server IP, PPTP Account and PPTP Password. Russia PPTP: If connected to the Internet using Static IP you must enter your server IP, PPTP Account and Password. Choose this option and enter the required information. Russia L2TP: 21 Physical Gateway IP Address will be required.

User's Guide
Page 28
If connected to the Internet using Static IP you must enter your server IP, PPTP Account and Password. If using Russian L2TP (Dial-up xDSL) enter your IP, Subnet Mask, Gateway, Server IP, PPTP Account and PPTP Password. 22
If connected to the Internet using Static IP you must enter your server IP, PPTP Account and Password. If using Russian L2TP (Dial-up xDSL) enter your IP, Subnet Mask, Gateway, Server IP, PPTP Account and PPTP Password. 22
User's Guide
Page 30
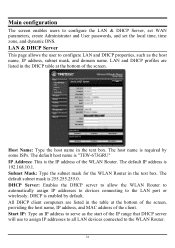
... IP address, subnet mask, and domain name. The default subnet mask is the IP address of the WLAN Router. The default host name is "TEW-673GRU" IP Address: This is 255.255.255.0. All DHCP client computers are listed in the table at the bottom of the screen. DHCP Server: Enables...WLAN Router. 24 LAN & DHCP Server This page allows the user to configure the LAN & DHCP Server, set WAN parameters, create Administrator and User passwords, and set the local time, time zone, and dynamic DNS. Main configuration The screen enables users to configure LAN and DHCP properties, such as ...
... IP address, subnet mask, and domain name. The default subnet mask is the IP address of the WLAN Router. The default host name is "TEW-673GRU" IP Address: This is 255.255.255.0. All DHCP client computers are listed in the table at the bottom of the screen. DHCP Server: Enables...WLAN Router. 24 LAN & DHCP Server This page allows the user to configure the LAN & DHCP Server, set WAN parameters, create Administrator and User passwords, and set the local time, time zone, and dynamic DNS. Main configuration The screen enables users to configure LAN and DHCP properties, such as ...
User's Guide
Page 32
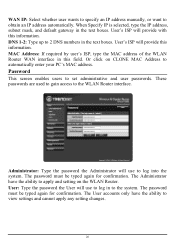
... screen enables users to automatically enter your PC's MAC address. The Administrator have the ability to log into the system. User: Type the password the User will provide with this information. User's ISP will use to view settings and cannot apply any setting changes. 26 DNS 1-2: Type up to...required by user's ISP, type the MAC address of the WLAN Router WAN interface in to 2 DNS numbers in the text boxes. Administrator: Type the password the Administrator will provide this field. User's ISP will use to apply and setting on CLONE MAC Address to set administrative and user...
... screen enables users to automatically enter your PC's MAC address. The Administrator have the ability to log into the system. User: Type the password the User will provide with this information. User's ISP will use to view settings and cannot apply any setting changes. 26 DNS 1-2: Type up to...required by user's ISP, type the MAC address of the WLAN Router WAN interface in to 2 DNS numbers in the text boxes. Administrator: Type the password the Administrator will provide this field. User's ISP will use to apply and setting on CLONE MAC Address to set administrative and user...
User's Guide
Page 34
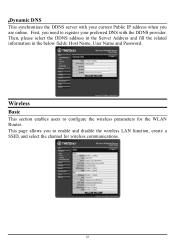
Then, please select the DDNS address in the Server Address and fill the related information in the below fields: Host Name, User Name and Password. This page allows you are online. Dynamic DNS This synchronizes the DDNS server with the DDNS provider. Wireless Basic This section enables users to enable and disable the wireless LAN function, create a SSID, and select the channel for the WLAN Router. First, you need to register your preferred DNS with your current Public IP address when you to configure the wireless parameters for wireless communications. 28
Then, please select the DDNS address in the Server Address and fill the related information in the below fields: Host Name, User Name and Password. This page allows you are online. Dynamic DNS This synchronizes the DDNS server with the DDNS provider. Wireless Basic This section enables users to enable and disable the wireless LAN function, create a SSID, and select the channel for the WLAN Router. First, you need to register your preferred DNS with your current Public IP address when you to configure the wireless parameters for wireless communications. 28
User's Guide
Page 44
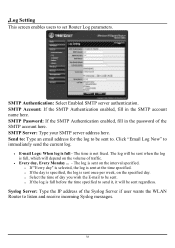
... Router Log parameters. Send to: Type an email address for the log to be sent. SMTP Account: If the SMTP Authentication enabled, fill in the password of day you wish the E-mail to be sent to send it, it will depend on the interval specified. o If the log is full - SMTP... Password: If the SMTP Authentication enabled, fill in the SMTP account name here. o Select the time of the SMTP account here. SMTP Authentication: Select Enabled SMTP ...
... Router Log parameters. Send to: Type an email address for the log to be sent. SMTP Account: If the SMTP Authentication enabled, fill in the password of day you wish the E-mail to be sent to send it, it will depend on the interval specified. o If the log is full - SMTP... Password: If the SMTP Authentication enabled, fill in the SMTP account name here. o Select the time of the SMTP account here. SMTP Authentication: Select Enabled SMTP ...

User's Guide
Page 57
A user name and password are required to disable it. Allow to Ping WAN Port: Type a range of running programs. Management Management enables users to set up remote management. It ...
A user name and password are required to disable it. Allow to Ping WAN Port: Type a range of running programs. Management Management enables users to set up remote management. It ...

Quick Installation Guide
Page 6
The Wizard will automatically appear. User Name: admin Password: admin 3. Click Wizard if the Wizard does not automatically appear. 4. Enter the User Name and Password, and then click Login. Open your web browser, type http://192.168.10.1 in the Address bar, and then press Enter. 2. ENGLISH FRANÇAIS DEUTSCH 3. Click Next. 4 ESPAÑOL Configure the Wireless Router Note: It is recommended that you configure the Wireless Router from a wired computer. 1.
The Wizard will automatically appear. User Name: admin Password: admin 3. Click Wizard if the Wizard does not automatically appear. 4. Enter the User Name and Password, and then click Login. Open your web browser, type http://192.168.10.1 in the Address bar, and then press Enter. 2. ENGLISH FRANÇAIS DEUTSCH 3. Click Next. 4 ESPAÑOL Configure the Wireless Router Note: It is recommended that you configure the Wireless Router from a wired computer. 1.

Quick Installation Guide
Page 7
Note: Do not change default settings unless it is admin. 6. Configure the settings based on information provided by your existing hardware. 8. Enter a Password, verify the Password and then click Next. Click Next. By default, the Password is conflicting with your ISP. Follow the wizard instructions to complete the configuration. ENGLISH FRANÇAIS DEUTSCH ESPAÑOL 5. Select your Time Zone and then click Next. 7. Note: Each Internet Connection type may have different options. 5
Note: Do not change default settings unless it is admin. 6. Configure the settings based on information provided by your existing hardware. 8. Enter a Password, verify the Password and then click Next. Click Next. By default, the Password is conflicting with your ISP. Follow the wizard instructions to complete the configuration. ENGLISH FRANÇAIS DEUTSCH ESPAÑOL 5. Select your Time Zone and then click Next. 7. Note: Each Internet Connection type may have different options. 5
Quick Installation Guide
Page 16
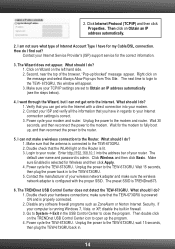
... seconds, and then reconnect the power to the TEW-673GRU. The default user name and password is selected for the correct information. 3. Make sure Enabled is admin. Unplug the power to the modem. Then double click on the TRENDnet USB Control Center icon to open up blocked"...to your router. I do ? 1. Login to Obtain an IP address automatically (see the steps below). 4. The TRENDnet USB Control Center does not detect the TEW-673GRU. Disable any software firewall programs such as ZoneAlarm or Norton Internet Security. Click on Wizard on Obtain an IP address ...
... seconds, and then reconnect the power to the TEW-673GRU. The default user name and password is selected for the correct information. 3. Make sure Enabled is admin. Unplug the power to the modem. Then double click on the TRENDnet USB Control Center icon to open up blocked"...to your router. I do ? 1. Login to Obtain an IP address automatically (see the steps below). 4. The TRENDnet USB Control Center does not detect the TEW-673GRU. Disable any software firewall programs such as ZoneAlarm or Norton Internet Security. Click on Wizard on Obtain an IP address ...

