
User's Guide
Page 5
...'s Guide ...1 INTRODUCTION 2 Applications: ...2 Supported Features: ...3 Wireless Performance Considerations ...4 UNPACKING AND SETUP 5 Unpacking ...5 Setup ...5 HARDWARE INSTALLATION 6 Front Panel ...6 Rear Panel ...7 Side Panel...8 Hanging Way ...8 Hardware connections ...9 Connecting the WLAN Router...9 Check the installation ...9 PC NETWORK TCP/IP SETTING 10... Windows 2000 ...11 Windows XP / Vista ...12 CONFIGURATION 13 Login to the WLAN Router through Wireless LAN ...13 Login to the WLAN Router...13 Using the Web Browser...13 Setup Wizard...14 Advanced configuration...27 Main ...27 LAN...
...'s Guide ...1 INTRODUCTION 2 Applications: ...2 Supported Features: ...3 Wireless Performance Considerations ...4 UNPACKING AND SETUP 5 Unpacking ...5 Setup ...5 HARDWARE INSTALLATION 6 Front Panel ...6 Rear Panel ...7 Side Panel...8 Hanging Way ...8 Hardware connections ...9 Connecting the WLAN Router...9 Check the installation ...9 PC NETWORK TCP/IP SETTING 10... Windows 2000 ...11 Windows XP / Vista ...12 CONFIGURATION 13 Login to the WLAN Router through Wireless LAN ...13 Login to the WLAN Router...13 Using the Web Browser...13 Setup Wizard...14 Advanced configuration...27 Main ...27 LAN...

User's Guide
Page 7
...configure and operate for Internet surfing and office resource sharing, and it is easy to setup your router. If you can connect the 300Mbps Wireless N Gigabit Router with wireless LAN and Fast Ethernet switch. Unpacking and Setup. Describes the front panel, rear panel and LED ...to the following paragraphs to your 300Mbps Wireless N Gigabit Router with the basic installation of the IEEE 802.11b/g/n Wireless Home Router. This integrated access device combines Internet gateway functions with USB Port to install the 300Mbps Wireless N Gigabit Router with USB Port. Purpose This manual ...
...configure and operate for Internet surfing and office resource sharing, and it is easy to setup your router. If you can connect the 300Mbps Wireless N Gigabit Router with wireless LAN and Fast Ethernet switch. Unpacking and Setup. Describes the front panel, rear panel and LED ...to the following paragraphs to your 300Mbps Wireless N Gigabit Router with the basic installation of the IEEE 802.11b/g/n Wireless Home Router. This integrated access device combines Internet gateway functions with USB Port to install the 300Mbps Wireless N Gigabit Router with USB Port. Purpose This manual ...
User's Guide
Page 11
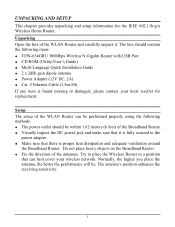
... Open the box of the antennas. Try to the power adapter. ‹ Make sure that can be performed properly using the following items: ‹ TEW-634GRU 300Mbps Wireless N Gigabit Router with USB Port ‹ CD ROM (Utility/User's Guide) ‹ Multi-Language Quick Installation Guide ‹ 2 x 2dBi gain dipole antenna ‹ Power Adapter (12V...
... Open the box of the antennas. Try to the power adapter. ‹ Make sure that can be performed properly using the following items: ‹ TEW-634GRU 300Mbps Wireless N Gigabit Router with USB Port ‹ CD ROM (Utility/User's Guide) ‹ Multi-Language Quick Installation Guide ‹ 2 x 2dBi gain dipole antenna ‹ Power Adapter (12V...
User's Guide
Page 12
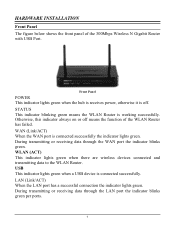
WAN (Link/ACT) When the WAN port is off means the function of the 300Mbps Wireless N Gigabit Router with USB Port. During transmitting or receiving data through the LAN port the indicator blinks green per ports. 6 Front Panel POWER This indicator lights... the indicator lights green. Otherwise, this indicator always on or off . WLAN (ACT) This indicator lights green when there are wireless devices connected and transmitting data to the WLAN Router. LAN (Link/ACT) When the LAN port has a successful connection the indicator lights green. STATUS This indicator blinking green means ...
WAN (Link/ACT) When the WAN port is off means the function of the 300Mbps Wireless N Gigabit Router with USB Port. During transmitting or receiving data through the LAN port the indicator blinks green per ports. 6 Front Panel POWER This indicator lights... the indicator lights green. Otherwise, this indicator always on or off . WLAN (ACT) This indicator lights green when there are wireless devices connected and transmitting data to the WLAN Router. LAN (Link/ACT) When the LAN port has a successful connection the indicator lights green. STATUS This indicator blinking green means ...

User's Guide
Page 13
... to 10Mbps, 100Mbps Ethernet or 10000Mbps Gigabit connections. USB One USB port to the xDSL/Cable modem for wireless connection. Rear Panel The figure below shows the rear panel of the 300Mbps Wireless N Gigabit Router with USB Port. WAN One 10/100/1000Mbps WAN port that connects to share either USB storage devices...
... to 10Mbps, 100Mbps Ethernet or 10000Mbps Gigabit connections. USB One USB port to the xDSL/Cable modem for wireless connection. Rear Panel The figure below shows the rear panel of the 300Mbps Wireless N Gigabit Router with USB Port. WAN One 10/100/1000Mbps WAN port that connects to share either USB storage devices...

User's Guide
Page 14
Hanging Way User can mount the device on the screws and completed the wall-mount. 8 Mount the Nylon screw anchors into a cement wall and then drive a screw into a wood wall. It does not need to execute the Wi-Fi Protected Setup process. Hook the mounting holes of the 300Mbps Wireless N Gigabit Router with USB Port. WPS (side panel) Push this button to mount the Nylon screw anchors into the Nylon screw anchors. Side Panel The figure below shows the side panel of the switch back on a wall.
Hanging Way User can mount the device on the screws and completed the wall-mount. 8 Mount the Nylon screw anchors into a cement wall and then drive a screw into a wood wall. It does not need to execute the Wi-Fi Protected Setup process. Hook the mounting holes of the 300Mbps Wireless N Gigabit Router with USB Port. WPS (side panel) Push this button to mount the Nylon screw anchors into the Nylon screw anchors. Side Panel The figure below shows the side panel of the switch back on a wall.
User's Guide
Page 15
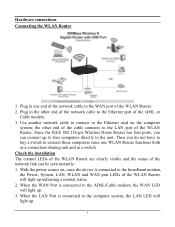
...the other end of the network cable to the Ethernet card on , once the device is connected to the unit. Since the IEEE 802.11b/g/n Wireless Home Router has four ports, you do not have to buy a switch to the computer system, the LAN LED will light up indicating a normal status. 2.... With the power source on the computer system; Hardware connections Connecting the WLAN Router 1. When the WAN Port is connected to connect these computers since one end of the cable connects to the ADSL/Cable modem, the WAN LED...
...the other end of the network cable to the Ethernet card on , once the device is connected to the unit. Since the IEEE 802.11b/g/n Wireless Home Router has four ports, you do not have to buy a switch to the computer system, the LAN LED will light up indicating a normal status. 2.... With the power source on the computer system; Hardware connections Connecting the WLAN Router 1. When the WAN Port is connected to connect these computers since one end of the cable connects to the ADSL/Cable modem, the WAN LED...
User's Guide
Page 19
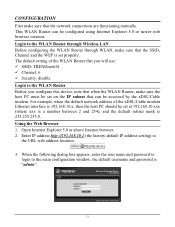
... Explorer 5.0 or above Internet browser. 2. When the following dialog box appears, enter the user name and password to login to the WLAN Router through Wireless LAN Before configuring the WLAN Router through WLAN, make sure the host PC must be set on the IP subnet that the network connections are functioning normally. This...
... Explorer 5.0 or above Internet browser. 2. When the following dialog box appears, enter the user name and password to login to the WLAN Router through Wireless LAN Before configuring the WLAN Router through WLAN, make sure the host PC must be set on the IP subnet that the network connections are functioning normally. This...

User's Guide
Page 20
Please click "Next" to continue. 14 Step 2: Choose time zone Select the time zone from the drop down list. Step 1: Set your new password Set a new admin password of the web configuration utility. Please click "Next" to continue. Users can simply follow the step-by-step process to get the wireless Router configuration ready to continue. Please click "Next" to run in 6 easy steps by clicking on` the "Wizard" button on the function menu. The following screen will appear. Setup Wizard Setup wizard is provided as part of the WLAN Router.
Please click "Next" to continue. 14 Step 2: Choose time zone Select the time zone from the drop down list. Step 1: Set your new password Set a new admin password of the web configuration utility. Please click "Next" to continue. Users can simply follow the step-by-step process to get the wireless Router configuration ready to continue. Please click "Next" to run in 6 easy steps by clicking on` the "Wizard" button on the function menu. The following screen will appear. Setup Wizard Setup wizard is provided as part of the WLAN Router.

User's Guide
Page 32
... the SSID in the text box and select a channel. The new settings will be the same as wireless devices attempting to connect to enable Wireless LAN. Step 5: Set Wireless LAN connection Click "Enable" to the WLAN Router. Step 6: Setup completed The Setup wizard is now completed. The SSID and channel must be effective after...
... the SSID in the text box and select a channel. The new settings will be the same as wireless devices attempting to connect to enable Wireless LAN. Step 5: Set Wireless LAN connection Click "Enable" to the WLAN Router. Step 6: Setup completed The Setup wizard is now completed. The SSID and channel must be effective after...

User's Guide
Page 33
The host name is 192.168.10.1. The default host name is "TEW-634GRU" IP Address: This is the IP address of the screen. The default IP address is required by default. 27 LAN & DHCP Server This page allows ... in the text box. DHCP Server: Enables the DHCP server to allow the WLAN Router to automatically assign IP addresses to devices connecting to the LAN port or wirelessly. Subnet Mask: Type the subnet mask for the WLAN Router in the text box. DHCP is 255.255.255.0. LAN and DHCP profiles are...
The host name is 192.168.10.1. The default host name is "TEW-634GRU" IP Address: This is the IP address of the screen. The default IP address is required by default. 27 LAN & DHCP Server This page allows ... in the text box. DHCP Server: Enables the DHCP server to allow the WLAN Router to automatically assign IP addresses to devices connecting to the LAN port or wirelessly. Subnet Mask: Type the subnet mask for the WLAN Router in the text box. DHCP is 255.255.255.0. LAN and DHCP profiles are...

User's Guide
Page 37
Basic This page allows you are online. First, you need to register your preferred DNS with your current Public IP address when you to configure the wireless parameters for wireless communications. 31 Then, please select the DDNS address in the Server Address and fill the related information in the below fields: Host Name, User Name and Password. Dynamic DNS This synchronizes the DDNS server with the DDNS provider. Wireless This section enables users to enable and disable the wireless LAN function, create a SSID, and select the channel for the WLAN Router.
Basic This page allows you are online. First, you need to register your preferred DNS with your current Public IP address when you to configure the wireless parameters for wireless communications. 31 Then, please select the DDNS address in the Server Address and fill the related information in the below fields: Host Name, User Name and Password. Dynamic DNS This synchronizes the DDNS server with the DDNS provider. Wireless This section enables users to enable and disable the wireless LAN function, create a SSID, and select the channel for the WLAN Router.
User's Guide
Page 38
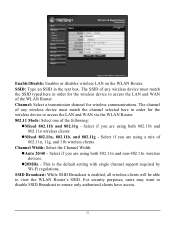
...802.11n, 802.11b, and 802.11g - Channel: Select a transmission channel for the wireless device to access the LAN and WAN via the WLAN Router. 802.11 Mode: Select one of 802.11n, 11g, and 11b wireless clients. Select if you are using a mix of the following: zMixed 802.11b and 802...is the default setting with single channel support required by Wi-Fi regulations. This is enabled, all wireless clients will be able to ensure only authorized clients have access. 32 The SSID of the WLAN Router. Channel Width: Select the Channel Width: zAuto 20/40 - Select if you are using both...
...802.11n, 802.11b, and 802.11g - Channel: Select a transmission channel for the wireless device to access the LAN and WAN via the WLAN Router. 802.11 Mode: Select one of 802.11n, 11g, and 11b wireless clients. Select if you are using a mix of the following: zMixed 802.11b and 802...is the default setting with single channel support required by Wi-Fi regulations. This is enabled, all wireless clients will be able to ensure only authorized clients have access. 32 The SSID of the WLAN Router. Channel Width: Select the Channel Width: zAuto 20/40 - Select if you are using both...

User's Guide
Page 44
It is only used by pressing the WPS button on the side of the WLAN Router LAN, WAN and Wireless connections, and view logs and statistics pertaining to view the WLAN Router's LAN, Wireless and WAN configurations. Device Information This screen enables users to connections and packet transfers. Push Button Configuration: Clicking this to ensure...
It is only used by pressing the WPS button on the side of the WLAN Router LAN, WAN and Wireless connections, and view logs and statistics pertaining to view the WLAN Router's LAN, Wireless and WAN configurations. Device Information This screen enables users to connections and packet transfers. Push Button Configuration: Clicking this to ensure...

User's Guide
Page 45
..."Clear Log" to delete the contents of the log and begin a new log Click "Refresh" to the WLAN Router LAN interface. Wireless: This section displays the wireless configuration information, including the MAC address, the Connection status, SSID, Channel and Authentication type. Click "DHCP Release" to... to renew log statistics 39 The Log screen commands are overwritten by new entries. Click "DHCP Table" to view a list of Router system statistics, events, and activities. WAN: This section displays the WAN interface configuration including the MAC address, Connection status, DHCP client...
..."Clear Log" to delete the contents of the log and begin a new log Click "Refresh" to the WLAN Router LAN interface. Wireless: This section displays the wireless configuration information, including the MAC address, the Connection status, SSID, Channel and Authentication type. Click "DHCP Release" to... to renew log statistics 39 The Log screen commands are overwritten by new entries. Click "DHCP Table" to view a list of Router system statistics, events, and activities. WAN: This section displays the WAN interface configuration including the MAC address, Connection status, DHCP client...

User's Guide
Page 47
... packets that shows the rate of the Syslog Server if user wants the WLAN Router to erase all statistics and begin logging statistics again. 41 Syslog Server: Type the IP address of packet transmission via the WLAN Router's LAN, Wireless and WAN ports (in the log: System Activity: Displays information related to errors...
... packets that shows the rate of the Syslog Server if user wants the WLAN Router to erase all statistics and begin logging statistics again. 41 Syslog Server: Type the IP address of packet transmission via the WLAN Router's LAN, Wireless and WAN ports (in the log: System Activity: Displays information related to errors...

User's Guide
Page 48
MAC Address: Displays the wireless client's MAC address. 42 Wireless This screen enables users to view information about wireless devices that are connected to the WLAN Router. Connected Time: Lists all wireless clients and how long they have been connected WLAN Router.
MAC Address: Displays the wireless client's MAC address. 42 Wireless This screen enables users to view information about wireless devices that are connected to the WLAN Router. Connected Time: Lists all wireless clients and how long they have been connected WLAN Router.

User's Guide
Page 65
...USB CONTROL CENTER UTILITY Utility The USB Control Center Utility is used to connect your computer turns on your PC through the Wireless N Gigabit Router with USB port (TEW-634GRU). Tools Configuration This option allows you to enable/disable the ability to automatically run the USB Control Center Utility when your computer...from USB Control Center utility. Select the printer you to use USB devices as if they were connected directly to the WLAN Router. System Select this feature to add into the Auto-Connect Printer Lists. 59 Auto-Connect Printer List Provides a list of installed printers ...
...USB CONTROL CENTER UTILITY Utility The USB Control Center Utility is used to connect your computer turns on your PC through the Wireless N Gigabit Router with USB port (TEW-634GRU). Tools Configuration This option allows you to enable/disable the ability to automatically run the USB Control Center Utility when your computer...from USB Control Center utility. Select the printer you to use USB devices as if they were connected directly to the WLAN Router. System Select this feature to add into the Auto-Connect Printer Lists. 59 Auto-Connect Printer List Provides a list of installed printers ...

User's Guide
Page 66
It is recommended to set this feature on your computer. Set Auto-Connect Printer Provides a list of the Wireless N Gigabit Router with USB port (TEW-634GRU). Configure Server Click this button to configure selected printer for Auto-Connect, or to delete selected printer from Auto-Connect list. Note: For proper installation ... connecting it to the USB port. Auto Connect Printer Click this button to configure the USB server and to use a USB printer through the WLAN Router. Print Sharing This section describes how to log into the Auto-Connect Printer Lists. 60
It is recommended to set this feature on your computer. Set Auto-Connect Printer Provides a list of the Wireless N Gigabit Router with USB port (TEW-634GRU). Configure Server Click this button to configure selected printer for Auto-Connect, or to delete selected printer from Auto-Connect list. Note: For proper installation ... connecting it to the USB port. Auto Connect Printer Click this button to configure the USB server and to use a USB printer through the WLAN Router. Print Sharing This section describes how to log into the Auto-Connect Printer Lists. 60
User's Guide
Page 67
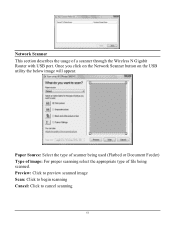
Network Scanner This section describes the usage of file being scanned. Preview: Click to preview scanned image Scan: Click to begin scanning Cancel: Click to cancel scanning 61 Paper Source: Select the type of scanner being used (Flatbed or Document Feeder) Type of image: For proper scanning select the appropriate type of a scanner through the Wireless N Gigabit Router with USB port. Once you click on the Network Scanner button on the USB utility the below image will appear.
Network Scanner This section describes the usage of file being scanned. Preview: Click to preview scanned image Scan: Click to begin scanning Cancel: Click to cancel scanning 61 Paper Source: Select the type of scanner being used (Flatbed or Document Feeder) Type of image: For proper scanning select the appropriate type of a scanner through the Wireless N Gigabit Router with USB port. Once you click on the Network Scanner button on the USB utility the below image will appear.


