
User's Guide
Page 5
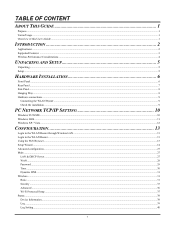
... ...8 Hardware connections ...9 Connecting the WLAN Router...9 Check the installation ...9 PC NETWORK TCP/IP SETTING 10 Windows 95/98/ME...10 Windows 2000 ...11 Windows XP / Vista ...12 CONFIGURATION 13 Login to the WLAN Router through Wireless LAN ...13 Login to the WLAN Router...13 Using the Web Browser...13 Setup Wizard...14 Advanced configuration...27 Main ...27 LAN & DHCP Server...27 WAN ...28 Password ...29 Time ...30 Dynamic DNS...31 Wireless ...31 Basic ...31 Security ...33 Advanced ...36 Wi-Fi Protected Setup ...37 Status ...38 Device Information ...38 Log ...39 Log Setting...40...
... ...8 Hardware connections ...9 Connecting the WLAN Router...9 Check the installation ...9 PC NETWORK TCP/IP SETTING 10 Windows 95/98/ME...10 Windows 2000 ...11 Windows XP / Vista ...12 CONFIGURATION 13 Login to the WLAN Router through Wireless LAN ...13 Login to the WLAN Router...13 Using the Web Browser...13 Setup Wizard...14 Advanced configuration...27 Main ...27 LAN & DHCP Server...27 WAN ...28 Password ...29 Time ...30 Dynamic DNS...31 Wireless ...31 Basic ...31 Security ...33 Advanced ...36 Wi-Fi Protected Setup ...37 Status ...38 Device Information ...38 Log ...39 Log Setting...40...

User's Guide
Page 6
Statistic ...41 Wireless ...42 Routing ...43 Static ...43 Dynamic ...44 Routing Table ...45 Access ...46 Filters ...46 Virtual Server...49 Special AP...50 DMZ ...51 Firewall Settings ...52 Management ...53 Remote Management ...53 Tools ...55 Restart ...55 Settings ...56 Firmware ...57 Ping Test ...58 USB CONTROL CENTER UTILITY 59 Utility ...59 System ...59 Tools ...59 Auto-Connect Printer List ...59 Print Sharing ...60 Auto Connect Printer ...60 Set Auto-Connect Printer...60 Network Scanner...61 Connecting USB Storage Device ...62 TECHNICAL SPECIFICATIONS 64 vi
Statistic ...41 Wireless ...42 Routing ...43 Static ...43 Dynamic ...44 Routing Table ...45 Access ...46 Filters ...46 Virtual Server...49 Special AP...50 DMZ ...51 Firewall Settings ...52 Management ...53 Remote Management ...53 Tools ...55 Restart ...55 Settings ...56 Firmware ...57 Ping Test ...58 USB CONTROL CENTER UTILITY 59 Utility ...59 System ...59 Tools ...59 Auto-Connect Printer List ...59 Print Sharing ...60 Auto Connect Printer ...60 Set Auto-Connect Printer...60 Network Scanner...61 Connecting USB Storage Device ...62 TECHNICAL SPECIFICATIONS 64 vi

User's Guide
Page 7
... started with USB Port. Technical Specifications. Lists the technical (general, physical and environmental, performance and Routers settings) specifications of the 300Mbps Wireless N Gigabit Router with USB Port. Overview of this guide, the term "the WLAN Router" refers to install the router with USB Port. ABOUT THIS GUIDE Congratulations on your purchase of this 300Mbps Wireless N Gigabit Router with USB Port. Purpose This manual discusses how to configure and operate for every user. It provides a complete solution for Internet...
... started with USB Port. Technical Specifications. Lists the technical (general, physical and environmental, performance and Routers settings) specifications of the 300Mbps Wireless N Gigabit Router with USB Port. Overview of this guide, the term "the WLAN Router" refers to install the router with USB Port. ABOUT THIS GUIDE Congratulations on your purchase of this 300Mbps Wireless N Gigabit Router with USB Port. Purpose This manual discusses how to configure and operate for every user. It provides a complete solution for Internet...

User's Guide
Page 8
... cost of corporations and into homes with wireless LAN and Fast Ethernet switch. File sharing: Exchange data, messages, and distribute files thus making good use of features, but also can be installed and configured right out of hard disk space. This integrated access device combines Internet gateway functions with at the same time means less affordable, higher costs. This device supports a simple local area network and Internet access share, offering great cost...
... cost of corporations and into homes with wireless LAN and Fast Ethernet switch. File sharing: Exchange data, messages, and distribute files thus making good use of features, but also can be installed and configured right out of hard disk space. This integrated access device combines Internet gateway functions with at the same time means less affordable, higher costs. This device supports a simple local area network and Internet access share, offering great cost...
User's Guide
Page 9
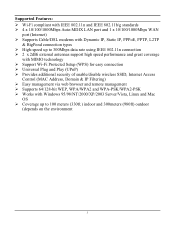
... WAN port (Internet) ¾ Supports Cable/DSL modems with Dynamic IP, Static IP, PPPoE, PPTP, L2TP & BigPond connection types ¾ High-speed up to 300Mbps data rate using IEEE 802.11n connection ¾ 2 x 2dBi external antennas support high speed performance and great coverage with MIMO technology ¾ Support Wi-Fi Protected Setup (WPS) for easy connection ¾ Universal Plug and Play (UPnP) ¾ Provides additional security of enable/disable wireless SSID, Internet Access Control (MAC Address, Domain & IP Filtering) ¾ Easy management via web browser and remote management...
... WAN port (Internet) ¾ Supports Cable/DSL modems with Dynamic IP, Static IP, PPPoE, PPTP, L2TP & BigPond connection types ¾ High-speed up to 300Mbps data rate using IEEE 802.11n connection ¾ 2 x 2dBi external antennas support high speed performance and great coverage with MIMO technology ¾ Support Wi-Fi Protected Setup (WPS) for easy connection ¾ Universal Plug and Play (UPnP) ¾ Provides additional security of enable/disable wireless SSID, Internet Access Control (MAC Address, Domain & IP Filtering) ¾ Easy management via web browser and remote management...

User's Guide
Page 13
... wireless connection. WAN One 10/100/1000Mbps WAN port that connects to 10Mbps, 100Mbps Ethernet or 10000Mbps Gigabit connections. USB One USB port to factory default settings. Rear Panel Antenna There are two 2dBi gain antennas on the rear panel for Internet connectivity. POWER Plug the power adapter to this power jack RESET Use a pin-shaped item to push to reset this device to share either USB storage devices or printers over the network. It will be a useful tool when the manager forgot the password...
... wireless connection. WAN One 10/100/1000Mbps WAN port that connects to 10Mbps, 100Mbps Ethernet or 10000Mbps Gigabit connections. USB One USB port to factory default settings. Rear Panel Antenna There are two 2dBi gain antennas on the rear panel for Internet connectivity. POWER Plug the power adapter to this power jack RESET Use a pin-shaped item to push to reset this device to share either USB storage devices or printers over the network. It will be a useful tool when the manager forgot the password...
User's Guide
Page 15
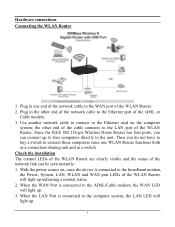
.../g/n Wireless Home Router has four ports, you do not have to buy a switch to connect these computers since one end of the network link can connect up indicating a normal status. 2. With the power source on the computer system; Check the installation The control LEDs of the WLAN Router are clearly visible and the status of the network cable to the ADSL/Cable modem, the WAN LED will light up . 3. Hardware connections Connecting the WLAN Router 1. When the WAN Port is connected to...
.../g/n Wireless Home Router has four ports, you do not have to buy a switch to connect these computers since one end of the network link can connect up indicating a normal status. 2. With the power source on the computer system; Check the installation The control LEDs of the WLAN Router are clearly visible and the status of the network cable to the ADSL/Cable modem, the WAN LED will light up . 3. Hardware connections Connecting the WLAN Router 1. When the WAN Port is connected to...
User's Guide
Page 19
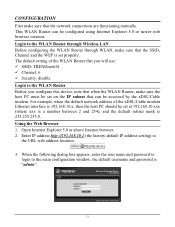
... WLAN Router can be configured using Internet Explorer 5.0 or newer web browser versions. Login to the WLAN Router Before you will use: 9 SSID: TRENDnet634 9 Channel: 6 9 Security: disable Login to the WLAN Router through Wireless LAN Before configuring the WLAN Router through WLAN, make sure that the network connections are functioning normally. CONFIGURATION First make sure that the SSID, Channel and the WEP is set properly. Enter IP address http://192.168.10.1 (the factory-default IP address setting) to the main configuration window, the default username and password is "admin...
... WLAN Router can be configured using Internet Explorer 5.0 or newer web browser versions. Login to the WLAN Router Before you will use: 9 SSID: TRENDnet634 9 Channel: 6 9 Security: disable Login to the WLAN Router through Wireless LAN Before configuring the WLAN Router through WLAN, make sure that the network connections are functioning normally. CONFIGURATION First make sure that the SSID, Channel and the WEP is set properly. Enter IP address http://192.168.10.1 (the factory-default IP address setting) to the main configuration window, the default username and password is "admin...

User's Guide
Page 34
... the IP range that DHCP will use to assign IP addresses to all LAN devices connected to the WLAN Router. WAN This screen enables users to the WLAN Router. Domain Name: Type the local domain name of the client. Connection Type: Select the connection type, DHCP client or Fixed IP, PPPoE, PPTP, L2TP, BigPond Cable, Russia PPPoE, Russia, PPTP and Russia L2TP from the drop-down list. 28 Start IP: Type an IP address to serve as the end of connection time a network user be allowed...
... the IP range that DHCP will use to assign IP addresses to all LAN devices connected to the WLAN Router. WAN This screen enables users to the WLAN Router. Domain Name: Type the local domain name of the client. Connection Type: Select the connection type, DHCP client or Fixed IP, PPPoE, PPTP, L2TP, BigPond Cable, Russia PPPoE, Russia, PPTP and Russia L2TP from the drop-down list. 28 Start IP: Type an IP address to serve as the end of connection time a network user be allowed...
User's Guide
Page 38
... in the text box. Enable/Disable: Enables or disables wireless LAN on the WLAN Router. Channel Width: Select the Channel Width: zAuto 20/40 - SSID Broadcast: While SSID Broadcast is the default setting with single channel support required by Wi-Fi regulations. zMixed 802.11n, 802.11b, and 802.11g - Select if you are using both 802.11b and 802.11n wireless clients. For security purposes, users may want to disable SSID Broadcast to view the WLAN Router's SSID.
... in the text box. Enable/Disable: Enables or disables wireless LAN on the WLAN Router. Channel Width: Select the Channel Width: zAuto 20/40 - SSID Broadcast: While SSID Broadcast is the default setting with single channel support required by Wi-Fi regulations. zMixed 802.11n, 802.11b, and 802.11g - Select if you are using both 802.11b and 802.11n wireless clients. For security purposes, users may want to disable SSID Broadcast to view the WLAN Router's SSID.

User's Guide
Page 49
... after changing parameters, click "Update" to its destination if the network has a static IP address. Metric: Select which the WLAN Router forwards data to confirm the changes. Interface: Select an interface, WAN or LAN, to connect to erase all fields and enter new information. 43 Static It enables users to this configuration. Cancel: Click the Cancel button to the Internet. Network Address: Type the static IP address the network uses to 255.255.255.0. Gateway Address: Type the gateway address of the network. Routing Table enables users to...
... after changing parameters, click "Update" to its destination if the network has a static IP address. Metric: Select which the WLAN Router forwards data to confirm the changes. Interface: Select an interface, WAN or LAN, to connect to erase all fields and enter new information. 43 Static It enables users to this configuration. Cancel: Click the Cancel button to the Internet. Network Address: Type the static IP address the network uses to 255.255.255.0. Gateway Address: Type the gateway address of the network. Routing Table enables users to...
User's Guide
Page 52
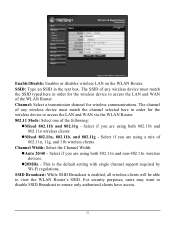
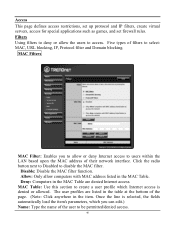
Filters Using filters to deny or allow the users to select: MAC, URL blocking, IP, Protocol filter and Domain blocking. Allow: Only allow or deny Internet access to disable the MAC filter. Five types of their network interface. Once the line is selected, the fields automatically load the item's parameters, which Internet access is denied or allowed. Click the radio button next to Disabled to users within the LAN based upon the MAC address of filters to access. The...
Filters Using filters to deny or allow the users to select: MAC, URL blocking, IP, Protocol filter and Domain blocking. Allow: Only allow or deny Internet access to disable the MAC filter. Five types of their network interface. Once the line is selected, the fields automatically load the item's parameters, which Internet access is denied or allowed. Click the radio button next to Disabled to users within the LAN based upon the MAC address of filters to access. The...

User's Guide
Page 65
USB CONTROL CENTER UTILITY Utility The USB Control Center Utility is used to connect your computer to USB devices connected to automatically run the USB Control Center Utility when your computer turns on your PC through the Wireless N Gigabit Router with USB port (TEW-634GRU). Tools Configuration This option allows you to enable/disable the ability to the WLAN Router. The utility allows you would like to add into the Auto-Connect Printer Lists. 59 Auto-Connect Printer List Provides a list of installed printers on . System Select this feature to your...
USB CONTROL CENTER UTILITY Utility The USB Control Center Utility is used to connect your computer to USB devices connected to automatically run the USB Control Center Utility when your computer turns on your PC through the Wireless N Gigabit Router with USB port (TEW-634GRU). Tools Configuration This option allows you to enable/disable the ability to the WLAN Router. The utility allows you would like to add into the Auto-Connect Printer Lists. 59 Auto-Connect Printer List Provides a list of installed printers on . System Select this feature to your...

User's Guide
Page 66
...-Connect list. Auto Connect Printer Click this button to configure selected printer for Auto-Connect, or to the printer when printing. Configure Server Click this button to configure the USB server and to use a USB printer through the WLAN Router. Print Sharing This section describes how to log into the Auto-Connect Printer Lists. 60 Note: For proper installation it is recommended that the printer's drivers are installed before connecting it to set this feature on your computer. Set Auto-Connect Printer Provides a list of the Wireless N Gigabit Router with USB port (TEW-634GRU...
...-Connect list. Auto Connect Printer Click this button to configure selected printer for Auto-Connect, or to the printer when printing. Configure Server Click this button to configure the USB server and to use a USB printer through the WLAN Router. Print Sharing This section describes how to log into the Auto-Connect Printer Lists. 60 Note: For proper installation it is recommended that the printer's drivers are installed before connecting it to set this feature on your computer. Set Auto-Connect Printer Provides a list of the Wireless N Gigabit Router with USB port (TEW-634GRU...

User's Guide
Page 70
...WAN LAN WPS Button USB Connection Type Internet Access Control LED Indicator Power Adapter Power Consumption Dimension (L x W x H) Weight Temperature Humidity Certifications Wireless Frequency Antenna Wired: IEEE 802.3/u Fast Ethernet, IEEE 802.3ab Gigabit Ethernet Wireless: IEEE 802.11b, IEEE 802.11g, IEEE 802.11n (draft 2.0), IEEE 802.11e QoS USB: v1.0, 1.1, 2.0 1 x 10/100/1000Mbps Auto-MDIX port (Internet) 4 x 10/100/1000Mbps Auto-MDIX ports Enable Wi-Fi Protected Setup function 1 x USB 2.0, 1.1 Compliant USB Type A Port Dynamic IP, Static (Fixed) IP, PPPoE, PPTP, L2TP, BigPond MAC Address...
...WAN LAN WPS Button USB Connection Type Internet Access Control LED Indicator Power Adapter Power Consumption Dimension (L x W x H) Weight Temperature Humidity Certifications Wireless Frequency Antenna Wired: IEEE 802.3/u Fast Ethernet, IEEE 802.3ab Gigabit Ethernet Wireless: IEEE 802.11b, IEEE 802.11g, IEEE 802.11n (draft 2.0), IEEE 802.11e QoS USB: v1.0, 1.1, 2.0 1 x 10/100/1000Mbps Auto-MDIX port (Internet) 4 x 10/100/1000Mbps Auto-MDIX ports Enable Wi-Fi Protected Setup function 1 x USB 2.0, 1.1 Compliant USB Type A Port Dynamic IP, Static (Fixed) IP, PPPoE, PPTP, L2TP, BigPond MAC Address...

Quick Installation Guide
Page 5
... TEW-634GRU, install the printer drivers to the Cable or DSL modem. http://www.trendnet.com) in a URL (e.g. If you have an Internet connection when connecting your computer directly to your Internet Connection before you start. Then shutdown the printer and disconnect the printer from your browser (e.g. Open your computer. Note: Please refer to your computer. Internet Cable/DSL Modem 2. 2. Internet Explorer) and type in the address bar. If necessary, contact your printer's manual for printer installation instructions. 3 English Hardware Installation...
... TEW-634GRU, install the printer drivers to the Cable or DSL modem. http://www.trendnet.com) in a URL (e.g. If you have an Internet connection when connecting your computer directly to your Internet Connection before you start. Then shutdown the printer and disconnect the printer from your browser (e.g. Open your computer. Note: Please refer to your computer. Internet Cable/DSL Modem 2. 2. Internet Explorer) and type in the address bar. If necessary, contact your printer's manual for printer installation instructions. 3 English Hardware Installation...

Quick Installation Guide
Page 11
Insert the Utility CD-ROM into your computer. Click Next. 9 English Using the USB port Install the Utility Note: Before installing the utility, install the printer drivers to your computer. Then shutdown the printer and disconnect the printer from your computer's CD-ROM Drive. 2. Please refer to your printer's manual for printer installation instructions. 1. Click Install Utility. 4. 4. Click Run Autorun.exe (Windows Vista only). 3.
Insert the Utility CD-ROM into your computer. Click Next. 9 English Using the USB port Install the Utility Note: Before installing the utility, install the printer drivers to your computer. Then shutdown the printer and disconnect the printer from your computer's CD-ROM Drive. 2. Please refer to your printer's manual for printer installation instructions. 1. Click Install Utility. 4. 4. Click Run Autorun.exe (Windows Vista only). 3.
Quick Installation Guide
Page 17
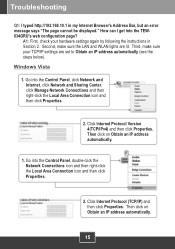
... WLAN lights are set to Obtain an IP address automatically (see the steps below). Click Internet Protocol Version 4(TCP/IPv4) and then click Properties. Then click on Obtain an IP address automatically. 1. Go into the Control Panel, double-click the Network Connections icon and then right-click the Local Area Connection icon and then click Properties. 2. Troubleshooting Q1: I get into the TEW634GRU's web configuration...
... WLAN lights are set to Obtain an IP address automatically (see the steps below). Click Internet Protocol Version 4(TCP/IPv4) and then click Properties. Then click on Obtain an IP address automatically. 1. Go into the Control Panel, double-click the Network Connections icon and then right-click the Local Area Connection icon and then click Properties. 2. Troubleshooting Q1: I get into the TEW634GRU's web configuration...

Quick Installation Guide
Page 18
...) support service for 15 seconds. Make sure Enabled is configured with a direct connection into the address bar of the browser, "Pop-up blocker. The preset SSID is correct. Unplug the power to the modem and router. Fourth, press on the factory reset button for the correct information. The next time to login to the modem. Second, contact your Internet connection settings is TRENDnet634. 16 Wait for Wireless and then click Apply. Enter...
...) support service for 15 seconds. Make sure Enabled is configured with a direct connection into the address bar of the browser, "Pop-up blocker. The preset SSID is correct. Unplug the power to the modem and router. Fourth, press on the factory reset button for the correct information. The next time to login to the modem. Second, contact your Internet connection settings is TRENDnet634. 16 Wait for Wireless and then click Apply. Enter...

Quick Installation Guide
Page 19
.... make sure that no longer appear. Press Request to Connect in . What should I cannot set my printer as ZoneAlarm or Norton Internet Security. If your storage device. Fifth, power cycle the TEW-634GRU. Double click on the drive for the other computer is using the printer. A6: First, double check your storage device. Q9: I do ? Q6: The TRENDnet USB Control Center does not detect the TEW-634GRU. On Windows...
.... make sure that no longer appear. Press Request to Connect in . What should I cannot set my printer as ZoneAlarm or Norton Internet Security. If your storage device. Fifth, power cycle the TEW-634GRU. Double click on the drive for the other computer is using the printer. A6: First, double check your storage device. Q9: I do ? Q6: The TRENDnet USB Control Center does not detect the TEW-634GRU. On Windows...


