Operating Instructions
Page 2
... with the limits for help. Operation is subject to the following measures: - IMPORTANT The nameplate is located on , the user is no guarantee that interference will not occur in USA, use the UL LISTED power cord specified below. CAUTION Danger of explosion if battery is connected. - Replace only with the same or equivalent type recommended by turning the equipment off...
... with the limits for help. Operation is subject to the following measures: - IMPORTANT The nameplate is located on , the user is no guarantee that interference will not occur in USA, use the UL LISTED power cord specified below. CAUTION Danger of explosion if battery is connected. - Replace only with the same or equivalent type recommended by turning the equipment off...
Operating Instructions
Page 4
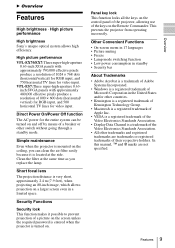
... Tools for Your Presentation 25 About the Preset Memory No. ....32 The SET SETTING Menu 33 The MENU SETTING Menu ...........35 The INSTALL SETTING Menu .......36 The INFORMATION Menu 38 Maintenance Replacing the Lamp 40 Cleaning the Air Filter 42 Others Troubleshooting 43 Messages List 45 Specifications 47 Installation Diagram 52 Floor Installation (Front Projection 52 Ceiling Installation (Front Projection 54 Dimensions 56 Index 58 Adjustments and Settings Using a Menu Using a MENU 27 The PICTURE SETTING Menu ...... 29 The INPUT SETTING Menu .......... 31 4 Table of Contents
... Tools for Your Presentation 25 About the Preset Memory No. ....32 The SET SETTING Menu 33 The MENU SETTING Menu ...........35 The INSTALL SETTING Menu .......36 The INFORMATION Menu 38 Maintenance Replacing the Lamp 40 Cleaning the Air Filter 42 Others Troubleshooting 43 Messages List 45 Specifications 47 Installation Diagram 52 Floor Installation (Front Projection 52 Ceiling Installation (Front Projection 54 Dimensions 56 Index 58 Adjustments and Settings Using a Menu Using a MENU 27 The PICTURE SETTING Menu ...... 29 The INPUT SETTING Menu .......... 31 4 Table of Contents
Operating Instructions
Page 5
...; Check that the operating voltage of your unit is identical with opaque draperies. • It is desirable to install the unit in the adjuster. • Do not spread a cloth or paper under the unit. Cleaning Before cleaning Be sure to reduce reflection of light. Cleaning the air filter • Clean the air filter whenever you replace the lamp. • Refer to the "Cleaning the Air Filter" on the lens, use...
...; Check that the operating voltage of your unit is identical with opaque draperies. • It is desirable to install the unit in the adjuster. • Do not spread a cloth or paper under the unit. Cleaning Before cleaning Be sure to reduce reflection of light. Cleaning the air filter • Clean the air filter whenever you replace the lamp. • Refer to the "Cleaning the Air Filter" on the lens, use...
Operating Instructions
Page 9
... system can be turned on the screen unless the required password is entered when the projector is located at the same time as you can clean the air filter easily because it possible to prevent projection of 800 × 600 dots (horizontal/ vertical) for RGB input, and 500 horizontal TV lines for video input. Short focal lens The projection distance is a trademark of the Video Electronics Standards Association...
... system can be turned on the screen unless the required password is entered when the projector is located at the same time as you can clean the air filter easily because it possible to prevent projection of 800 × 600 dots (horizontal/ vertical) for RGB input, and 500 horizontal TV lines for video input. Short focal lens The projection distance is a trademark of the Video Electronics Standards Association...
Operating Instructions
Page 12
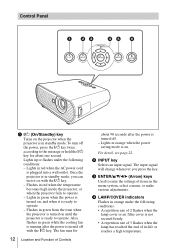
... settings of its life or reaches a high temperature. b INPUT key Selects an input signal. Lights in red when the temperature becomes high inside the projector, or when the projector fails to operate. - d LAMP/COVER indicators Flashes in green while the cooling fan is running after the power is turned off. - The input signal will change whenever you can turn off with the ?/1 key. - Also, flashes in orange under the following conditions: • A repetition rate of 2 flashes when the lamp cover or air filter cover...
... settings of its life or reaches a high temperature. b INPUT key Selects an input signal. Lights in red when the temperature becomes high inside the projector, or when the projector fails to operate. - d LAMP/COVER indicators Flashes in green while the cooling fan is running after the power is turned off. - The input signal will change whenever you can turn off with the ?/1 key. - Also, flashes in orange under the following conditions: • A repetition rate of 2 flashes when the lamp cover or air filter cover...
Operating Instructions
Page 15
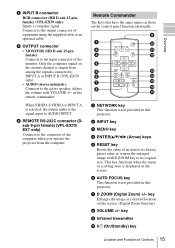
... in this projector. key Enlarges the image at a desired location on the remote commander. f REMOTE RS-232C connector (Dsub 9-pin female) (VPL-EX70/ EX7 only) Connects to the connector of Controls 15 f AUTO FOCUS key This function is the signal input to the active speaker. Remote Commander The keys that have the same names as those on the control panel function identically. 1 2 3 INPUT NETWORK USB MENU APA 9 0 qa qs 4 5 6 7 8 ENTER RESET KEYSTONE AUTO FOCUS LENS /TILT PIC...
... in this projector. key Enlarges the image at a desired location on the remote commander. f REMOTE RS-232C connector (Dsub 9-pin female) (VPL-EX70/ EX7 only) Connects to the connector of Controls 15 f AUTO FOCUS key This function is the signal input to the active speaker. Remote Commander The keys that have the same names as those on the control panel function identically. 1 2 3 INPUT NETWORK USB MENU APA 9 0 qa qs 4 5 6 7 8 ENTER RESET KEYSTONE AUTO FOCUS LENS /TILT PIC...
Operating Instructions
Page 16
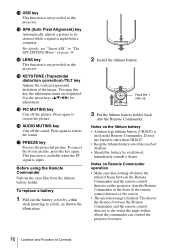
... Remote Commander and the remote control detector is, the wider the angle within which the commander can control the projector becomes. 16 Location and Function of children. • Should the battery be swallowed, immediately consult a doctor. q FREEZE key Freezes the projected picture. Notes on the lithium battery • A button type lithium battery (CR2025) is used in "The SET SETTING Menu" on the projector. Pressing this projector. To replace...
... Remote Commander and the remote control detector is, the wider the angle within which the commander can control the projector becomes. 16 Location and Function of children. • Should the battery be swallowed, immediately consult a doctor. q FREEZE key Freezes the projected picture. Notes on the lithium battery • A button type lithium battery (CR2025) is used in "The SET SETTING Menu" on the projector. Pressing this projector. To replace...
Operating Instructions
Page 20
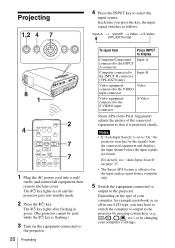
... green. (The projector cannot be used while the ?/1 key is projected clearly. The ?/1 key lights after flashing in -one LCD type, you press the key, the input signal switches as follows: Input-A t Input-B t Video t S-Video (VPL-EX70 only) 4 INPUT NETWORK USB MENU APA 2 ENTER RESET KEYSTONE AUTO FOCUS LENS /TILT PIC MUTING D ZOOM VOLUME FREEZE AUDIO MUTING 7 7 1 Plug the AC power cord into standby mode. 2 Press the ?/1 key. Depending on the type of the connected equipment so that it is flashing.) 3 Turn on...
... green. (The projector cannot be used while the ?/1 key is projected clearly. The ?/1 key lights after flashing in -one LCD type, you press the key, the input signal switches as follows: Input-A t Input-B t Video t S-Video (VPL-EX70 only) 4 INPUT NETWORK USB MENU APA 2 ENTER RESET KEYSTONE AUTO FOCUS LENS /TILT PIC MUTING D ZOOM VOLUME FREEZE AUDIO MUTING 7 7 1 Plug the AC power cord into standby mode. 2 Press the ?/1 key. Depending on the type of the connected equipment so that it is flashing.) 3 Turn on...
Operating Instructions
Page 21
... the top of the projector or do not want to perform the automatic keystone adjustment, set the "V Keystone" to "Auto," the "V Keystone" correction is performed at the same time. Projecting 21 In this case, adjust it may cause malfunction. 7 Adjust the trapezoidal distortion ( ) of the picture. (VPL-EX7/ ES7 only) Press the KEYSTONE key on the Remote Commander to display the adjustment menu and adjust the tilt using the Focus ring. If you...
... the top of the projector or do not want to perform the automatic keystone adjustment, set the "V Keystone" to "Auto," the "V Keystone" correction is performed at the same time. Projecting 21 In this case, adjust it may cause malfunction. 7 Adjust the trapezoidal distortion ( ) of the picture. (VPL-EX7/ ES7 only) Press the KEYSTONE key on the Remote Commander to display the adjustment menu and adjust the tilt using the Focus ring. If you...
Operating Instructions
Page 27
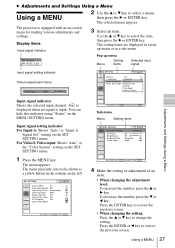
... an on the SET SETTING menu. 1 Press the MENU key. You can hide this indicator using "Status" on the SET SETTING menu. setting on the MENU SETTING menu. SET SETTING Input-A Smar t APA: On Auto Input Search: Off Input-A Signal Sel.: Component Color System: Auto Power Saving: Off Panel Key Lock: Off CC Display: Off Lamp Timer Reset Sub menu Menu Setting items PICTURE SETTING Input A ADJUST PICTURE Contrast: Brightness: Gamma Mode: Color Temp.: Standard 80 50 Graphics High 4 Make the setting or adjustment of an item. • When changing the adjustment level: To increase...
... an on the SET SETTING menu. 1 Press the MENU key. You can hide this indicator using "Status" on the SET SETTING menu. setting on the MENU SETTING menu. SET SETTING Input-A Smar t APA: On Auto Input Search: Off Input-A Signal Sel.: Component Color System: Auto Power Saving: Off Panel Key Lock: Off CC Display: Off Lamp Timer Reset Sub menu Menu Setting items PICTURE SETTING Input A ADJUST PICTURE Contrast: Brightness: Gamma Mode: Color Temp.: Standard 80 50 Graphics High 4 Make the setting or adjustment of an item. • When changing the adjustment level: To increase...
Operating Instructions
Page 34
... Standby mode if no signal is displayed on the remote commander - Locks all the control panel keys on the top panel of the image may not be displayed on the type of a program. When replacing the lamps, reset the lamp timer. - The picture may not be adjusted properly depending on the screen. - while you press and hold the MENU key for 10 seconds turns the projector on . Setting items Power Saving Panel Key Lock CC Display Lamp Timer Reset Functions Initial setting...
... Standby mode if no signal is displayed on the remote commander - Locks all the control panel keys on the top panel of the image may not be displayed on the type of a program. When replacing the lamps, reset the lamp timer. - The picture may not be adjusted properly depending on the screen. - while you press and hold the MENU key for 10 seconds turns the projector on . Setting items Power Saving Panel Key Lock CC Display Lamp Timer Reset Functions Initial setting...
Operating Instructions
Page 36
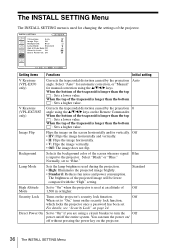
... the screen when no signal Blue is input to turn the power on the security lock function, which locks the projector once a password has been set to "On" when the projector is longer than the top : Sets a lower value. Background Selects the background color of the trapezoid is used during the projection. • High: Illuminates the projected image brightly. • Standard: Reduces fan noise and power consumption. Off • HV: Flips the image...
... the screen when no signal Blue is input to turn the power on the security lock function, which locks the projector once a password has been set to "On" when the projector is longer than the top : Sets a lower value. Background Selects the background color of the trapezoid is used during the projection. • High: Illuminates the projected image brightly. • Standard: Reduces fan noise and power consumption. Off • HV: Flips the image...

Operating Instructions
Page 40
appears on the screen • The LAMP/COVER indicator lights up . Do not tilt the lamp. Turn the projector over . 3 Open the lamp cover by loosening the screw with a Phillips screwdriver. Note For safety reasons, do not loosen any other screws. 4 Loosen the two screws on conditions of any other lamps than the LMP-E191 may cause damage to the projector. Use an LMP-E191 Projector Lamp as a light source is consumable...
appears on the screen • The LAMP/COVER indicator lights up . Do not tilt the lamp. Turn the projector over . 3 Open the lamp cover by loosening the screw with a Phillips screwdriver. Note For safety reasons, do not loosen any other screws. 4 Loosen the two screws on conditions of any other lamps than the LMP-E191 may cause damage to the projector. Use an LMP-E191 Projector Lamp as a light source is consumable...
Operating Instructions
Page 41
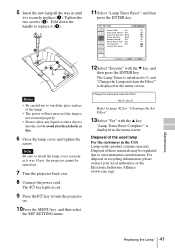
... used lamp For the customers in the USA Lamp in place (a). SET SETTING Smar t APA: On Auto Input Search: Off Input-A Signal Sel.: Auto Color System: Auto Power Saving: Off Panel Key Lock: Off CC Display: Off Lamp Timer Reset Input-A Notes • Be careful not to 0, and "Change the Lamp and clean the Filter?" Change the Lamp and clean the Filter? Disposal of the lamp. • The power will not turn the projector on. 10Press the MENU key, and then select the SET SETTING menu...
... used lamp For the customers in the USA Lamp in place (a). SET SETTING Smar t APA: On Auto Input Search: Off Input-A Signal Sel.: Auto Color System: Auto Power Saving: Off Panel Key Lock: Off CC Display: Off Lamp Timer Reset Input-A Notes • Be careful not to 0, and "Change the Lamp and clean the Filter?" Change the Lamp and clean the Filter? Disposal of the lamp. • The power will not turn the projector on. 10Press the MENU key, and then select the SET SETTING menu...
Operating Instructions
Page 43
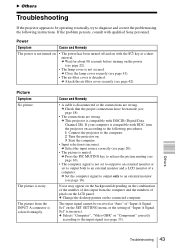
... at "Auto" of "Input-A Signal Sel" on the connected computer. Others Troubleshooting 43 Power Symptom Cause and Remedy The power is disconnected or the connections are wrong. c Close the lamp cover securely (see page 42). If the problem persists, consult with DDC2B (Digital Data Channel 2B). c Attach the air filter cover securely (see page 41). • The air filter cover is colored strangely. The picture from the computer and the numbers of...
... at "Auto" of "Input-A Signal Sel" on the connected computer. Others Troubleshooting 43 Power Symptom Cause and Remedy The power is disconnected or the connections are wrong. c Close the lamp cover securely (see page 42). If the problem persists, consult with DDC2B (Digital Data Channel 2B). c Attach the air filter cover securely (see page 41). • The air filter cover is colored strangely. The picture from the computer and the numbers of...
Operating Instructions
Page 44
... XGA (VPLEX70/EX7) (see page 18). Sound Symptom No sound. c Adjust the focus (see page 21). • Condensation has accumulated on the SET SETTING menu to the wrong color system. Symptom Cause and Remedy On-screen display does not "Status" on the PICTURE SETTING menu (see page 30). 44 Troubleshooting key on the Remote Commander or adjust "Volume" on the MENU SETTING menu has been set to match the color system being input (see page 33). c Input a signal...
... XGA (VPLEX70/EX7) (see page 18). Sound Symptom No sound. c Adjust the focus (see page 21). • Condensation has accumulated on the SET SETTING menu to the wrong color system. Symptom Cause and Remedy On-screen display does not "Status" on the PICTURE SETTING menu (see page 30). 44 Troubleshooting key on the Remote Commander or adjust "Volume" on the MENU SETTING menu has been set to match the color system being input (see page 33). c Input a signal...
Operating Instructions
Page 45
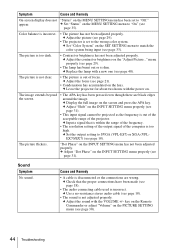
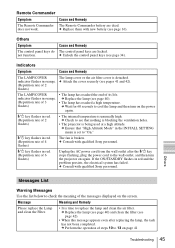
... temperature is set to replace the lamp and clean the air filter. Remote Commander Symptom Cause and Remedy The Remote Commander The Remote Commander battery are locked. c Replace them with qualified Sony personnel. c Unlock the control panel keys (see that "High Altitude Mode" in the INSTALL SETTING menu is unusually high. Indicators Symptom Cause and Remedy The LAMP/COVER The lamp cover or the air filter cover is time to "On." :/1 key flashes in red. (Repetition rate of its life. c Check to the wall outlet, and then turn...
... temperature is set to replace the lamp and clean the air filter. Remote Commander Symptom Cause and Remedy The Remote Commander The Remote Commander battery are locked. c Replace them with qualified Sony personnel. c Unlock the control panel keys (see that "High Altitude Mode" in the INSTALL SETTING menu is unusually high. Indicators Symptom Cause and Remedy The LAMP/COVER The lamp cover or the air filter cover is time to "On." :/1 key flashes in red. (Repetition rate of its life. c Check to the wall outlet, and then turn...
Operating Instructions
Page 47
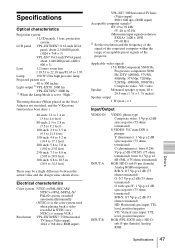
...-inch SVGA panel, about 1,440,000 pixels (800 × 600 × 3) Lens 1.2 times zoom lens f 18.53 to 22.18 mm/F1.65 to 1.93 Lamp 190 W Ultra high pressure lamp Projected picture size 40 to 300 inches Light output 1) VPL-EX70: 2600 lm VPL-EX7/ES7: 2000 lm 1) When the Lamp Mode is the color system used when playing back a video recorded in NTSC on the floor./ Adjuster not stretched...
...-inch SVGA panel, about 1,440,000 pixels (800 × 600 × 3) Lens 1.2 times zoom lens f 18.53 to 22.18 mm/F1.65 to 1.93 Lamp 190 W Ultra high pressure lamp Projected picture size 40 to 300 inches Light output 1) VPL-EX70: 2600 lm VPL-EX7/ES7: 2000 lm 1) When the Lamp Mode is the color system used when playing back a video recorded in NTSC on the floor./ Adjuster not stretched...
Operating Instructions
Page 48
... (VPL-EX70/EX7) 816 BTU (VPL-ES7) Operating temperature 0°C to 35°C (32°F to 95°F) Operating humidity 35% to 85% (no condensation) Storage temperature -20°C to +60°C (-4°F to +140°F) Storage humidity 10% to 90% Supplied accessories Remote Commander (1) Lithium battery CR2025 (1) 48 Specifications HD D-sub 15 pin cable (1.8 m) (1) (1-832-428-11, SONY) Carrying case (1) AC power cord (1) Lens cap (1) Operating Instructions...
... (VPL-EX70/EX7) 816 BTU (VPL-ES7) Operating temperature 0°C to 35°C (32°F to 95°F) Operating humidity 35% to 85% (no condensation) Storage temperature -20°C to +60°C (-4°F to +140°F) Storage humidity 10% to 90% Supplied accessories Remote Commander (1) Lithium battery CR2025 (1) 48 Specifications HD D-sub 15 pin cable (1.8 m) (1) (1-832-428-11, SONY) Carrying case (1) AC power cord (1) Lens cap (1) Operating Instructions...
Operating Instructions
Page 58
... Lamp Timer 38 Lamp Timer Reset 34 Language 35 selecting the menu language 23 Lens 11 Location and function of controls connector panel 14 control panel 12 rear/bottom 10 Remote Commander 15 top/right side/front 10 M Menu clearing the menu display 28 INFORMATION Menu 38 INPUT SETTING menu 31 INSTALL SETTING menu 36 MENU SETTING menu 35 PICTURE SETTING menu 29 SET SETTING menu 33 using a menu 27 Menu Position 35 Message List caution 46 warning 45 O Optional accessories 48 P Panel Key Lock 34 Picture Mode 29 Pin assignment 49 Power turn...
... Lamp Timer 38 Lamp Timer Reset 34 Language 35 selecting the menu language 23 Lens 11 Location and function of controls connector panel 14 control panel 12 rear/bottom 10 Remote Commander 15 top/right side/front 10 M Menu clearing the menu display 28 INFORMATION Menu 38 INPUT SETTING menu 31 INSTALL SETTING menu 36 MENU SETTING menu 35 PICTURE SETTING menu 29 SET SETTING menu 33 using a menu 27 Menu Position 35 Message List caution 46 warning 45 O Optional accessories 48 P Panel Key Lock 34 Picture Mode 29 Pin assignment 49 Power turn...


