Operating Instructions
Page 4
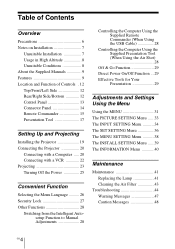
... 12 Rear/Right Side/Bottom 12 Control Panel 13 Connector Panel 14 Remote Commander 15 Presentation Tool 17 Setting Up and Projecting Installing the Projector 19 Connecting the Projector 20 Connecting with a Computer ..... 20 Connecting with a VCR 22 Projecting 23 Turning Off the Power 25 Convenient Function Selecting the Menu Language .......... 26...
... 12 Rear/Right Side/Bottom 12 Control Panel 13 Connector Panel 14 Remote Commander 15 Presentation Tool 17 Setting Up and Projecting Installing the Projector 19 Connecting the Projector 20 Connecting with a Computer ..... 20 Connecting with a VCR 22 Projecting 23 Turning Off the Power 25 Convenient Function Selecting the Menu Language .......... 26...
Operating Instructions
Page 6
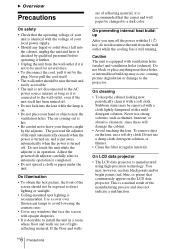
...(intake) and ventilation holes (exhaust). Stubborn stains may occur, causing picture degradation or damage to install the unit in operation. On LCD data projector • The LCD data projector is still running. The air coming out is hot. • Be careful not to a dark color. Adjust the powered tilt ... ventilation holes. On cleaning • To keep the cabinet looking new, periodically clean it out by the plug. To remove dust on the LCD data projector. You may, however, see tiny black points and/or bright points (red, blue, or green) that continuously appear on the lens, use...
...(intake) and ventilation holes (exhaust). Stubborn stains may occur, causing picture degradation or damage to install the unit in operation. On LCD data projector • The LCD data projector is still running. The air coming out is hot. • Be careful not to a dark color. Adjust the powered tilt ... ventilation holes. On cleaning • To keep the cabinet looking new, periodically clean it out by the plug. To remove dust on the LCD data projector. You may, however, see tiny black points and/or bright points (red, blue, or green) that continuously appear on the lens, use...
Operating Instructions
Page 7
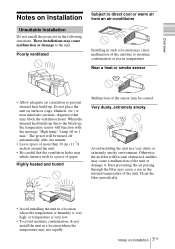
... sensor will be caused. When the internal heat builds up due to the block-up . Overview Notes on Installation Unsuitable Installation Do not install the projector in a location where the temperature may rise rapidly. 7 Notes on surfaces (rugs, blankets, etc.) or near materials (curtains, draperies) that the ventilation holes may inhale...
... sensor will be caused. When the internal heat builds up due to the block-up . Overview Notes on Installation Unsuitable Installation Do not install the projector in a location where the temperature may rise rapidly. 7 Notes on surfaces (rugs, blankets, etc.) or near materials (curtains, draperies) that the ventilation holes may inhale...
Operating Instructions
Page 8
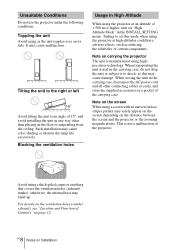
...on the screen depending on its side. For details on the floor or suspending from the ceiling. Unsuitable Conditions Do not use the projector under the following conditions. Toppling the unit Avoid using highprecision technology. Blocking the ventilation holes Usage in a pocket of Controls" on... page 12. 8 GB Notes on carrying the projector The unit is not a malfunction of certain components. Note on Installation When transporting the unit stored in the carrying case, do not...
...on the screen depending on its side. For details on the floor or suspending from the ceiling. Unsuitable Conditions Do not use the projector under the following conditions. Toppling the unit Avoid using highprecision technology. Blocking the ventilation holes Usage in a pocket of Controls" on... page 12. 8 GB Notes on carrying the projector The unit is not a malfunction of certain components. Note on Installation When transporting the unit stored in the carrying case, do not...
Operating Instructions
Page 9
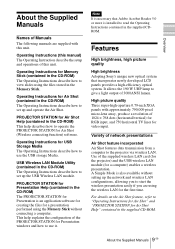
...the supplied CDROM. Features High brightness, high picture quality High brightness Adopting Sony's unique new optical system that Adobe Acrobat Reader 5.0 or more is ...Wireless LAN module. High picture quality Three super-high-aperture 0.79-inch XGA panels with this unit. For details on the Air Shot feature, ...projector via wireless LAN. PROJECTOR STATION for Air Shot Help (contained in the CD-ROM) The Operating Instructions describe how to use it. Operating Instructions for Air Shot (Wireless connecting function) software. Note It is necessary that incorporates newly developed LCD...
...the supplied CDROM. Features High brightness, high picture quality High brightness Adopting Sony's unique new optical system that Adobe Acrobat Reader 5.0 or more is ...Wireless LAN module. High picture quality Three super-high-aperture 0.79-inch XGA panels with this unit. For details on the Air Shot feature, ...projector via wireless LAN. PROJECTOR STATION for Air Shot Help (contained in the CD-ROM) The Operating Instructions describe how to use it. Operating Instructions for Air Shot (Wireless connecting function) software. Note It is necessary that incorporates newly developed LCD...
Operating Instructions
Page 10
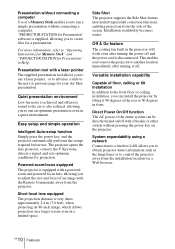
...installation, you can be directly turned on a larger screen even in a limited space. Off & Go feature The cooling fan built in the projector will work even after turning it 90 degrees at the rear or 90 degrees in front. System expandability using a network Connection to a wireless LAN...The supplied presentation tool allows you to use . Easy setup and simple operation Intelligent Auto-setup function Simply press the power key, and the projector automatically performs the setups required before use a laser pointer, or to advance a slide to the next or previous page for Presentation" software...
...installation, you can be directly turned on a larger screen even in a limited space. Off & Go feature The cooling fan built in the projector will work even after turning it 90 degrees at the rear or 90 degrees in front. System expandability using a network Connection to a wireless LAN...The supplied presentation tool allows you to use . Easy setup and simple operation Intelligent Auto-setup function Simply press the power key, and the projector automatically performs the setups required before use a laser pointer, or to advance a slide to the next or previous page for Presentation" software...
Operating Instructions
Page 11
...possible to project no picture on the screen unless the required password is entered when the projector is trademark of Sony Corporation. Features 11 GB This prevents the projector from operating incorrectly. ... • Adobe Acrobat Reader is a trademark of Adobe Systems Incorporated.... • Windows is a registered trademark of Microsoft Corporation in the United States and/or other countries. • VGA, SVGA, XGA...
...possible to project no picture on the screen unless the required password is entered when the projector is trademark of Sony Corporation. Features 11 GB This prevents the projector from operating incorrectly. ... • Adobe Acrobat Reader is a trademark of Adobe Systems Incorporated.... • Windows is a registered trademark of Microsoft Corporation in the United States and/or other countries. • VGA, SVGA, XGA...
Operating Instructions
Page 12
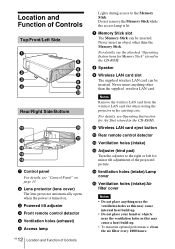
... every 1000 hours. Location and Function of the projected picture. Notes Remove the wireless LAN card from the wireless LAN card slot when storing the projector in the CD-ROM). For details, see "Control Panel" on page 13. 2 Lens protector (lens cover) The lens protector automatically opens when the power is...
... every 1000 hours. Location and Function of the projected picture. Notes Remove the wireless LAN card from the wireless LAN card slot when storing the projector in the CD-ROM). For details, see "Control Panel" on page 13. 2 Lens protector (lens cover) The lens protector automatically opens when the power is...
Operating Instructions
Page 13
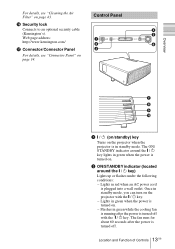
... an optional security cable (Kensington's). Web page address: http://www.kensington.com/ qj Connector/Connector Panel For details, see "Cleaning the Air Filter" on the projector with the I / 1 key. Control Panel 1 2 3 INPUT 4 5 TILT MENU PUSH ENTER 6 Overview FOCUS ZOOM SIDE SHOT POWER STANDBY TEMP/FAN LAMP/COVER 7 8 9 0 1 ... (located around the I / 1 key lights in green when the power is in green when the power is turned on the projector when the projector is turned on page 14. The fan runs for about 60 seconds after the power is turned off . 13 Location and Function of...
... an optional security cable (Kensington's). Web page address: http://www.kensington.com/ qj Connector/Connector Panel For details, see "Cleaning the Air Filter" on the projector with the I / 1 key. Control Panel 1 2 3 INPUT 4 5 TILT MENU PUSH ENTER 6 Overview FOCUS ZOOM SIDE SHOT POWER STANDBY TEMP/FAN LAMP/COVER 7 8 9 0 1 ... (located around the I / 1 key lights in green when the power is in green when the power is turned on the projector when the projector is turned on page 14. The fan runs for about 60 seconds after the power is turned off . 13 Location and Function of...
Operating Instructions
Page 14
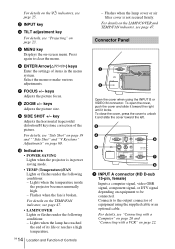
... the picture focus. 8 ZOOM +/- key Adjusts the horizontal trapezoidal distortion/H keystone correction of Controls - Lights when the temperature inside the projector becomes unusually high. - Lights when the lamp has reached the end of its life or reaches a high temperature. 14 GB Location ... "Connecting with a Computer" on page 20 and "Connecting with a VCR" on page 60. q; Indicators • POWER SAVING Lights when the projector is in the menu system. Flashes when the lamp cover or air filter cover is broken. Connector Panel 1 2 INPUT A AUDIO VIDEO IN INPUPSUHTSBLIDE...
... the picture focus. 8 ZOOM +/- key Adjusts the horizontal trapezoidal distortion/H keystone correction of Controls - Lights when the temperature inside the projector becomes unusually high. - Lights when the lamp has reached the end of its life or reaches a high temperature. 14 GB Location ... "Connecting with a Computer" on page 20 and "Connecting with a VCR" on page 60. q; Indicators • POWER SAVING Lights when the projector is in the menu system. Flashes when the lamp cover or air filter cover is broken. Connector Panel 1 2 INPUT A AUDIO VIDEO IN INPUPSUHTSBLIDE...
Operating Instructions
Page 15
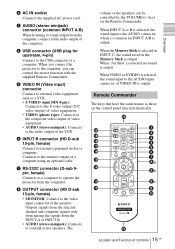
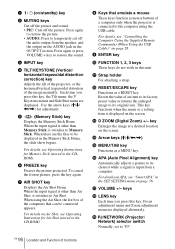
...VOLUME MENU/ TAB AIR SHOT FREEZE 1 2 3 4 5 6 7 8a 8b qd qs ENTER R CLICK D ZOOM RESET/ ESCAPE 1 3 2 FUNCTION RM-PJM15 PROJECTOR RM-PJM17 8c 9 q; Connects to the monitor output of a computer using an optional cable. 7 RS-232C connector (D-sub 9pin, female) Connects to a computer to... operate the projector from the computer. 8 OUTPUT connector (HD D-sub 15-pin, female) • MONITOR: Connect to the video input connector of the VCR. 6 INPUT...
...VOLUME MENU/ TAB AIR SHOT FREEZE 1 2 3 4 5 6 7 8a 8b qd qs ENTER R CLICK D ZOOM RESET/ ESCAPE 1 3 2 FUNCTION RM-PJM15 PROJECTOR RM-PJM17 8c 9 q; Connects to the monitor output of a computer using an optional cable. 7 RS-232C connector (D-sub 9pin, female) Connects to a computer to... operate the projector from the computer. 8 OUTPUT connector (HD D-sub 15-pin, female) • MONITOR: Connect to the video input connector of the VCR. 6 INPUT...
Operating Instructions
Page 16
... restore the picture. • AUDIO: Press to restore the sound. 3 INPUT key 4 TILT/KEYSTONE (Vertical/ horizontal trapezoidal distortion correction) key Adjusts the tilt of the projector, or the horizonal/vertical trapezoidal distortion of the image manually.
... restore the picture. • AUDIO: Press to restore the sound. 3 INPUT key 4 TILT/KEYSTONE (Vertical/ horizontal trapezoidal distortion correction) key Adjusts the tilt of the projector, or the horizonal/vertical trapezoidal distortion of the image manually.
Operating Instructions
Page 18
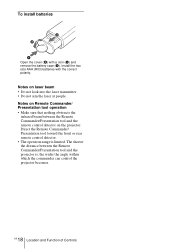
...toward the front or rear remote control detector. • The operation range is , the wider the angle within which the commander can control the projector becomes. 18 GB Location and Function of Controls To install batteries Open the cover (2) with the correct polarity. The shorter the distance between the ... on Remote Commander/ Presentation tool operation • Make sure that nothing obstructs the infrared beam between the Remote Commander/Presentation tool and the projector is limited. Install the two size AAA (R03) batteries with a coin (1) and remove the battery case (3).
...toward the front or rear remote control detector. • The operation range is , the wider the angle within which the commander can control the projector becomes. 18 GB Location and Function of Controls To install batteries Open the cover (2) with the correct polarity. The shorter the distance between the ... on Remote Commander/ Presentation tool operation • Make sure that nothing obstructs the infrared beam between the Remote Commander/Presentation tool and the projector is limited. Install the two size AAA (R03) batteries with a coin (1) and remove the battery case (3).
Operating Instructions
Page 19
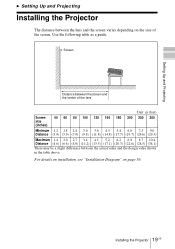
... a slight difference between the lens and the screen varies depending on page 56. 19 Installing the Projector GB Use the following table as a guide. Setting Up and Projecting B Setting Up and Projecting Installing the Projector The distance between the actual value and the design value shown in the table above. Screen Distance...
... a slight difference between the lens and the screen varies depending on page 56. 19 Installing the Projector GB Use the following table as a guide. Setting Up and Projecting B Setting Up and Projecting Installing the Projector The distance between the actual value and the design value shown in the table above. Screen Distance...
Operating Instructions
Page 20
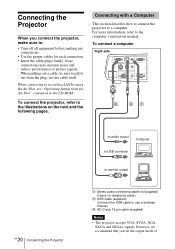
...Operating Instructions for each connection. • Insert the cable plugs firmly; To connect the projector, refer to use a wireless mouse.) 3 HD D-sub 15-pin cable (supplied) Notes • The projector accepts VGA, SVGA, XGA, SXGA and SXGA+ signals. To connect a computer Right side INPUT A AUDIO VIDEO... IN INPUT B S VIDEO VIDEO AUDIO OUTPUT MONITOR AUDIO REMOTE RS-232C 3 21 20 GB Connecting the Projector to audio output Computer to USB ...
...Operating Instructions for each connection. • Insert the cable plugs firmly; To connect the projector, refer to use a wireless mouse.) 3 HD D-sub 15-pin cable (supplied) Notes • The projector accepts VGA, SVGA, XGA, SXGA and SXGA+ signals. To connect a computer Right side INPUT A AUDIO VIDEO... IN INPUT B S VIDEO VIDEO AUDIO OUTPUT MONITOR AUDIO REMOTE RS-232C 3 21 20 GB Connecting the Projector to audio output Computer to USB ...
Operating Instructions
Page 21
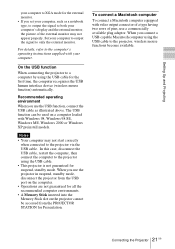
...plug adaptor. In this case, disconnect the USB cable, restart the computer, then connect the computer to the projector via the USB cable. Setting Up and Projecting your computer to XGA mode for the external monitor. • If you set your computer, such as illustrated above. Set your ...computer to output the signal to both your computer. For details, refer to a computer by using the USB cable to the projector, wireless mouse functions become...
...plug adaptor. In this case, disconnect the USB cable, restart the computer, then connect the computer to the projector via the USB cable. Setting Up and Projecting your computer to XGA mode for the external monitor. • If you set your computer, such as illustrated above. Set your ...computer to output the signal to both your computer. For details, refer to a computer by using the USB cable to the projector, wireless mouse functions become...
Operating Instructions
Page 22
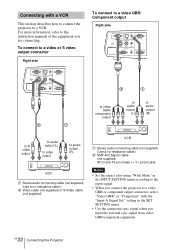
...Use the composite sync signal when you input the external sync signal from video GBR/component equipment. 22 GB Connecting the Projector setting in the INPUT SETTING menu according to a VCR. For more information, refer to the instruction manuals of the equipment you connect... the projector to a video GBR or component output connector, select "Video GBR" or "Component" with a VCR This section describes how to connect the projector to the input signal. • When you are connecting. Connecting with the...
...Use the composite sync signal when you input the external sync signal from video GBR/component equipment. 22 GB Connecting the Projector setting in the INPUT SETTING menu according to a VCR. For more information, refer to the instruction manuals of the equipment you connect... the projector to a video GBR or component output connector, select "Video GBR" or "Component" with a VCR This section describes how to connect the projector to the input signal. • When you are connecting. Connecting with the...
Operating Instructions
Page 23
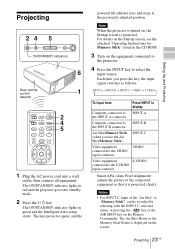
The ON/STANDBY indicator lights in red and the projector goes into a wall outlet, then connect all equipment. Note When the projector is projected. For details on the Startup screen, see the attached "Operating Instructions for Memory Stick" stored in the CD-ROM. 3 Turn on , the ...Startup screen is turned on the equipment connected to the projector. 4 Press the INPUT key to the S VIDEO input connector Smart APA (Auto Pixel Alignment) adjusts the picture of the "Air Shot" or "Memory Stick" ...
The ON/STANDBY indicator lights in red and the projector goes into a wall outlet, then connect all equipment. Note When the projector is projected. For details on the Startup screen, see the attached "Operating Instructions for Memory Stick" stored in the CD-ROM. 3 Turn on , the ...Startup screen is turned on the equipment connected to the projector. 4 Press the INPUT key to the S VIDEO input connector Smart APA (Auto Pixel Alignment) adjusts the picture of the "Air Shot" or "Memory Stick" ...
Operating Instructions
Page 24
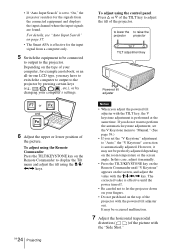
...Remote Commander to display the Tilt menu and adjust the tilt using the control panel Press f or F of the TILT key to the projector by pressing certain keys (e.g., / LCD VGA , / , etc.), or by changing your computer's settings. To adjust using the Remote Commander Press the TILT/KEYSTONE key on... the input signal from the connected equipment and displays the input channel where the input signals are found. to lower the to raise the projector projector TILT TILT adjustment key Powered tilt adjuster F7 or Fx and Fn 6 Adjust the upper or lower position of your computer, for example ...
...Remote Commander to display the Tilt menu and adjust the tilt using the control panel Press f or F of the TILT key to the projector by pressing certain keys (e.g., / LCD VGA , / , etc.), or by changing your computer's settings. To adjust using the Remote Commander Press the TILT/KEYSTONE key on... the input signal from the connected equipment and displays the input channel where the input signals are found. to lower the to raise the projector projector TILT TILT adjustment key Powered tilt adjuster F7 or Fx and Fn 6 Adjust the upper or lower position of your computer, for example ...
Operating Instructions
Page 25
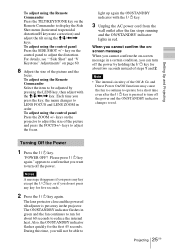
Setting Up and Projecting To adjust using the Remote Commander Press the TILT/KEYSTONE key on the Remote Commander to display the Side Shot menu (horizontal trapezoidal distortion/H keystone correction) and adjust the tilt using the M/m/
Setting Up and Projecting To adjust using the Remote Commander Press the TILT/KEYSTONE key on the Remote Commander to display the Side Shot menu (horizontal trapezoidal distortion/H keystone correction) and adjust the tilt using the M/m/


